Gazz
-
Posts
294 -
Joined
-
Last visited
Content Type
Profiles
Forums
Articles
Gallery
Downloads
Events
Everything posted by Gazz
-
I watched a skin graft being done on a burned patient once. One doctor would debride the dead or damaged skin with a thing called a Humby knife, sort of like a small plane that was dragged across the affected area then another doctor would follow behind the knife with with a battery powered cauterization tool to burn every spot that started to bleed sealing off the small blood vessels. The graft would not take if blood filled the space between the new skin and the freshly planed skin. Fascinating stuff! Also made me aware of how dangerous it was to wash parts in gasoline as that is how the poor fellow had got burned.
-
I remember seeing a tool like that with a shallow groove in its working edge being called a caulking tool, something used by folks who built boilers or other pressure vessels. I think I have one in my pile that I've never used for anything. I don't think a grooved working edge like that would hold up long on stone.
-
I had a cast iron one of these that was in tough shape that I was always going to repair but then thought making a new one would be less work. I started with a piece of iron pipe and cut out a section so that I could close it up to form the point. Then into the forge and on to the anvil to close it up. Nest I got it hot again and swaged down a section over the horn. This took a little more work than I thought it would as I needed the swaged section to be long enough to make the bend neatly. I also cut a section out of the other end of the pipe to make the handle part a bit tapered and rounded over on the end but it is not shown in the picture. Also not shown is grinding out the seams and welding them and then grinding off the bead. Then into the vise and making the bends using the cutting torch as a heat source to keep the heat local so it would bend where I wanted. It took me about an hour to make and I'm sure I could go faster now that I have made one. The finish is linseed oil on hot scale. If you don't know what a dibble is, every gardener could use one.


-
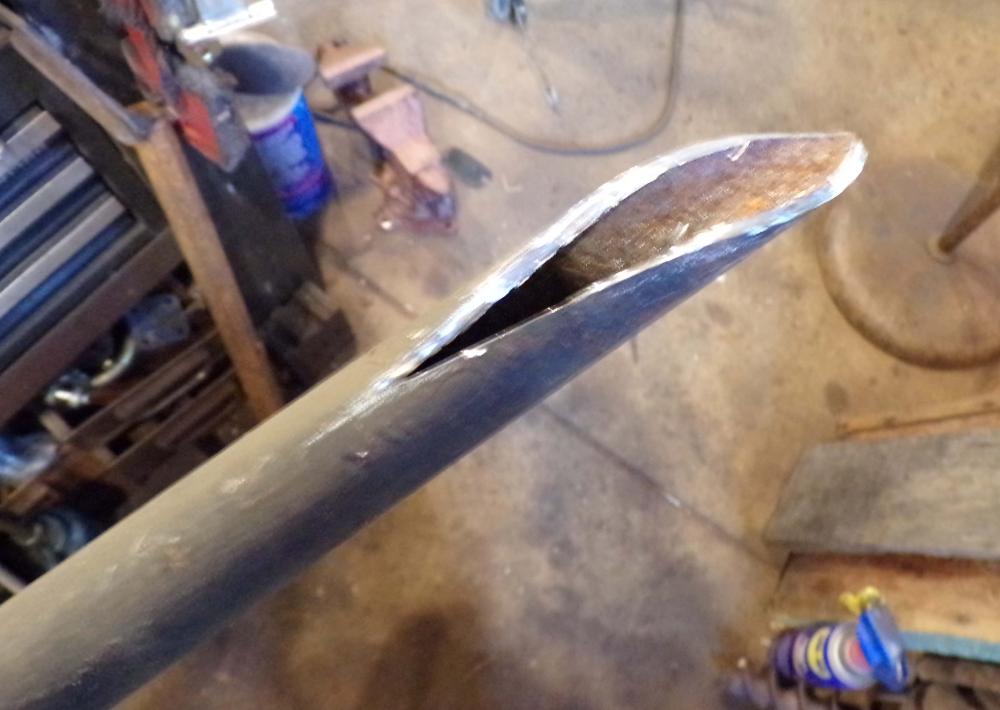
I started to cut plow or grader blade up to make steel targets out of. I don't how it will compare to the A500 stuff but it was free and probably sufficient for .22 rimfire.
-
I would hesitate to put any food stuff in there. You have NO idea what they may have cooked in that.
-
Some epic thread drift here. I'm curious about the return trip to the garden store. Did you buy the tire shrinker? Get any other interesting stuff?
-
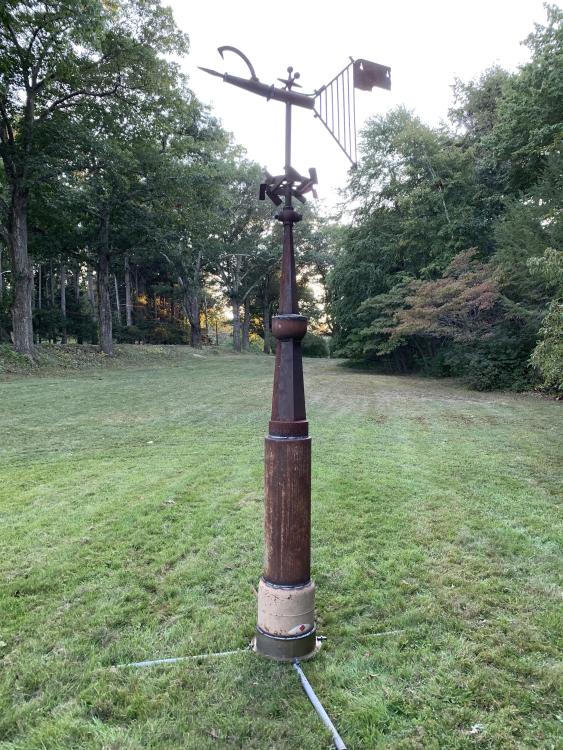
Growing up, my dad had a workshop in the basement where he did wood working and other fix it home repair stuff. He had inherited much of his fathers stuff who was a watchmaker, jeweler and model train builder. I would spend hours in the basement picking through that stuff for my own model making interests and other "scientific" experiments. There was lots of little bits of all kinds of stuff for me paw through. We would also visit my grandparents on the farm, and I was always interested in the scrap iron pile that was as big as a small garage. When I first started making stuff in steel at 18, I asked if I could root through the pile for interesting bits to make sculptures with and was told go ahead but I need to see what you're taking was the reply. After a few hours of picking I summoned gramps to show him my small pile I had selected. He looked it over and then one by one picked each piece up and throwing it back in the pile saying that this stuff still had potential use for him. I ended up with nothing! So my hoarding of interesting scrap stuff must be hereditary as I don't farm. Much later in life, actually about 15 years ago, I had to get new homeowners insurance. I made the deal over the phone and a month or two later, an agent showed up at my house with a camera to take pictures for their records. I knew I was in trouble when he spent a fair amount of time at the resource pile which was a bit sprawling then and two days later I got the cancellation notice in the mail. I cleaned up a bit scraping some and moving the rest to a more concentrated pile and then built a stockade fence around it. It has sprawled past the fence since then. It has been quite useful over the years both for me and friends who share some metal working interests with me but as noted it can be a liability. I found a picture of the sculpture I made from selecting stuff from the pile. The top piece does rotate with the wind but its up to the viewer to know what direction its pointing.
-
No kidding organization is required! I think I'm organized when I save them to a file but then they are not where I thought I put them I sometimes think the pc puts them where it thinks they should go.
-
It is easy to over accumulate and have a shop that is difficult or at least presents challenges to work in, especially when you live in an area that has lots of old stuff around. I was warned years ago by a teacher to be careful about crapping your shop up but didn't heed his advice. A drill press is quite handy and I think worth getting now if you have come across a good one. I have four as I have a hard time passing up good deals when I come across them but do need to sell two of them. While over accumulating may be bad, throwing stuff away can be worse! I can't tell you how many times I've finally ditched something as I had had it for years and never used it and then a few weeks after it's gone, I finally need it! I'm sure I have some kind of diagnosable mental issue as I do throw stuff in the trash pile only to find myself digging it back out a few days later. A few years ago, I was invited to show a sculpture in a local show but didn't have anything to submit but still said okay. A few days before the deadline I was able to root through the resource pile and slap something together. Some of the pieces I used I had been holding on to for over 40 years! The piece is not typical of my work but was fun to do and well received. I'm trying to find a picture of it but am not having any luck as my picture "album" is quite confusing as I save everything ;-)
-
Nice haul! Files typically cut on the forward stroke so no pressure on the return stoke. Looks like you have at least one lead float or file in there, the one with the semi circular teeth and orange tang so lead only but may work okay for aluminum or wood. Get a file card which is a very short bristle wire brush to keep the teeth clean. You can also use a sharp scribe to remove accumulated material from the teeth. In school, the teacher told us that the files worst enemy was another file meaning don't bang them together or store them touching each other. Also, they way more comfortable and effective to use if they have handles. I have seen folks use old golf balls which look like they would work well. On small needle files, I use wine corks.
-
I have had good success hand hammering cable into solid and have some things for you to consider. How clean is your cable? Does it have a plastic component twisted into it? If it does you need to remove all of it. Welded ends are best but I think wrapping the ends tightly with wire would work. (Set/weld the ends first) Warm the piece first enough to get the flux to stick - don't get it red, just hot enough so the flux liquifies. Also what are you using for flux? I have used a "touch stick" when pattern welding, a 1/4" steel rod with a taper forged or ground into the end, that can be inserted into the forge to touch your work piece. What I am looking for here is to determine if the work piece is hot enough to weld. The touch stick should stick or weld to the work piece if it is hot enough. Once the touch stick does stick, let your work piece soak a bit longer to be sure it is at a welding temperature at its core. Set the welds at the end with light hammer blows. Do one end then add flux and back into the forge to get it hot again for the other end. Reapply flux every time the piece comes out of the forge - to be clear, remove the piece, hammer, then flux and then back into the forge. Once both ends are welded, flux it and get it up to welding heat again and twist it tightly in your vise and with a twisting wrench and then flux and back into the forge. Once at welding temp again, remove and with light hammer blows, set the welds over the entire piece. I wonder if your stray wires are getting burned through and pulling away from the bundle. You may need to put a baffle to block the blast from the burner impinging directly on your work piece. The direct flame will burn through individual wires before the rest of the piece is hot. These are things that have worked for me and others may have different advice Don't be shy, lets see some pictures.
-
Making a bend like that in 2" stock will take a considerable amount of force even when the steel is hot especially something like 4340. What machinery do you have on hand to do this? If you are going to attempt it with muscle power, you will need an immoveable fixture, a lever for mechanical advantage and several strong men. You may also need a large rosebud type heating tip to keep things hot. Years ago I worked in a shop that would hot bend stock of similar sizes but never that tight a radius. We did it with a fixture, muscle and large bending forks. If the piece you were given is already cut to length you have no leverage. If I had to do something like that, I would make the bend on long piece of stock and then cut to length. I think a machine like a bulldozer (not the CAT type) with a proper jig could do that job.
-
Not really obvious in the picture is the chain that is attached to pointy eye thing. The other end of the chain is attached to the splitter, a tether of sorts. So my guess is you drive the spiky thing into the chunk of wood and when the cannon shoots, the tether chain keeps it from heading off to the next county. I'm sure a hydraulic splitter is much faster but I don't have one - I split my wood with a maul (if I can't buy it split already). I use the chainsaw to bust up crotch pieces which I think the split-all will do as well. Splitting wedges fired from your cannon Thomas? Make sure you have a good backstop!
-
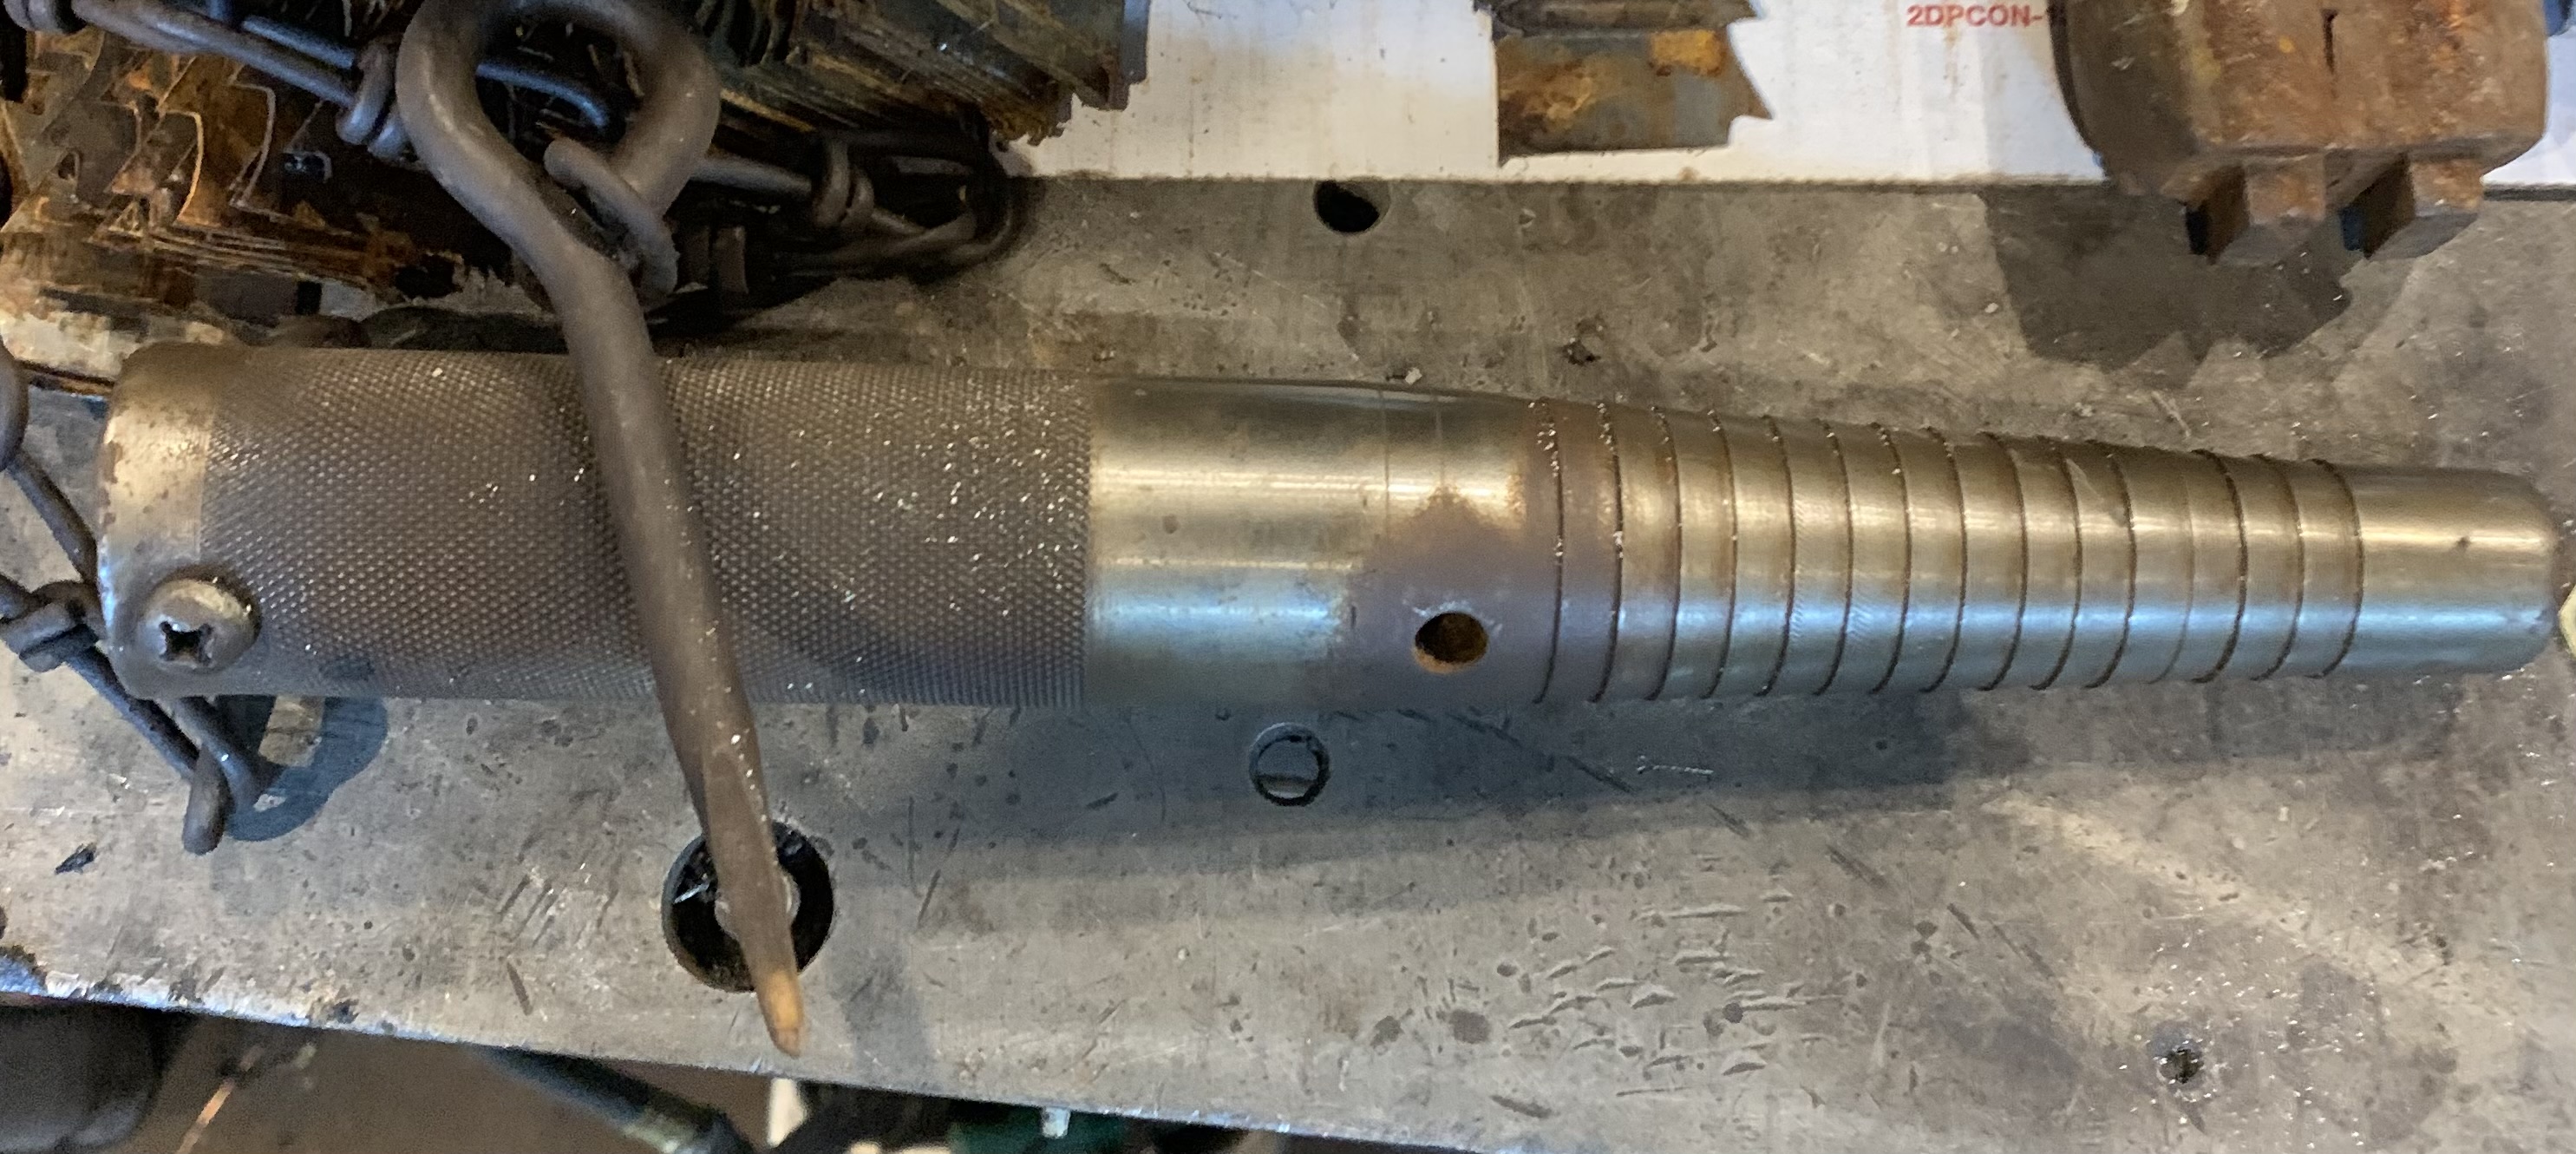
A few weeks ago I attended an estate sale that featured a blacksmith/metal worker shop up north. As I rooted through the stuff I came across some kind of tool I could not identify nor guess its intended purpose. I was thinking some kind of gasket cutter punch or maybe something to expand tubing with but none of these guesses seemed to make any sense. I threw it in my pile of stuff as I knew it would not really cost me anything by the time I had collected a bunch. Yesterday I was cleaning in my shop and got looking at it and wondering about its purpose still. Rubbing at the corrosion and staining I see the words "split-all" stamped lightly and by hand in the side. Then I suddenly realized that the hole in the side was a touch hole or place for a fuse and that the thing was a black powder log splitter! I'm gonna try it out today and hopefully a video will follow.

-
Frozen Shaft on 100# Fairbanks Hammer
Gazz replied to Steven Bronstein's topic in Power Hammers, Treadle Hammers, Olivers
Still stuck? -
If you're going to forge them anyway, why not use your press to drive them into a bolster to remove the radius? Forge out whatever shape you have in mind on the business end first and then with a localized heat, press them into an appropriately sized bolster to iron out the radius. Or if you have access to a lathe, turn the radius off. It could also be done with an angle grinder quite neatly if you are handy with one of them. Looking at your pictures, I also thought you cold make the shank the business end of the tool, cut off the current business end and use the tool inverted but I think the diameter would not fit in the press. You could also add an inside radius to the shaft of the press but that is probably a huge job requiring disassembly. Just some thoughts that bounce through my head while I suffer mildly from fly press envy.
-
Frozen Shaft on 100# Fairbanks Hammer
Gazz replied to Steven Bronstein's topic in Power Hammers, Treadle Hammers, Olivers
I have tried ATF and acetone and found that they do not mix, like oil and vinegar salad dressing. Maybe it's the type of ATF I used I don't know but what i tried didn't work so well. -
Frozen Shaft on 100# Fairbanks Hammer
Gazz replied to Steven Bronstein's topic in Power Hammers, Treadle Hammers, Olivers
Do I see the shaft in between the two bearings or is that some kind of shaft tunnel? What is the part that looks to be attached to it? -
Frozen Shaft on 100# Fairbanks Hammer
Gazz replied to Steven Bronstein's topic in Power Hammers, Treadle Hammers, Olivers
After seeing the picture I think I would attempt to use heat on the bearing areas and have a long bar clamped to the flywheel for added leverage. Do you have a rosebud type heating tip? As noted above, it does not take much heat and I don't think any cooling of the shaft would be required. The transfer of heat between the two parts would be slow enough that the shaft would not get warm enough to expand much. You may find that a bar on the flywheel and more penetrating type oils (my favorite is Kroil) might work without any heat. -
Frozen Shaft on 100# Fairbanks Hammer
Gazz replied to Steven Bronstein's topic in Power Hammers, Treadle Hammers, Olivers
The hammer probably has babbit bearings which may have melted in the fire. I have seen Fairbanks hammers before but cant conjure up a visual of the problem area you are having. Can you post any pictures? Another place you can ask is at the practical machinist antique tool forum. Sorry that I can't post a link to it here as it is not allowed. -
What did you do in the shop today?
Gazz replied to Mark Ling's topic in Blacksmithing, General Discussion
Nice stuff here folks! The hammer is outstanding Jennifer! -
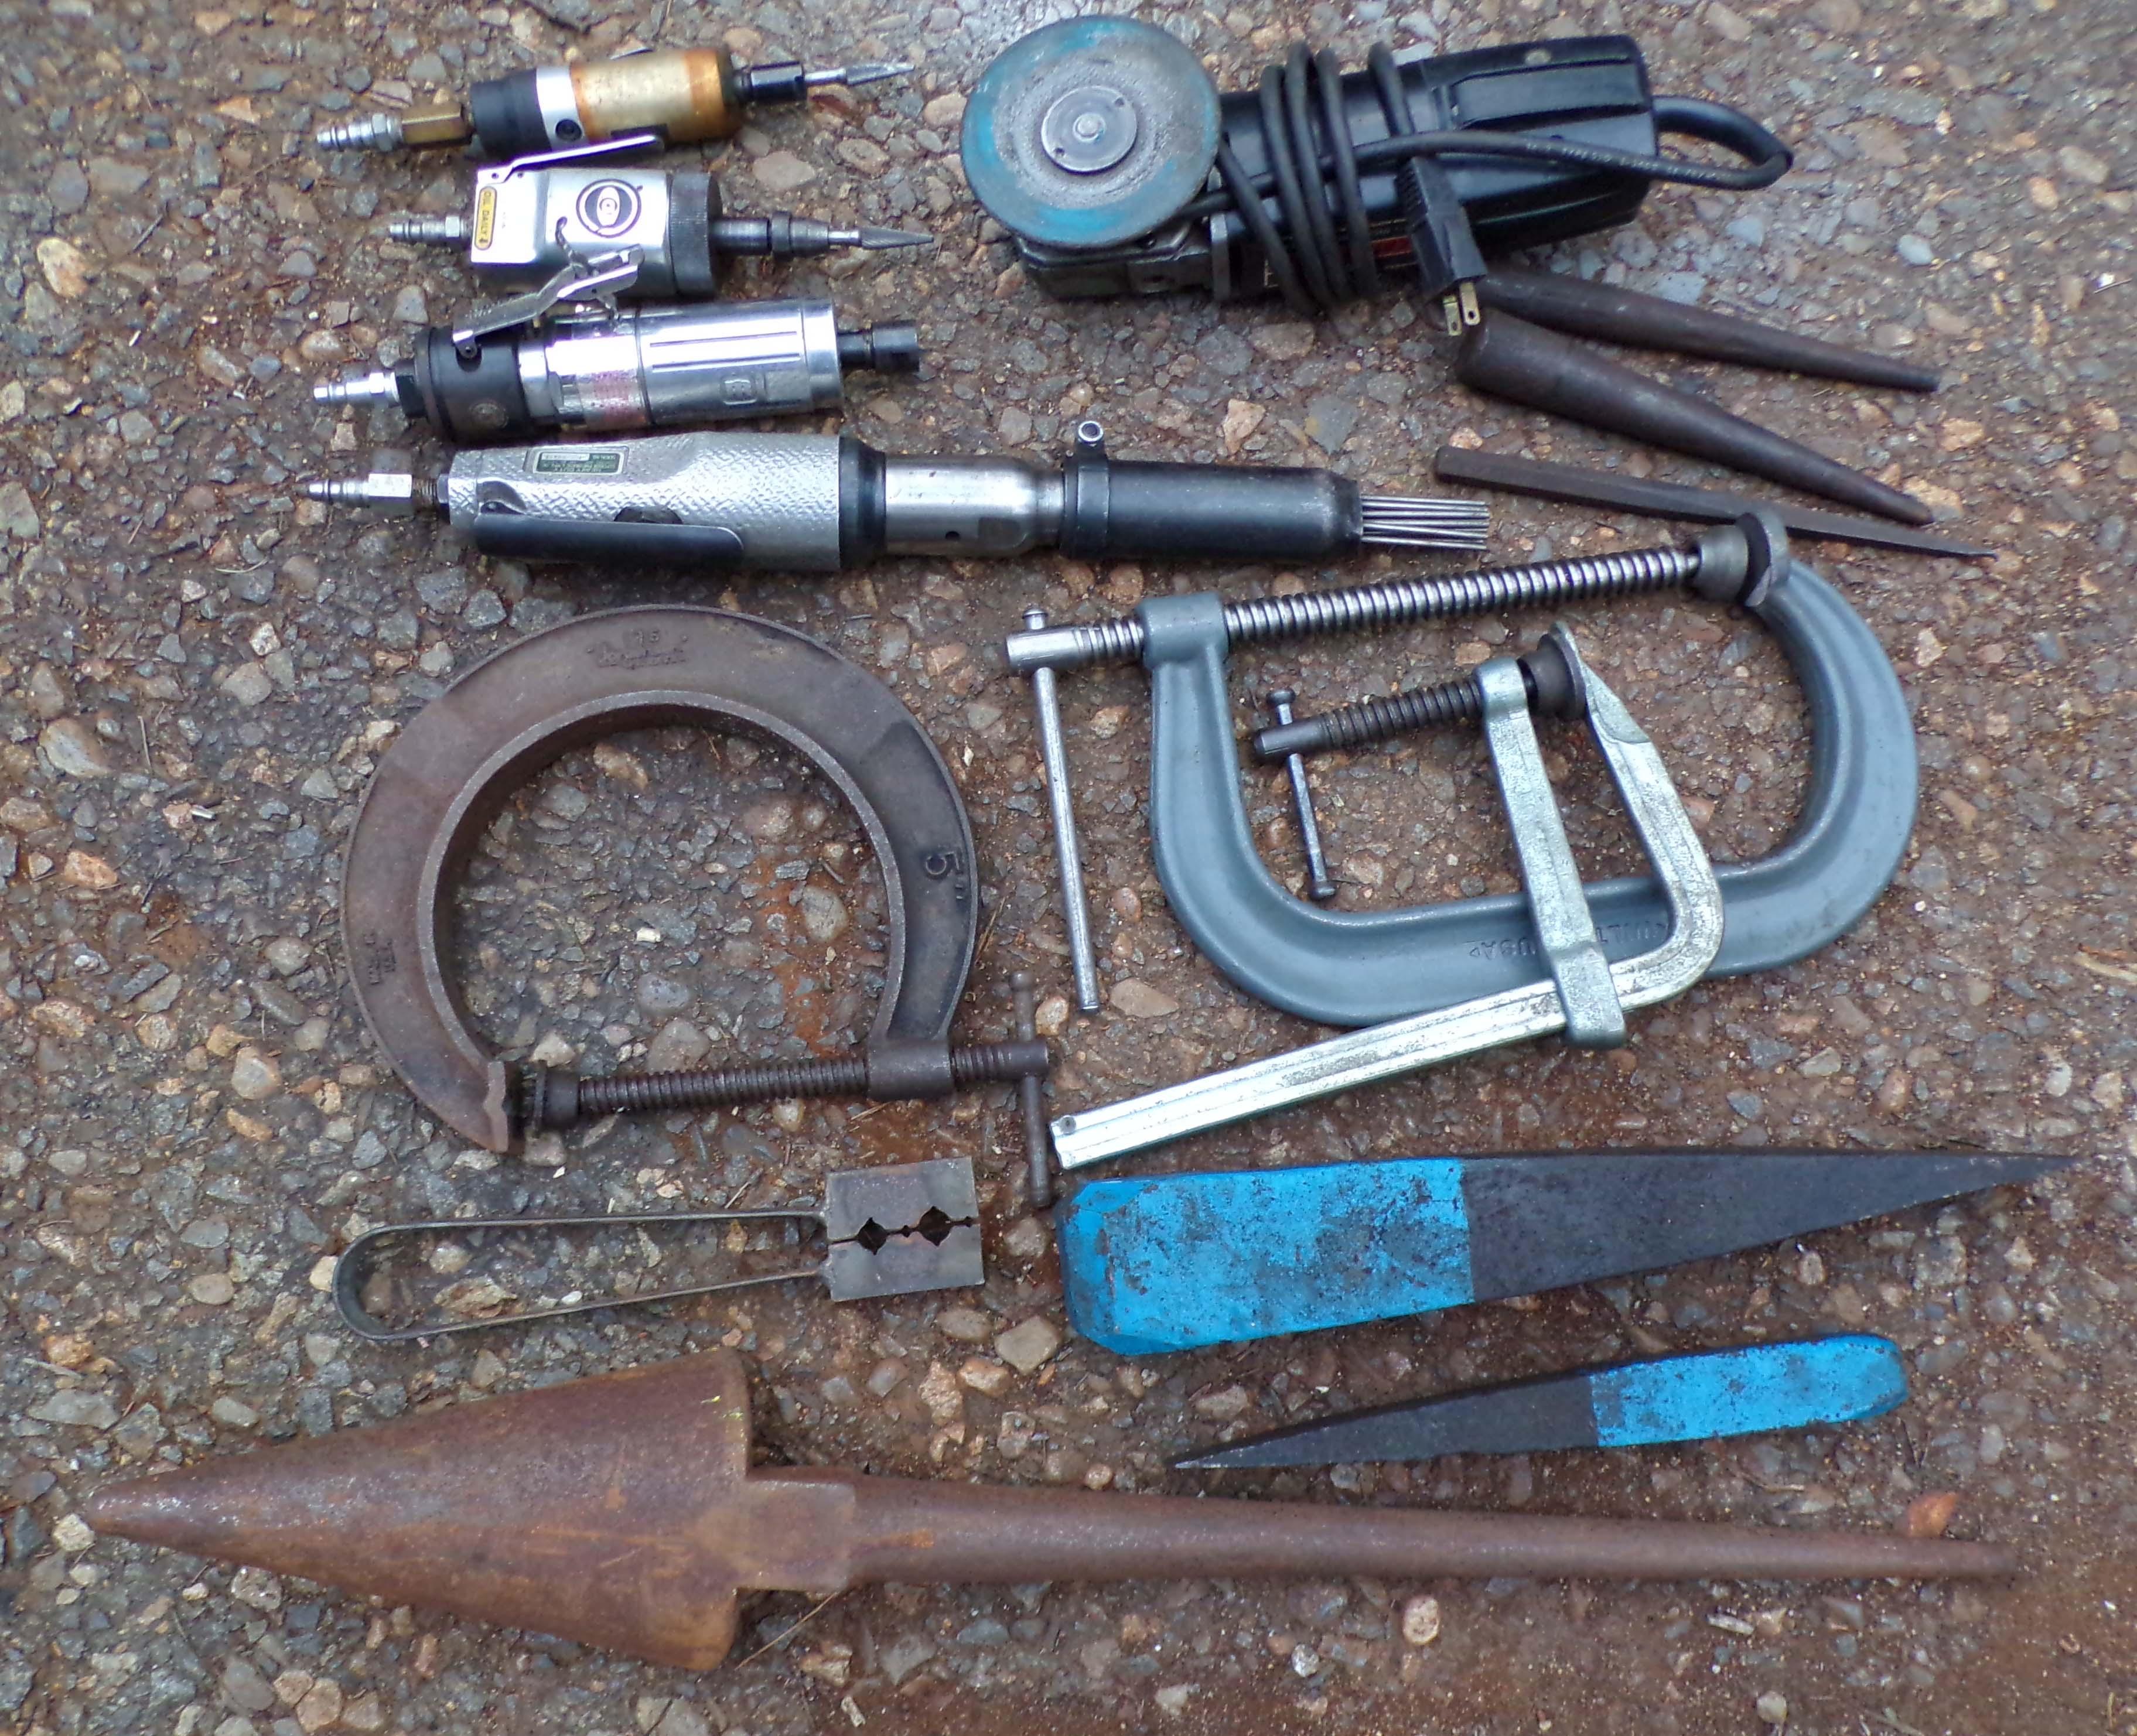
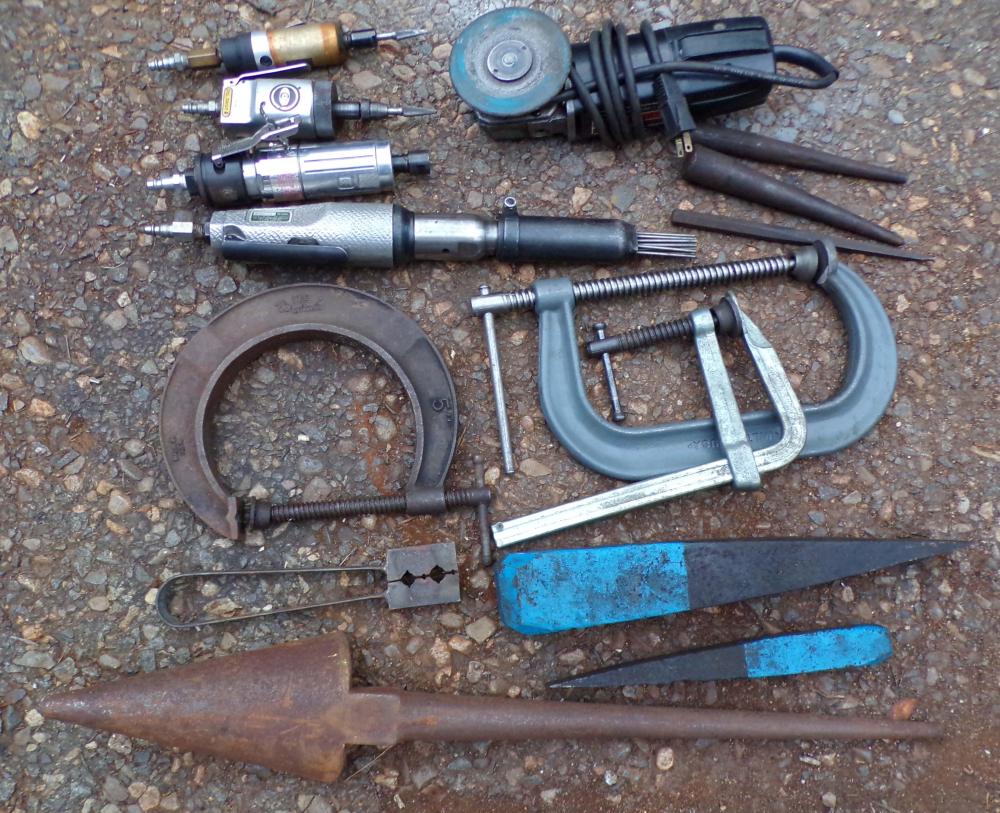
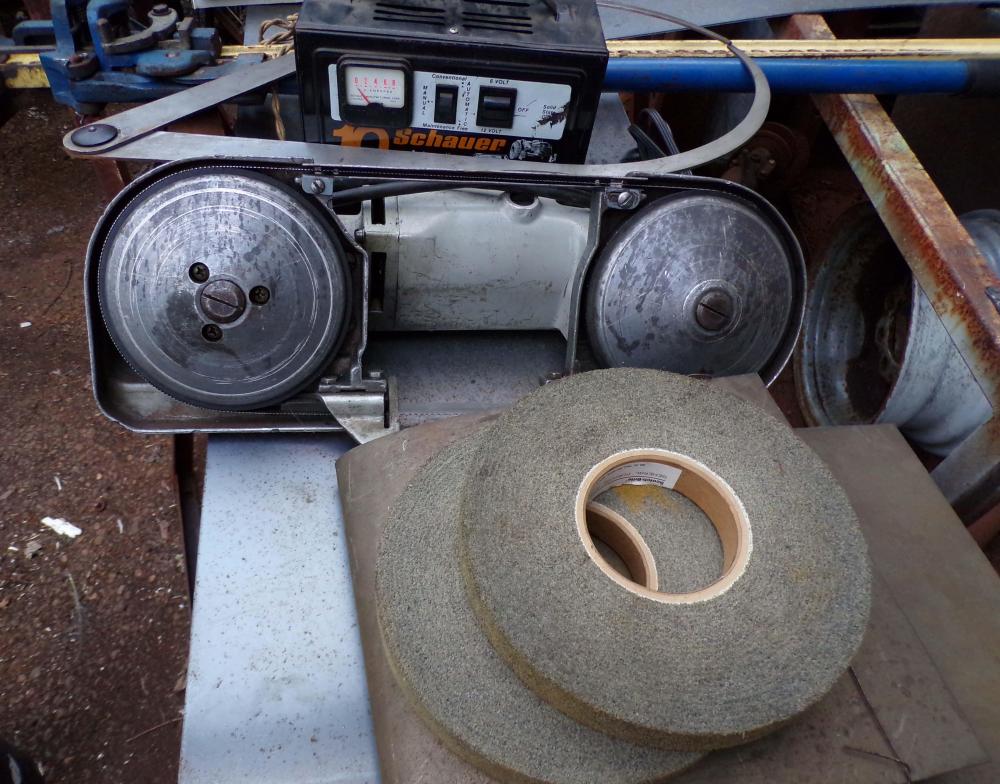
Attended an estate sale on Saturday and scored a few things. I primarily went to it as I was interested in the power hammer that was for sale but it was highly valued by the seller and not really one that i had ever considered (see my other post in the power hammer forum). I made an offer of $1000 for it after I got home and after doing some research but didn't find much (like nothing) about that particular hammer. It sold for $1700 on Sunday in any case so no more consideration required. I am headed back there today to pick through the leftovers today. There is a large swage block and stand that had a low earth orbit price at the official sale that I think is still there so maybe the price has become reasonable. Also there is a piece of plate that is maybe 2.5" thick by 2.5'x 4' that would make a great shop table but I a have no place for it and moving it would be a serious task given what I have available to work with. Curious that the stakes made by Pexto have no vertical posts for the stake plate and look like they never had any. The two wheeled thing in the second picture is a Portaband that came with 6 new blades. I was bummed to learn that somebody had gone through my big canvas hopping bag and took two wood handle punches that were new and I paid for them. The really large calipers are Brown & Sharpe. Also not very visible is a high lift jack. I can't say how much I paid for fear of being arrested.

-
I looked at one today that seems smaller than the ones I find online. It has a round ram sliding in a cylinder and overall seems more delicate than the 30lb hammers that are showing up. It also seems to have little finesse and seems to always hit hard with basically no easy way to strike lightly no matter how careful you are on the treadle. The clutch plate is marked The K RR Hard CO Red Oak Iowa and NOT Kerrihard. Anybody know about these? I have made an offer on it but am wondering about size and ruggedness. It is less than delicate in operation yet it's size seems to indicate it is for small stuff. Thanks for any comments!

-
Blacksmith Shop Excavation, what is it?
Gazz replied to Chip McCoy's topic in Tools, ID, and pictorial reference
My pond is small but it is one of a chain (the last of four) of small ponds. A mile or two away it drains into a much larger pond. While watching the videos, I remembered that the person I bought this place from told me there is supposed to be parts of the water wheel elevator mechanism buried in the yard. She indicated it might be where a large maple now grows so probably will not be digging for it. Other old timers around town tell me that Henry Ford took the water wheel for his museum. I also heard that the pond was salted in the spring to prohibit weed growth. By winter the salt had all washed away leaving clear water for clear ice. It would be exciting to find a buried ice plow! -
Blacksmith Shop Excavation, what is it?
Gazz replied to Chip McCoy's topic in Tools, ID, and pictorial reference
Interesting thing that ice plow! I really should look for pictures at our small town historical archives. It is my understanding that the ice blocks were floated over to the dam where there was a water powered elevator for lifting the blocks to the top of a slide which slid them to the ice houses. I had assumed the blocks were cut by saw. I have a couple saws and push/hook tools that came from yard sales around here as there are several ponds that used to supply Boston with ice. I've been digging by the ice house foundations. Would anybody ever wonder about what the horse might leave behind on the ice? Hopefully the ice was just used to keep stuff cold and not for your drinks.