Walker's Forge
-
Posts
21 -
Joined
-
Last visited
Recent Profile Visitors

-
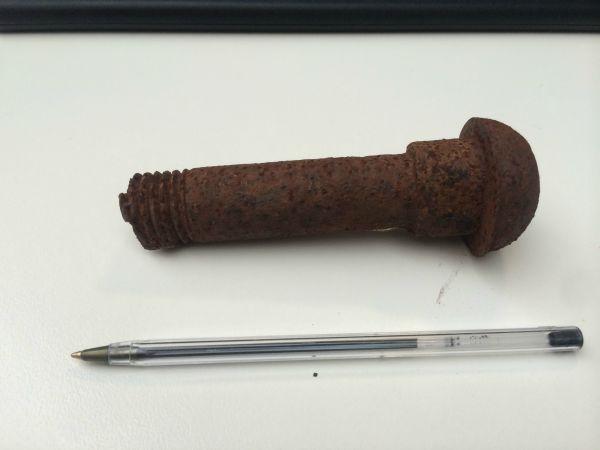
Railway bolt what metal
Walker's Forge replied to Walker's Forge's topic in Blacksmithing, General Discussion
Thanks for the replies guys. I has hoping it would be a slightly better than mild steel item. Planning to make a couple different hardy tools and punches from them. Not sure what I will make for the guy who gave me them, perhaps a letter opener or something. -
Railway bolt what metal
Walker's Forge replied to Walker's Forge's topic in Blacksmithing, General Discussion
These are just going to be for playing with, but if someone knows if they are would make useful tools, such as punches etc. that would be great. -
Hi everyone, I work for the rail company in Tasmania and some of the guys out in the field heard about my little hobby and said they would start bringing me stuff in. The first delivery has arrived. It is nearly an inch in diameter and about 4 inches long with a large mushroom head. The guys here are not sure if it is cast or not, or what steel it is. Hoping someone here might have some information. The bolt was used on the rail line so I imagine it wouldnt be mild steel. It is not galvanised either. They gave me about 10 in total. Thanks. Giles
-
I am looking at getting a makers mark done so I can mark my work. I have the design already but am having trouble with finding someone to do it. So far I have contacted about a dozen different engineering/fabricator metal shops and only one has got back to me and quoted approximately $850 for a treated tool steel punch with the design being about 30mm The other day in town I found a tiny little store with a guy who does leather and metal work and he said he can do it for $150. I am most likely going to use him as a.) it supports a small local business, b.) he will do it by hand and has done loads before. Also the fact that he is nearly an 1/8th of the price helps too. Would like to hear your stories (and see your marks) of how you got your makers marks made.
-
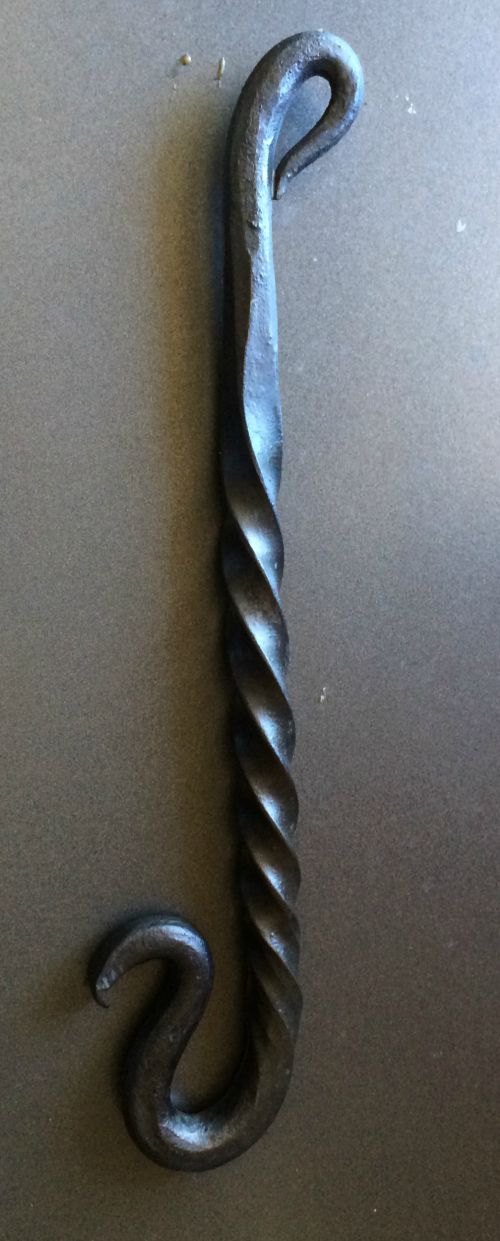
Show me your Bottle Openers!
Walker's Forge replied to Arbalist's topic in Blacksmithing, General Discussion
AusFire - with this piece of rebar I squared it off with my 3-4# hammer and this gets rid of most of the ridges. I then use my small 1.5# ball pein to clean off any ridges I didnt get. Usually the squaring gets rid of all of the ridges. -
Show me your Bottle Openers!
Walker's Forge replied to Arbalist's topic in Blacksmithing, General Discussion
Here is one I made for a friend out of a piece of rebar. Overall length was about 15 cm.
-
Good practice for newbies
Walker's Forge replied to ChiefCodeX's topic in Blacksmithing, General Discussion
A good start is going through the projects in this book. Start at the beginning and do each exercise 10 times before moving on, then you can get started on making more interesting things: http://www.hlcollege.ac.uk/Downloads/cp_blacksmith.html -
My new anvil, identification please
Walker's Forge replied to Walker's Forge's topic in Anvils, Swage Blocks, and Mandrels
Thanks Andy, I will give it a clean up this weekend, hopefully something is hidden under the rust. -
Thanks everyone for all your answers. I am going to cut off the little spikes where the old bolts were and re-drill bolts holes. I don't want to risk ruining the forge and like many of you have said even if done properly things can still go astray and the forge could crack. I will hopefully get to it this weekend unless the wife goes into labour (only week and a half left until baby is due). Once it is done though I will post some pictures. I did mange to make a stand for the blower that came with it though. Cleaned it out over the weekend, there was about 20 years of caked on grease and dirt to clean off, it purrs now though.
-
My new anvil, identification please
Walker's Forge replied to Walker's Forge's topic in Anvils, Swage Blocks, and Mandrels
Hi ThomasPowers, yes they are, would there be any other distinguishing marks to go my to tell if it is a Peter Wright? -
Hi everyone, Picked up this anvil last weekend at a deceased estate sale in rural New South Wales, Australia, it took about six hours to get there. Unfortunately no one knew anything about it. It as the weight stamped on one side 1 2 0, 168 lbs or 76 kg. It has a number 4 on the base directly under the horn, however there are no other marking that i can see. I will be giving the side a light cleaning to see if there are any other markings. I hope someone out there may know something about it. Thanks, Giles
-
Thanks for the replies everyone, I will try and load some pictures this weekend. Thanks for the info DSW - from what I have read you hit the mark that it is a very difficult thing to do, and even if you follow the correct procedures you still run the risk of it not working or cracking the whole thing. I think I may have to drill some holes and bolt the thing together. At least this way I dont have to worry about damaging the forge. Giles
-
Hi everyone, Got my hands on an old forge this weekend. The guy was 75 and he and his dad used the forge to make horse shoes back in the day when they broke in horses. I am guessing it is cast iron based on age however I will be doing a spark test to confirm. The forge came with an excellent hand cranked blower too. The forge is fed air from the underneath. There is a T section of pipe (ignore the words in the picture): Where this T section joins the forge are three rusted out bolts that were at sometime welded to the forge. I would like to weld the T section completely to the forge so it becomes one solid piece. My question for you guys and gals is what is the best way to weld cast iron? I have access to a MIG and an Arc welder. I have heard that heating the forge up first and welding while hot and then allowing to cool slowly is the best way. If the forge turns out to be cast steel will there be much difference for welding? Any help you can provide would be much appreciated. Giles
-
Went to a free garage sale a couple weeks ago :D . Picked up a heap of items including a bucked of charcoal, and stuff for the house. Best find was a German made electric two speed blower. Its not a blacksmithing blower but once I build a frame to mount it to it will work very well. When I got home I turned it on and it purrs, great find.
-
Mastercrafts of Blacksmithing
Walker's Forge replied to Chancellor's topic in Blacksmithing, General Discussion
Great video, watched it during my lunch break. It has got me thinking about building a gate for my place haha.