
Aaron J. Cergol
-
Posts
186 -
Joined
Content Type
Profiles
Forums
Articles
Gallery
Downloads
Events
Everything posted by Aaron J. Cergol
-
Hi all, Here's a Jewelers hammer I forged. Made from 1" diameter 1045. I threw it into my "reject pile" and eventually came back to re-forge it; at the time, I didn't like the proportions of the cheeks, or the eye, I fixed the eye, and filed down the cheeks as well as made the ball peen down turned like some of the original antique hammers I own. I did some very basic file work for decoration, and decided to leave a rough-filed finish. I heat treated, buffed off the scale, oiled it down and tempered. I left the temper colors on it, as I thought it made it older somehow. I'm happy with the results. I forged a round wedge-although I think an H wedge would have been more appropriate. The handle is also home made, and is straight grained Hickory. Enjoy the pics-any questions, please ask. For more pictures of what I'm working on, I post regularly on my facebook page-under "Cergol Tool and Forgeworks". Warm regards, Aaron
-

Beautiful tools made by Aaron Cergol
Aaron J. Cergol replied to Momatt's topic in Tools, general discussion
I do sell on ebay, as well as made to order hammers for individuals. If you're looking for something in particular, drop me a line. Aaron -
Beautiful tools made by Aaron Cergol
Aaron J. Cergol replied to Momatt's topic in Tools, general discussion
Thanks for the kind words. I do hope you will enjoy using them, Momatt. Aaron -
Thanks Stan. We did sure enjoy making this. Have an order for a sledge-we'll be punching a few sledge eyes tomorrow... for anyone interested, I finally finished uploading pictures of the making of this sledgehammer. https://picasaweb.google.com/110237586412247118904/ForgingASledgeHammer# Aaron
-
Building my small smithy in Florida
Aaron J. Cergol replied to neg's topic in Building, Designing a Shop
Did you use a cut down tree stump (still embedded in the ground for a stand)? If so, kudos to building your shop around it! A lot of people will argue and say that is too small of a shop. I like it, you will make a shop work, no matter the size. I prefer a smaller size myself, only allows me to have the tools I *need* in my shop, and makes it stay relatively clean. It also helps avoid the blacksmiths hoarder disease...which I still have a case of. Nice work, Aaron -
Thanks all, I'm glad you like it. here's a link to pics of us making it. I still have lots more photos to add, and some captions. This shows a pretty good storyboard of us making it, and all the trials and tribulations we went through making it. a few setbacks (punches getting stuck) and how we improvised to fix them. https://picasaweb.google.com/110237586412247118904/ForgingASledgeHammer Aaron
-
Some finished pics-better pics to come tomorrow. sorry for the blurry grainy pics, these were with my iPad and in the dark... final weight-12# on the spot with handle. Handle is hickory. Decided to blacken the sides, and leave a stripe in the middle natural. finished with linseed oil and paste wax. Wedge as always is black walnut. Worked with it for a bit today-swings like a dream. mainly used the rounded face for striking against top tools, hit nice and centered every time. Aaron
-
Picked her up from heat treat today, Finished pics coming tomorrow... I am looking forward to swinging this thing. Aaron
-
Howdy! We have decided to start getting all of hammers commercially heat treated. We've sold many hammers treated ourselves, but since we have been producing an awful lot more these days, and have a big order to fill, it seemed like the right thing to do. It assures not only quality control, but ensures that the most ideal hardness and toughness are present. We would rather spend our time focused on the forging and finishing aspects, the parts we enjoy the most, and let the heat treaters do what they do best. And to us, this decision meant better quality, and better longevity. Something that our blacksmith tools should stand for. However, if I was to heat treat this myself, I would do just like I do with smaller hammers; heat both faces (rotating it) to non magnetic-or just above. plunge in clean water (I'd wager a lot more water for this beast :) ) and agitate it to break past the steam jacket. Re-buff, and heat several drifts. put the hot drift in the eye and let the heat be drawn into the hammer, I'd imagine we'd go through...close to 10 hot drifts for this hammer. continue to swap a hot drift until you see the colors run on the faces. Watch them run until they're the desired color and quench again. We made a handle yesturday, came out real purty. we just had to take a few swings with it-feels good in the hand. looking forward to putting this one to the test. a couple more pics of working the sledge-note the smoking ove gloves. :P I also got a new striker, Maeve. I think she'll work out well, doesn't show up drunk, and doesn't argue. :) Aaron
-
Thanks for the kind words all. Dave, I think it took roughly 4-4.5 hours of forging/heating. This time also included forging a new drift, and a new punch and die changing. Mr.Nobody-you'd be surprised at how quickly you get used to swinging a bigger hammer. our main striking hammer weighs in at 14# and if you're not used to it, you'll feel it quick. after a couple full days of striking you'll have it up over your head and on your tip toes swinging it like it was nothing. after that initial few days of hard striking, even after a short break from striking, you can come right back to it with ease. Its all just a matter of routine practice. Also,breaking up concrete is a bit lower than we are striking-striking height lets you get a full blow in without having to hit the ground-this saves your back! heres a picture showing what we're doing for the surface treatment for this hammer. A bit more polishing, and I have to sand the faces a bit more yet. My foot must be huge, because the hammer looks small next to it. :P let me assure you this hammer is bigger than it looks. More pics to come. aaron
-
Hi all, For a while now, my striker Bill and I have been talking about forging a sledge hammer. We've hemmed and hawed about how to make it the most efficiently and how to go about forging such large stock. As luck would have it, I was given a few "cut offs" from a factory. looking closely we saw them stamped as 1045-jackpot! So, we started with 3" Diameter round by around 7" tall if I recall correctly. took just under 10 minutes to heat from cold using my hand crank blower (coal forge) We punched the eye by hand with surprising ease. I was actually quite shocked at how smoothly this went. We upset the blank in my H frame fly press, using a cupping swage for the bottom. the finished faces are closer to 3 1/2" diameter now. We used a normal size hammer drift to get the drifting process started, then quickly made a larger one to finalize the size of the eye. The cheeks were worked on my 50#LG power hammer. It moved the material, but was not overly happy about the size stock being worked under it. We used 3" diameter fullers-top and bottom to draw out the cheeks. The shoulders were forged in with a matching set of 1" diameter fullers. Of note, we used 1" bars tock, but next time we will use a 1.5-2" diameter, but a cut "flat" sided fuller (3/4"-1" wide or so) as opposed to a full round or half round. The sides of the faces were then worked flat, and we re-fullered the necks to planish them. We had small fullering dies (1.5" in length) so we decided to make the shoulders round, as opposed to octagonal or square with broken corners. starting weight was right around 12#. After forging, we were down to 11.6#. I still have a bit of grinding to do, so I figure final weight after the handle should be right around 12# even. We have oodles of pictures-but still need to go through them-lots of action shots in these. expect final pics after heat treat, temper, and handling sometime next week. this has been an exceptionally fun project, and we plan to make many more sledges. Getting used to man-handling around that 12# HOT piece of steel was quite a chore. (need a longer drift) Used to 5# and under, but after I got used to it, it wasn't all bad. Aaron
-
Hi all, Lately we've been making an awful lot of hammers; mostly from 1045. Forge, grind, polish, then heat treat. Heat treat consists of heating each face to non-magnetic or just above, and quenching in water-aggressively moving it to break through the steam jacket. Then re polish and temper using hot drifts-watch the colors run and quench again. My question is this-is tempering nessesary? I have read about Tom Clarke, IIRC he used 4140, heat treated (quenched in...oil? I'm assuming) and then did not temper. Maybe I read false information about that, but I've heard others mentions not tempering as well. Is this specifically talking about 4140? Or in general for hammers? What is it really accomplishing? I understand it will make the hammer less brittle-so it would divot or dent before it would chip... What are your thoughts on it? We always temper because that's how I learned, but curiosity is getting the better of me. Aaron
-
thanks all for the kind words. Toolish-I do not know the reason for this either. My guess would be aestetics mostly, but perhaps that it narrows the area that transmits the force so that the force ends up more centered? Have another cross pein in progress, this one has a more narrow pein. The next one I think will be a straight pein. Aaron
-
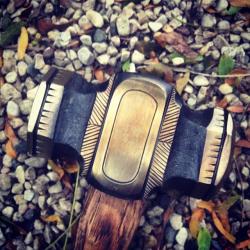
Hi all, Myself and my striker Bill forged this up around a week or so ago. Bill helped me punch the eye, then I worked the shoulders and cheeks on my 50#LG and then worked the pein down by hand. It's inspired by the older farrier cross pien hammers, and a cross pein Brian and I forged. :) He really gave me some insight to drawing the pein out to help it avoid fish mouthing. Simple matter of upsetting it into a dish or swages to keep it in check along the way, Starting stock was 1045 1 3/4" Diam by 4" long. came out to just over 2.6# after forging/grinding. Handle is home made from American Ash, and has two walnut wedges in a cross formation. Let us know what you all think. Aaron
-
An army of anvils
Aaron J. Cergol replied to Aaron J. Cergol's topic in Anvils, Swage Blocks, and Mandrels
I'm afraid I do not know the city of origin. It is dated 1820 on the front, and I believe this was the year made as it (as well as all the other decorations) are quite deep-suggesting it was stamped while hot (in the forging process) it is probably my favorite of the ones I brought over. Why no horn? To be honest, I'm not sure. I can imagine a smaller hornless anvil (like this one) possibly being used as a bench anvil, but I've had hornless anvils weighing upwards of 400#...they were popular enough though, as I've come across an awful lot of them. I suppose I don't use the horn too often, and if I had a variety of hardies, it would just make the anvil have more mass where it's most important. Cpt.Bruno, you'd be surprised at how reasonable shipping can be. For anything up to 150# it can be shipped USPS or normal carrier for right around $100. Anything more goes via freight. Depending on location, it's usually right around $200 or a bit less. That's strapped to a pallet and provided you have a forklift terminal where it can be dropped off at. Lift gate service is a whole lot extra. Aaron -
An army of anvils
Aaron J. Cergol replied to Aaron J. Cergol's topic in Anvils, Swage Blocks, and Mandrels
Doh! Try this: https://picasaweb.google.com/110237586412247118904 -
An army of anvils
Aaron J. Cergol replied to Aaron J. Cergol's topic in Anvils, Swage Blocks, and Mandrels
here is some more pics-these were the pics I recieved from my contact in Austria. When time permits I'll take better, more detailed ones, and put up longer descriptions. Anyone interested in any of them can feel free to contact me. https://picasaweb.google.com/home I'm still debating which one to keep...descisions descisions...I do think the Square spanish one would be fun-make a nice tapered stump for it, and carve figures on the stump. Maybe a carving of St.Elias??? We'll see, but for the time being I might have to "test run" a couple of the big ones. Aaron -
An army of anvils
Aaron J. Cergol replied to Aaron J. Cergol's topic in Anvils, Swage Blocks, and Mandrels
Lil tomato, Steve has some very nice stuff, I bet you had fun out there. Especially seeing Tim's collection. I did bring a few German ones over as well. I have no interest whatsoever in brining cast ones over. I have never owned a cast anvil, and I do not plan to. Just my preference. All of these are older forged ones, the oldest-judging stylistically and decorations could be as early as the 1670's, the newest from around the turn of the century. (1900) why Austria though? I had a good contact over there and it made my descision easier. Cheers, Aaron -
An army of anvils
Aaron J. Cergol replied to Aaron J. Cergol's topic in Anvils, Swage Blocks, and Mandrels
Thanks all for the compliments, I'm pretty stoked to finally have them. Daniel, I'd be curious to see the 45degree slant on your PW. there is a lot of argument and speculation about this 45degree "face" most German or Austrian smiths I have talked to tend to agree it is for drawing pieces out over the edge-always placed on the far side, it is the edge that takes all the abuse from the striker. having a bullnose edge, or an angled face not only prevents cold shuts from forming, but allows that far edge to have an awful lot of mass under it to withstand heavy blows/chipping/mushrooming. The earlier Austrian ones had tall shallow church windows, and a simple "bullnose" rounded over edge that went straight down-this projected out from the face maybe 3/8" or less. Later forms retained both features but began to become less about function and more about form. Very deep and rough church windows serve no real function except stability and aesthetics. again-speculative, the earlier forms of church windows were believed to be used as "swages" when tipped on its side. I most certainly plan to import again. This was a "trial-run" for me to see just what was involved with the whole process and allowed me to iron some of the kinks out to plan for a much larger shipment in the future. I think these wonderful German and Austrian anvils need to see more use, and I swear by them; so I figured why not make them available on this side of the pond. The few of us who do import from Germany are all on very good terms with one another, and it's in such small quantities that we are not really treading on each others toes. Frank-thanks. The two Spanish ones; the blocky one dates from the 1760's or so, from Castellan Spain. It weighs in at 340#+. the shank on it has a wavy bottom to allow the ridges to bite into the wood I would imagine. I didn't yet take measurements, but the bottom of the shank is a good 3.5-4" square. One can see where Nimba drew its inspiration from. The other Spanish stake is beat to heck, and is even older. In its heyday it must have been something to see. Stepped feet, and some chiseled decoration complete it. It is over 400#. IW-I'd love to see yours. This was the first one like this that I've come across-it has the angled face, church windows, AND an upsetting block-an odd combination for sure. the horns are exceptionally small for the overall size of it. I need to measure it, but the base is massive, as is the upsetting block. Agreed-they are a joy to use. Aaron -
Hi all, at long last my shipment of anvils from Austria has arrived. 15 total! Picked them up yesterday in two trucks-the leaf springs on my truck were dead flat. :) All of these are old forged anvils, no cast ones. All of them are over 100 years old. When people talk about the wonders of "German engineering" It absolutely applies to their anvils too. They are incredibly functional, and feature a steel plate that continues over the horn(s) as well. Some of these date as far back as the 1740's, and a few are even dated. they range in weight considerably; from around 50# up to 660#! The three large ones on the pallet are all beasts. The south German double horn is around 480# I believe, the Austrian is 550#, and the green monster is a South German with angled face, church windows, AND an upsetting block-this one weighs in at a heft 660#. these were not fun to unload by any means. We had a forklift set them on the ground, but it was too icy to have the forklift drive them through the garage door. Slipping and sliding on the ice moving them inside led us to several injuries, but all in all, a great day. I'm a little sore from smiling so much that they finally arrived. :) five of these are spoken for already-More pics and weight to come later. These will all be for sale shortly-I am going to clean some of them, but most will have the original patina left as is. I plan to photograph, weigh and measure them, and put up a website devoted to them to sell them. Warm regards, Aaron
-
Tried cobalt, tried black oxide, tried carbide bits under the press going at a very slow RPM. nothing, no chips. Center punched it first and used copious amounts of oil. Cant get an EZ out or extractor in there with no pilot first though. I have often thought a mag drill might be the ticket. I have a freind who has one, that might be next. A cole drill isn't a terrible idea! I think that might just work, and certainly in conjunction with some heat. Will have to figure a way to clamp it though...nothing to really get a firm grip on as everything that is available to grab is angled. Macbruce-I don't have a compressor or air chisel, but I do have access to a jackhammer...hopefully it won't come to that. :P Aaron
-
It seemed as if there were two pieces of metal wedged/rusted in. The first one was on the surface of the face and drilled out easily. The other seemed to be hardened and was deeper in. Looking in with a flashlight after drilling I barely see any shiney spot. Looking up from the bottom, its well rusted in. Being a German pattern, the pritchel hole goes through a solid 4.5" of material making this even more fun. :P Thanks for the acetone mix-I will try this.
-
Ive got a 360# north German pattern double horn that I'm currently using. It's all torch gouged up, but has a flat face and tremendous rebound. The Pritchel hole is plugged with...metal? And is rustd solid. I've soaked the Pritchel in penetrating oil for weeks, moved it under the drill press and tried drilling it out. Three drill bits later, still nothing. I took some heat to it, but don't want to get it hot enough to ruin the temper. As a last resort, put a round punch in it, and struck it repeatedly with a sledge...didn't budge. Being that its a German pattern, I cannot access the hole easily from the bottom as the foot of the anvil would be in the way. Any ideas? Aaron
-
I'm shocked that no one has even mentioned files. Looking at colonial ironwork,one can see many small (flat) facets adding up to make a round. With proper technique and a halfway decent file, you can get darn near a mirror finish, especially draw filing. If you don't pickle your forged pieces to remove scale, always use a crummy file first-scale ruins files quickly. Filing is pretty darn fast too, especially if your forging is accurate and quite close to the finished result anyway. Aaron
-
Dave, did you use kiss blocks for the shoulders (troughs)? Thanks, Aaron