
Aaron J. Cergol
-
Posts
186 -
Joined
Content Type
Profiles
Forums
Articles
Gallery
Downloads
Events
Posts posted by Aaron J. Cergol
-
-
Hi all, here's a couple of anvils I've forged. Both started out roughly as a cube of material. Can't remember the smaller one, but the larger was a 3" cube of 4140.
Working on a French "pig" now-the feet however will be forge welded on. The next larger American pattern I make will be 10-14 pounds and will also be forge welded at the waist. With the addition of a (much) larger power hammer this fall, I plan to make these up to 30 pounds or so.
The larger of the two is 5.25 pounds and the smaller is 1.5 pounds.

-
See you all there! Coming with 5 big German double horned anvils for sale, and close to 75 hammers that I forged. Pending availability of space, planning to set up by Josh (Mr.Fischer man) and Steve (Matchless).
Aaron
-
Hi all,
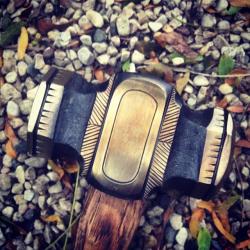
Lately I've been having fun adding some decoration to some of my hammers. Does not take that much extra time, but the thinking does. Figuring out proportions, and the overall "business" of the piece can take some time. I usually don't do much layout work, but if I do, I use a simple fine tip sharpie. Inspiration came from several medieval war hammers. I originally had browned this one using "Dr.Caseys Birchwood plum brown", but decided to lightly polish it.
Without furth ado, I give you one of the latest. This decoration was done with three simple tools.
these pics are of the same tool. This is a concave "fuller" of sorts. Instead of a fuller that pushes material, and creates one valley and two hills, this one creates two valleys, and one hill. Think of it as a "top swage" (half round) with two leading "cutting" edges. I do this hot, until the deepest part bottoms out. After I had all four sides established deep enough, I then had to re-work each side (hot) on a block of hardwood so I would not mash the opposite side when I was working on the other side. If I did this on the anvil, I would have been left with flats in the middle of the roped bubble.
 The roping itself was done with a concave chisel that comes to two points. This corresponds to roughly the same width as the first tool, and the same curvature. Actually, this one is a bit wider, so that when tilted at an angle to create the roped effect it is then the same width as the first tool. This is established cold, then set in deepr hot-but only at a dull red heat. We're not forging at this stage, only changing the surface, and I did not want to mash the metal to the core-only the surface.
 the small cut lines in the shoulders of this hammer were done with a very small chisel-cold. I did this on a piece of leather on the anvil. The leather helps add some grip as well as helping to not deform anything.the handle was hewn from a hickory stave then roughed out on a belt grinder, then finished with a spokeshave, rasp, and files. the roping was carved in and then wood burned. The other decoration on the handle was filed in with wood files.Hope this all makes sense. Any questions please ask.


-
Hi all,
I've been doing some digging, and haven't come up with much. Looking for some 12" ID double wall flue (stainless or other) I only need double wall sections 3' above and below pass throughs of floor/ceiling, the rest can be single wall. so four 4' sections would do me. Anyone know of sources?
I had found a source that advertised "Duratech" (the fancy twist and snap together stuff) 4' lengths, for only $150. I thought that price was too good to be true, well it was. Did some digging about the site it was on, and every review said it was a scam.
Called half a dozen local chimney/woodstove places too, no one stocked that size, and their minimum order for special orders was absurd.
Thanks,
-A
-
Nice work as per your usual Sir. now just make me up one up for some of my German anvils now...it'd only have to be 2' in diameter. :)
Next time you make one, swing by, I have a die filer you can use.
Aaron
-
Where in Milwaukee are you? I'm on the north side, near Capitol Dr. and 1st st. Swing by to my shop sometime and we can talk iron. If you're looking for equipment I usually have some anvils, vises, forges, and tongs kicking around as well.
Aaron
-
oh yes, I'm currently working on one for myself (meaning it might get finished this millennium) It has file work, and will be browned with silver inlay.
-
Nitiriding, is that similar to case hardening? I heat treated the hammer after doing the chisel and filework as it was 1045.
dntfxr; yes, I anneal before any of this begins. after annealing, I pickle in vinegar, or heavily wire wheel the scale off (It KILLS files). Then I go to the belt grinder and prepare the surfaces. I rough it out at 60G and then do a pass of 120 over that. This gets the surface good and even, making it much easier to file on.
Another note, after chiseling, and even center punching, the metal will "pucker up" around your design. Be sure to file this smooth after. Otherwise it leaves a somewhat sharp burr and looks unfinished.
btw-I'm working on another one of these at the moment, a smaller one though, would it be worthwhile to take some progress pics? -
Admanfrd-I used 3/8" diameter 4140. Forged it to an octagonal cross section, and tapered the struck end. For planishing tools and more specialty shaped tools I would forge them down to shape and then file/grind, but these chisels I just ground the edges on. Heat treat; brought the business end to non magnetic and threw it in oil. Left the struck end as normalized. I tempered with a small propane torch, heating about half an inch down the shaft from the business end. Watch the colors run until I hit a dark straw. I would usually temper something like this to a bronze, but that proved to be too soft and I needed to re heat treat.
Mitch; I have a professionally done video in the works of the forging of a claw hammer. Should be complete in a few weeks.
Aaron
-
Here's the three main chisels/punches I used for this piece. two small straight chisels ov different widths, and a very acute center point of sorts.

For cold work, I like the smaller length, it allows me to steady the piece too. I'm working on the anvil, but put a piece of leather over it. Helps to not mar the piece, and helps add a bit of grip as well.

For layout work (If I decide to do any) forget a ruler, couldn't get by without these. They give unchanging units of measure, allow you to pick a pin point spot to mark with ease, and make finding harmonious proportions a breeze. I've got a pair that I forged in pickling to descale it, because I should really be using a pair I made myself. :)

-
Thanks all for the kind words! I really don't do much layout work, if any, I just file and chisel as I go. I add one element, and see what might look good next to it. I've seen some nice filed hammers, and some beautiful antique ones, so that's where I've drawn some inspiration from. Old Jewelers hammers have some very ornate designs.
The chisels I use are very simple. I used 3/8" round, 4140, as that's what I've got a bunch of. I forged it octagonal, with a tapered end for the striking end. I then either forge or grind the chisels and shapes to shape. Heat treat/temper and call it a day.
Aaron
-
here's a rounding hammer I just finished up. Head weight is a tick over 3.6#. The handle was requested to be a bit shorter. The handle is antiqued, and has some simple filing near the head to add a little decoration to it to match the status of the head.
This one was prettied up with some file work, and with the use of some chisels. The chisels I use for this are itty bitty little things. They're not 3" tall, and are pretty narrow too. When working on a piece cold, I like chisels of this length and size as it allows me to better control the work I'm using it to accomplish. Also, it's nice to be able to rest my hand or fingers on the piece itself to help steady my hand.
The chisels used for this one were quite simple, a couple straight ones of different lengths, and widths. Sometimes I used one with more of a "knifepoint" for finer lines, and sometimes I have reason to use one with a blunt angle, much like a cold chisel, if I want a thicker, more pronounced line. The "teeth" on the sides of the faces were done with a thicker one like this. I established them in flat, at the groove, then lightly tipped it to make the teeth taper out thinner near the ends. I think a small "S" chisel would do excellent for this-would give the appearance of stylized flames. I also used a very small, very acutely pointed center punch for the dots. The curved line on the flat oval on the cheeks was also done with a small straight chisel. With a small enough chisel, and enough overlapping blows, it's easy to walk it into a curved design.
I'm pleased with how this one came out. The bronze colors are done by using my super secret method of coloring steel. It's so secret that even if I told how it was done, none would believe me. Can you say 1980's broken down toaster oven? :) After bringing to the desired temperature (color) I quench in oil to blacken all of the recessed areas.
I've made a few of these decorated hammers now, and plan to do more.
Aaron
Post edited to remove facebook link. No reason to have part here, past there, and part somewhere else. If everything is posted in one place it is much easier to read.


-
78sharpshooter was kind enough to pass the sellers info along to me. I am the proud new owner of this machine. I had been talking about a KA75 for the past few weeks quite enthusiastically; as it might work perfect for what I need it for. I wasn't really willing to pay new prices, so was about to start the hunt for a used one, and this one pops up. The universe provides. :)
Talked with the owner this AM-real nice fellow to talk iron with. We're figuring out shipping/pickup now.
Thanks again 78SS!!
Aaron
-
We own a champion #1 and it is a swell hammer to run, especially compared to my 50# LG. I would say that the Champ hits like a good well tuned 100#LG without a doubt in my mind. The factory brake is a nice benefit, especially with the right amount of tension to really make it grab. It has nice big dies too, as well as a lot of useable daylight for a mechanical hammer of it's size. We've used it for punching and it does well. It has a centered tup, so the use of combination dies will not harm it.
I think my only complaint would be;
-the orientation of the hammer; Working from the side, it takes some getting used to-standing out of the way enough to miss the springs. Working from the front could work, though you would have to modify the treadle.
Things to look out for-
-as mentioned, the sow block is cracked on a lot of these old machines from over tightening the bottom die.
-worn ways (guides)
-any other cracks on the frame or other parts
-any missing parts-study pics of others machines and make sure yours is all there
lastly, something to keep in mind is extra expenses to get it running. This can include transportation/loading/unloading, restoration work and time, machining, new motor, motor mount, and various sundries/consumables. We got ours for a screaming good deal in darn nice shape, but even simple stuff like new wire and plug can run you $100 without blinking twice. Granted most of this work you can do yourself to get it up and running if it's not already, but time is something you need to account for too.
Maybe Bill will chime in with his thoughts on the hammer.
Aaron
-
Just use the edges of your anvil as a bolster or support. Every 2 or 3 blows, flip the piece and support the other side. If one of my swage blocks doesn't have the support I need, this is what I do. If you're making an axe with "cheeks" mind to not upset them or put divots in them by laying them off the face/edges a bit. If you're making a simple Michigan pattern axe, easy stuff.
Aaron
-
Thanks all.
RT, must not have recieved the bribe yet... :)
T-started out as 1.75" diameter.
The Bolton dies are nice, especially of you can weld. They are quicker to change than unwedging the dies, but still to very fast. Spring tooling would allow multiple tooling changes income heat. Looking forward to the 100 with all the useable space though.
Aaron -
Thanks all for the compliments.
Vaughn, it's called a "bandit" and is the best $20 I ever spent. look for it on amazon. I had an accident last summer that tore my bicep, as well as pinching a couple nerves. Hammering would be extremely painful, and seemed to spread to tendonitis. I got this brace, and after about a month of "breaking it in" (for lack of a better term) I no longer have any pain while hammering. I think it'd be safe to go without it now, but I'm going to play it safe and keep using it for a while. If you have any elbow or arm pain while hammering, you need to invest in one of these.
KY-I run a 50# LG at my shop, so I know exactly what you mean. The hammer in the photos is a friends #1 champion (65#). With the 100# LG I am thinking of (for certain applications) taking the sow block off, and putting an oversized die in the frame to be able to have more useable daylight. As long as the arms have enough clearance to not hit the wrap around guide, I think it should work fine. It'll be a big improvement over my 50 right now. This said, most of the time, I use bolt in dies with the tooling I need, or flat dies with spring tooling, so most of the time I don't use too much top tooling. I'll be adding a brake to both of them to make them suit my needs better.
Aaron
-
:) hahaha, yes, I owe you a few meals. Looking forward to seeing you there. Might see you at madness, still debating if I have the time to go or not.
-
Hi all,
Just finished up this hammer order for a client. I was given creative reign on the finishes and handles.
I'll let the pics speak for themselves. 8 hammers are 2.25#, one is 3.25# and the baby one is 1.75#. forged from 1045 steel. My father made me a beautiful oak box to ship them all in. the hammers are held in place by a set of two "stockades" and then shimmed on the sides so they don't rattle around. there is then a lid that slides into a dato.
let me know what you think.
Aaron


-
Thanks all. I've gotten more into axe making lately, so the process is ever evolving.
Dave-glad to hear you like the hammer. :) getting used to the heft?
HS-learning from someone else is surefire way to learn how to do something, but not necessarily the best way. If you're just doing this as a hobby, I'm a huge fan of trial and error-sure it'll be frustrating, but you'll learn the most efficient way-for *you*. This is how I learned...I know10 ways to not make an axe, but 3 really good ways. After you've got a good grip on the concept, then go to someone else, and try out their way. Then you won't be set in stone a certain technique. nuff said.
Aaron
-
Very nice find. I see many anvils of this period to have a gentle crown in the face like this one. Whether that was done by the manufacturer, or if it was after decades of use and being work hardened I am unsure though.
I for one do not like the term "colonial anvil". I understand that it implies that it was used by people of the colonies, but it also often gets mistaken for being made in the colonies. Going along with Mr.Miller, a good many tools, and materials were being exported by England to the colonies, including anvils. It was quite a while before the first anvil manufacturer appears on this side of the pond. This is not to say that anvils were not being made by shops, it's just a loosely used term.
Aaron
-
Thanks guys.
Dave-that's exactly it. :) It's also sometimes a place to put pieces I get frustrated with-I know if I continue working on them, I'll end up getting more frustrated and ruining them. Set them aside, and look at them for ideas until you feel like working on them again. Some of my most favorite hammers have come from my reject pile.
I would like to make a sledge hammer soon with fancy filework. I am still narrowing my drawings on a design though.
Aaron
-
Thanks all for the compliments.
Forgd from 4140; 1.75" diameter by 4" long. I forged the barstock to rectangular, than slit it. Drawing out the body on axes and hatchets is always fun, as it goes quite quickly and you can control every aspect of the shape. I drew out the body with my main forging hammer-a 4.75 pound octagonal faced hammer with a radiused face. I rough forgd the "wings" in over the horn, and with a fuller, taking localized heats. The edge was somewhat forged in, then ground the rest of the way.
Why 4140? I've had good luck with it for tools lie this in the past, and it was available on my shelf. Normally I would have used a mild steel, or wrought iron body and welded in a steel bit for the edge. I prefer to start with rectangular barstock too.
Aaron -
Hi All,
forged this hatchet up last week. I call it the "Batwing hatchet". head is a hefty 2.25#, so it does the work for you. chops and splits well, I will have to try and throw it...
Let me know what you think. You can see what else I'm working on, on my Facebook page-under "Cergol Tool and Forgeworks"
Aaron


A couple of anvils I've made
in Anvils, Swage Blocks, and Mandrels
Posted
Thanks all for the kind words. Been having an awful lot of fun making these. I'm learning a lot more about the forging process too, especially as it relates to manipulation of material under a power hammer. Forging an anvil, the material is drawn, stretched, upset, fullered...in every plane, and the material changes quite drastically, at least compared to a hammer, which is what I'm usually making. :)
Zachary, Once I get the big hammer up and running I'll be making them, though they will not be cheap. A 30#er would run close to what you paid for your German anvil from me. I figure for forged anvils they'll range from $50-100 a pound. Might sound crazy, but there is a lot of work that goes into them-regardless of having a (large) power hammer or not. Lots of forge time, lots of hard hitting, lots of tweaking, and quite a bit of grinding/cleanup work. Not to mention the heat treat/temper and polishing. This also takes into account all of the tooling I will be making to produce these. I can already think of about a dozen tools I need to make to make these go a bit easier.
I mostly finished forging the little French Pig anvil. Might need a couple more heats to tweak and refine some of the forging. It's been an interesting forging to say the least. I am obsessed with, and pay very close attention to the forging process. Every action has a reaction, knowing what that reaction is, is half the battle. I was surprised at a couple of the reactions from the piggy. :P
Aaron