

GregDP
-
Posts
197 -
Joined
-
Last visited
Content Type
Profiles
Forums
Articles
Gallery
Downloads
Events
Everything posted by GregDP
-
An admirable project! The sort of craftsmanship that inspires me. Thanks for sharing.
-
Neat stuff, I wish all my round tapers looked so clean! Something I noticed were the screws. Since you're selling stuff.. and just starting out. You may not find it economical to make nails. I've made them but while some folks crank them out like candies falling from a vending machine for 25 cents. I don't feel a need to include them unless someone request them specifically. I've got a few 5 gallon buckets of old nails from over the years. More than a few dollars worth of metal that could be arrow heads if hand forged. I simply put them in the vice and peen them about for a nice texture that looks really cool to me. That said screws hold much better. I just like tossing them in because they've been paid for by other jobs and I'm only looking to make enough money to keep on forging.
-
I've been mocked, not so much for being a blacksmith. It took me years to realize it seldom had anything to do with me. It's often people talking to a crowd and not to you, even when you're around. Peacocking and chest pounding. Just remember there are only so many years to learn how to handle confrontation with out it ending in blows and often jail time. If you know who and what you are and are proud of it nothing else matters. If one person thinks someone who's interested in a historically oriented craft is "geeky" I can actually understand that. Learn to wound their pride with your words or physical stature and demeanor. The best way to win a fight may be to start it. But to win in the game of life is to only finish them. Do you really want to be known as the guy who flies off the handle and likes to make sharp pointy things? People will still talk about you; just not to your face. I personally rather know what folks really think of me. I may sound like I'm preaching but I'd be the choir if I was listening. Hope you enjoy the shop time though :D And I doubt you'll have to make your point twice. (But we do like in an age of guns and a drive by may not concern you but I imagine you live with folks you care about. Some people just want revenge and can't take a hint :mellow: )
-
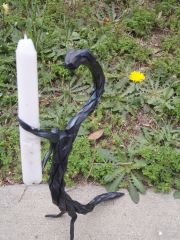 Prototype
© AAAPirateBlacksmith
-
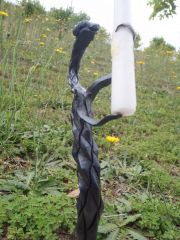 Prototype
© AAAPirateBlacksmith
-
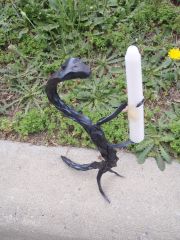 Prototype
© AAAPirateBlacksmith
-
If I were you I'd look up Bill Epps. He teaches how to make some bugs and it would be a good place to start imagining.
-
Very cool, thanks for sharing. I want to make my first hammer soon. I'm not sure my technique is good enough to switch styles but it I like trying new things!
-
 Peter Ross. He's talented, knowledgeable and experienced. I'd like to learn more traditional techniques and practices. I remember vividly seeing the smithy and folk at colonial Williamsburg as a fairly young kid when visiting Virginia. I think there is something to learn from most smiths though; even if it's just getting a chance to learn what not to do. :P It's also a plus that he's the most respected blacksmith that I know of in NC. Although Tim Ryan or Paul Garrett would be great to learn from.
 -
Wow what a night I had a chance to coat the inside of the forge with Plistix and try it out. When the forge was fired I was getting a huge dragons breath and isolated heat.. very little swirl. I was at a friends house and we considered the problem and narrowed down the causes: A - to large of a internal volume B - the angle of the burner C - Both I'm really glad it was 'B'. It was an easy fix with a cutting wheel and a little muscle. A little back story When planing the forge I wanted to weld the burner mount at a slightly more acute angle to the forge bottom. And well when trying to figure out how to keep it in place I figure out I could just thread the galvanized (**not suggested for those who don't know the risk**) pipe into the hole, only increasing the angle slightly. Doh! I hope ya'll like pictures.. 'cause I'm kinda proud and just wanted share! About 2.5-3 psi with a needle valve mostly open: Thanks for the advice on the homemade refractory and door designs Frosty. I may toss them into my next forge (I got an old refrigerant tank for just a few cents today!) Clayton has grown a lot in my lifetime but it's still got that small town charm in a lot of ways. Did you ever make it out to muledays in Benson James? Thanks for the tip on the back door. I considered that it may get a little too hot to open without tongs, but hadn't thought about how to approach opening it without a face full of UV. I did give it a nice little tong hook though which doubles to lock the forge closed. I'm really happy with how things have turned out. All that is left is to burn of the zink, strip the old paint and give it a new look. But everything except the zink is on the back burner.
-
Thanks Phil. If I had planned out things better-- I probably would have put the 3 inches of wool on the top instead of the floor or just two inches all around. I'm very happy with how things are going so far though and if I have to replace the floor it should be easier to replace this way.. I'll keep that in mind about the back door. I sorta regretted the large door idea after I made the cut. Mostly because I would have like to at least see how this burner handles a forge with more length. I'm not sure if such a large back door will be helpful. At least the door is large enough for two inches of wool at its center.. Too bad it doesn't close air tight.. though I may find that to be a good thing.. I feel like I could have cast the two halves to line up better and I may take a masonry wheel to it and rework it some. It certainly is getting hot though I'm not really pushing it too much till the refractory cures completely. I'm not really seeing the sort of swirl I imagined. Although I'm still really restricting the amount of gas and pressure. The chamber is about 9" long, 5.5" high and 7" wide. I did some rough calculations and if I can apply the rule for finding the volume of a elliptical cylinder pi*(2/width)*(2hight)*length I find I've got about 272 cu. in.-- Which just doesn't look right. It's not a perfect eclipse so I'm not really sure how to get an exact number (I wish I focused a bit more in school, now I've got to remind myself all these things!)-- But ~300 cu. in. doesn't sound bad. I'm sure it'll work, but probably not as efficient as I'd like. I really want to build my next burner like Frosty, so I'll be taking some tips from you Phil. I've only got a little refractory cement left and if I wanted to retool things a bit. Would mixing in some wood ash and kitty litter be a bad idea to stretch it?
-
I've been working on my first gasser and I would appreciate any advice before I wrap and cast the refractory. What I'm working with: Ceramic Fiber Spun Blanket, Temperature Rating 2300°F - 1" thick Vesuvius Hot Top Moldit Plistix 900f IR 1 inch forge/foundry burner (An 1" wide, 16 1/2" long atmospheric burner 0.45 mig welding tip and sliding choke) An old propane tank Uses: Light foundry work Pattern welding General purpose forging I've got an idea of what I'm doing, and have had a chance to talk to a few local folks to get their opinions before starting the project. I bought the burner some time last year so I was kinda locked in and almost everyone I know uses 3/4" inch or less burners. In my mind I'm planning to have a narrower entrance (~4") with a blooming internal forge area (~8") a flat level floor. with a hinged door on the rear end. It's clam shell and I don't know if I should let the two haves meet flush or try and have them line up like this... / \ .. In my mind it seems to allow for less heat loss... The burner is mounted just over 65 degrees in the middle but off to one side. Rex Price mentions 600 cu inches but with no firm suggestion. I've been advised it's best to go for less than advertised volume so I figured out a 12" by 8" cylinder is just over 600"cu inches. My forge body is just over 10 inches long. Depending on how the wool fits I'm guessing right now I'll end up with between 450" and 500" cu inches.. I'm kinda worried this may not be big enough or I may have a hard time regulating down far enough to keep from burning small stuff.. I'm sure I'll be happy with what ever I manage to build but I've learned a lot from many folks here and I figure you'll never know what you don't know unless you ask. Thanks! (Edited - Forgot to resize my photo.)
-
Hi I hope I'm not too late; I've had a chance to use some of the forges made by Eric the good fellow behind forgemonkeys.com. I haven't really used a lot of gas forges personally but I really liked using the ammo box forges he's made. I've had a good look at them in person, studied them a bit and even watched him work on making one. I'd be happy to answer any questions I can or pass them on to Eric next time I see him. He's a nice guy who's been very helpful to me so I'm rather sure he won't mind me tossing him with a few other questions in between my own. =P
-
When are you considered a blacksmith?
GregDP replied to mk74's topic in Blacksmithing, General Discussion
I didn't really want to comment on this when I first read this thread. Mostly because if I commented on everything I had an opinion on folks would get really tired of seeing my little name and picture. If I'm not at my j-o-b or in the shop, then I'm absorbing what I can from this place or sharing my own attempts to become an accomplished blacksmith on my blog. In other words: I'm long winded and read a lot. It occurred to me last night though how to sum up how I feel on the subject. I thought it might make some of ya'll smile, if it does the it's worth it. :) You can't please everyone or be everything to everyone. This is just a joke with some truth. A few people have mentioned plumbers, electrician, and a few trades requiring formal education whether in a school or on the job. Maybe a blacksmith is better compared to another label. (And I know this is a family site so..) ****ographer. United States Supreme Court Justice Potter Stewart once said on the subject of what is ****ography - "I know it when I see it" But I dunno.. I think what does it for some people doesn't for others. Some stuff is down right weird. Some is so mundane it barely qualifies. Some is fake and some is cheap. Even the amateur stuff has an audience. I'm a blacksmith. I'm also a brother, a son, and when I became a husband almost a year ago I took some time away from blacksmithing so I could focus on a j-o-b and my relationship...so one day when we're ready I can be a father. I don't think I ever stopped being a blacksmith. I am a lot of things to a lot of people. Ideally one day I can be an ornamental ironwork fabricator to supplement my blacksmithing hobby. Hopefully have a chance to even do it professionally. I just like metal. -
I like the look. I'm working on a horse shoe door knocker myself so I may be partial. Does it slide side to side on the hinge rod? My knocker broke while peening and the repair. I'm considering uses a simular design but I considered side to side play to be undesirable personally. I have some ideas how you may have avoided the problem but would be very interested to know how you approached it. I'm glad you shared. ^_^
-
Mr BrianBrazeal I think I'm on the right track of logic now. I kid you not that it came to me lying in bed this morning trying to get just 30 more minuets of sleep but my mind kept wondering. Imagine how happy I was to see you'd taken the time to explain what hadn't sunk in yet. "Cold shunts" would be that odd thin collared ring of metal that formed inside my first two test slots. I'd previously attributed to male-aligned slots and i nexperienced. I read last night that the plug "takes the path of least resistance"... I've only done small round punches and they even have very small slugs that are popped out.. but for some reason in my mind punches displace metal (to the floor), were as I thought chisels moved metal out of the way. What you're saying is that with your "chiseled punches" is that they have less resistance than a flat punch to make working easier. But when the time comes to either "pop the bubble" or "punch" a nice clean even hole.. then they have just enough resistance to get the job done. No upsetting required because the amount of metal removed is nominal and it avoids what is apparently a problem for folks with a little more time at the anvil as well. If I remember correctly typing isn't your strongest trait so thank you for taking the time to repeat yourself. I should have taken more time to read and reflect before writing off what you had to say. I hope that I can put your advice to use (safely) with the steel I have on hand. Even though it's no fancy tool steel I've had decent results with coke dust and a 5 gallon bucket of water.
-
I think I'm followinging you, to rephrase: the mass of any length of the chisel (past the cutting edge) should not be greater than the mass of an equal length of the thickest part of the drift.. or if the chisel is a rectangle and the drift is a square then they should have an equal perimeter? I've seen that the drift is usually driven through the other side of the hole after the first drift, but completely let it slip my mind when considering this project! I think that is the final flaw of many that make this idea a grade-A flop. I'm still in need of figuring out how to make a hole that has an equal amount of material on both sides, half the the width of the stock.. kinda like the bar just grew past the inserted piece. So I'm not sure the punch is the way to go in this instance. If I knew how to upset the middle of a small length of stock like I'm working with I could probably manage with a punch. I appreciate the link, and have found it informative so far!
-
***Please delete I'm an internet idiot - Greg***
-
I had an idea recently that one could split and drift a square (diamond?) shaped hole with the same tool. But the geometry of such a tool has thrown me for a loop. I'm sure it's rather simple concept to some but I've struggled any advice would be appreciated. Has anyone seen/made/used such a tool? (pictures would be great!) Is there a specific name for such a tool? (Or is it just a chisel when cutting and a drift when drifting?) I'm sure the usefulness of such a tool is highly debatable but I've set out to make one anyways if only as an exorcise. I've had limited success so far and I don't think a lengthy post is desired here, but I've detailed my experiences in my two most recent blog entrees if anyone would like more insight into my questions. PS: this is more of a general blacksmithing question but I don't think it warrants a second topic.. As I understand it the length of the slot to be cut is 2a - 5% ('a' being the width of one of the four sides of the the hole to be punched). In Mr Hofi's blueprint his chisel cut a rectangular hole, less of a 'split'. I'm led to believe I may need to account for the thickness of the chisel as well. Does anyone use any other formula? When I was first approaching this problem I assumed the diagonals of the square would be used to calculate.
-
Hey! That something to really be proud of. Congratulations!
-
Some very good advice. I'm currently reading a few books in preparation. Please don't click unless you're on a super high speed connection but a picture is often worth a thousand words. How many are in this one?!? I want to represent the community in a positive and professional manner so I'm bringing far less tools than I actually use. I hope to show a bit of authenticity through my dress and a feather in my cap. Probably literally.. Question I've never owned a leather apron. A I've seen a lot of demonstrators wearing them. Is this a safety sort of thing or keep your clothes clean sort of thing. I know when dealing with the public other safety gear is a positive thing. I know where to buy one for a cheap price. I don't wanna look just like a green horn in my new apron I'd have to eat nothing but instant noodles for a month so I could buy.. Just to keep my clothes clean. - Thanks
-
Thanks for sharing. I like your hammer but even more so your yard. You seem like the kinda guy that keeps a lot of iron in the fire if you know what I mean. Makes me feel better about starting new projects while my workspace is cluttered. :P
-
That is a great looking knife but you seem to have the same habit I have. I always forget to re-size my photographs! I forget how annoying they are at times. Luckily it let me notice a few deeper looking scratches that may come out during the finishing stage of your knife. (They're near the edge, I'd be happy to send you a picture highlighting where). That being said, I did a small sword recently that once refined I noticed no matter how hard I tried they just didn't smooth over. It looks really good considering I don't own a buffer. I still see them. It was something a lot of people like but far from gold. I hope you have my luck with your first knife. Consider those scratches though. :)
-
I've been lucky enough to have scheduled demonstration gig at the Transportation Museum next month. I've been nervous about working with the public but I'm hoping it goes well for me. I want to have some relative things to talk about with folks. I started researching the model T but haven't found out much about how the front axle was drop forged. I've familiarized myself with the parts to horse drawn buggies and have a few examples of the sort of work that went into manufacturing a buggy along with photos highlighting aspects like joining and tapering. I hope to be able to answer questions regarding the process of moving metal. I'd like to talk as time allows about the historical roll in the community a blacksmith served. The roll blacksmithing played in the industrial revolution. How that roll led to modern manufacturing techniques and finally it's resurgence in popularity today as an art. I would love to offer a chance for folks to step up and swing a hammer but neither of our insurances would cover that! Instead I'll have some registration cards for NCABANA and educational stuffs. If anyone would like some of the buggy resources posted I'd be happy to help out. The demonstration fee I'm charging doesn't even cover gas for the two and a half hour drive. I'm hoping it's busy and my vendor table/tip jar makes up for the night I'll be sleeping in the truck loaded up with a forge, anvil and tools. What other points could I touch on involving transportation? (trains, cars, ect) My problem lies in knowing how to relate what people are there to see (Transportation) with what they're getting (A hot air filled metal worker and blacksmith). I would like to have enough stock to spend most of my time at the anvil explaining simple things like why you use the crosspein first with clay then with steel. Any other ideas that may be helpful to a newbie who's only attended a few public demonstrations himself? Thank you - Greg D. Price Jr.
-
Remember you want to hone to a straight section of the blade the edge still looks uneven I'd fix it while beveling the blade to an edge. Not a perfect edge but an dull edge. Before heat treating. I don't know how well chainsaw chain Damascus hardens and tempers personal. Good luck and draw filing is a lot of work looks like you've had some practice! Walnut root sounds like a well thought out choice have you worked with it before?