

frogvalley
-
Posts
201 -
Joined
-
Last visited
Content Type
Profiles
Forums
Articles
Gallery
Downloads
Events
Everything posted by frogvalley
-

-
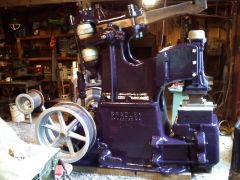
 Fairbanks 25# circa 1905
 -
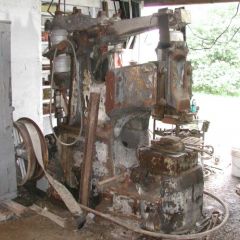 Before.
 -
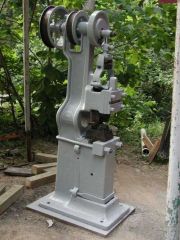
 300 # Bradley Upright Helve Hammer. Its actually Purple.
 -
We went with purple as a final color, with silver trim and drive components. Purple power hammer sounds a bit rude, but there you have it. After a three year project, buying, moving it 300 miles, building an addition to house it, digging a five foot deep foundation, moving the machine inside, cleaning and repainting and this week setting her on her new concrete its been a very long road. Attached is a before and after pic. Soon...
-
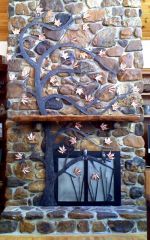 This client requested a fireplace screen with a separate sculpture to place above the fireplace. Here is what I came up with.
© © Frog Valley Artisans, Ltd.
-
 This client requested a fireplace screen with a separate sculpture to place above the fireplace. Here is what I came up with.
© © Frog Valley Artisans, Ltd.
-
Vibration isolation in Power Hammer
frogvalley replied to rambo's topic in Power Hammers, Treadle Hammers, Olivers
The question I have is not how to dampen the vibration, but why? It seems you have plenty of isolation already. The effort and expense involved in MORE isolation may not be worth it. There is going to be an acceptable level, an almost unavoidable level of transfer of vibration with such a big hammer. All of the large industrial hammers I know of shake the ground a bit. Is the vibration causing problems? Would it be easier to isolate the other equipment around the hammer to prevent the vibes from effecting them? -
cant figure this out - hardy holes are not square
frogvalley replied to burnsy the smithy's topic in Problem Solving
Its my 2 cents that someone simply enlarged the pritchell hole on a soft faced anvil. Yup, pass on this one. -
The action of both types of helve hammers, those with full length spring helves and those with supposed solid beams and one end spring or cushion, is virtually identical. Where you put the spring(s) , whether it be one or both ends, makes little difference. The design of the controls and adjustments for the hammer make the primary difference in tunabilty. Ask anyone who has used both a Dupont/Fairbanks hammer with its stroke and height adjustments and a Little Giant without brakes or decent adjustments. Once again, it is my opinion that the reason that we tend to build these using leaf springs is expediency and ease of construction, and the tendency towards lighter frames, hence requiring a more flexible coupling in order to reduce vibration through the frame.
-
I've used hundreds of linear feet of them, they are free in the trash in most cities, plus they get dropped off here by everybody. Oh you're a blacksmith, you can use these. They are hard, but WILL cut fine on a bandsaw if you have a good blade and the right feed. I've never had trouble cutting them. I weld them mostly, but have drilled them, I use Cobalt drills without incident, although they will drill with reg HS drills, it is crunchy. Stock racks, shelf brackets any 1/8 angle projects around the shop. Free is the price, and easy to deal with.
-
A solid arm? Wood is quite flexible and most helve hammers have wooden helves. Granted it is not as flexible as a spring, but it is not iron. A more appropriate comparison of hammer styles is not with the unguided helve hammers, but with a guided helve such as the Bradley's. There are flexible coupling at both ends of the helve, a large series of rubber cushion on one end and a rubber or leather connector at the ram end. I own a 75# Appalachian style and a 300# Bradley guided helve. It is my opinion that the reason for the difference in flexible materials is simply that in order to fully transmit the force from the motor to the ram, a super heavy frame is required, the less flexible the helve, the stronger the frame/body needs to be. Otherwise they would just beat themselves to death and vibrate uncontrollably. One other reason is that in order to make a wider range in your workable heights for the appalachian hammers it is necessary to allow more flex in the helve. Differing work heights and actual stroke length are fully adjustable on a more sophisticated machine such as the Bradley(stiffer helve). My appalachian has one adjustment, a sleeve adjustable crank, but no allowance for stroke adjustment(very flexible spring helve). If anyone has any other information regarding this, please chime in.
-
Two points to consider. One is that alot depends on the actual shape of the edge of your anvil. If its really rounded over like my Peter Wright, its less efficient to fuller over the edge. If your edge is sharper, it'll move more metal. You can't judge this process without setting some parameters for a test. Other wise we're mostly talking anecdotal evidence. Two is that energy is lost during the movement of a hammer at the moment it strikes a piece of work at anything other than perfectly parallel and/or centered strikes. If you balance your hammer pretty well its helps, but since it swings in an arc (assuming over the edge with a little reach) and the stock changes thickness during the hit it is all but impossible to make it hit perfectly parallel, hence some loss through the handle. Even using different hammer methods, ie, Hofi or your own personal style. I prefer to use the edge of the anvil hit straight on for fullering larger stock. That is if its my Fisher with the sharp edge, not on the Peter Wright. Smaller stock I start over the edge and then finish with more control but less efficiency on the face with an angle blow and then finish blows angled another way to make it smooth. Some shapes of stock of course require the horn to fuller them. So much of this comes down to the requirements of the workpiece.
-
Do you want a shaft with the splines outside (male) or a square block 6" long with a 5/8 splined hole inside (female)? I would not try to put accurate splines on a long internal hole, thats more of a job for a shaper that can index and bore out the grooves. External splines are more often rough forged and at least finished by milling , if not cut from the raw stock entirely with a mill. You almost need a milling machine to make a die to form the splines to make a rough forging that you might need to mill for accuracy. Chicken and egg.
-
I agree with Frosty , I'd do a test in a weak acid, acetic acid 5% would be my choice. Of course I have a 35 gallon tank of it so easier done than said. A vibratory cleaner, with some fine abrasive or shot media might work, you could rig something up with a five gallon bucket or a similar soft container with fine media. Oh and sometimes, just sometimes, using a very hot torch just playing over the surface of a piece of iron can heat and pop the scale off. Just be sure to heat very quickly and not too long. I like the idea of a wax resist, though the strength of the muriatic might be a bit much, but I am timid with acid and copper.
-
Mathematics in blacksmithing
frogvalley replied to Ferrous Beuler's topic in Blacksmithing, General Discussion
The ever present math. One of my big projects last year took more than three days total to do the math, and even then a number of calculations occurred on the fly during the creation process. From the most simple math to figure the length of stock needed for a hook, to much more advanced stuff for curved staircases and railings or intricate multi component structures we all need to be reminded how important this is. Creating a simple source for these diverse and often difficult to locate formulas would be a big help to those who are math challenged. Good math takes the guess work out of forging, and for those who are contemplating a full time smithy, math is a very necessary evil. I happen to really dig the technical and mathematical part of metal working. Obviously an artistic flair helps, but if you don't have or can't find or can't do the math, your gonna have problems. Thanks in advance to those of you who have "volunteered" for this task. -
The main trunks of these tree railings are made from pipe. For these pieces I cut an almost full length piece out. I measure the pipe to get me close to final size, then mark and cut the wedge with plasma. Next I grind the edges and put back into the forge. I close the gap using forge, anvil and round grooves on swage block. Next I tig weld the seam closed. Basically I then have a very long funnel. I reheat and forge to shape, often adding a texture or curves to make the trees that are a staple of my work. I weld on a solid top section that might be 6 feet long. For the ones that have "root" or "trunk" bases that are thicker, I actually taper the tops, then cut and add pieces to the bottoms. and of course there is always the cattail cobs made from pipe.
-
Of course the snails are named "Gary". Its a sponge bob thing.
-
these are the small ones made from 1/4" stock. I make them in various sizes of stock, and each one is a different shape. 1/4" makes it easy for demos, takes under 5 minutes, 4 heats or so, practice it a couple of times. Make sure they sit up and are well balanced. Again the order to make one. Start with a long piece of stock say three feet. Heat about 6 inches of the end, start a tight coil by bending a tight tiny starter bend doubling back on itself. Heat again if necessary. Next bend about 2-3 inches of the end into an ell then begin rolling in down on itself. Heat and roll until the coil is about 1" to 1-1/4" or so. Heat about 5" of stock behind the coil, use the cut off hardy to cut off at that 5" from the coil mark. Grab the snail shell firmly, heat the 5" straight section again, flatten until its about 1/2" or so wide, flattening right up to the coil. Using the cut off hardy again, cut through about 3/4 " of the end of the flat section. Heat it again and work the eyes to desired finish. Now comes the finish. Do this in one heat, most people won't guess what this is until you actually do this last step. Heat again, then bend it back on it self starting at about 3/4" to 1" from the coil, hammer lightly until flat. Do this step while grabbing it with tongs by the eyes, tugging upwards as you tap it to shape, thus giving the eyes the right upturn and the body, foot and shell the right flat shape. Reheat and adjust as necessary and clean as desired. I wire brush while hot, then quick quench for steamy effects, after double checking it really quick to be sure its cool, I then hand it at the end of the tongs to someone in the crowd. I tell them its a racing snail, from 2000 degrees to room temperature in 10 seconds flat. Well from 1500 anyway. You can get real crazy with them, you can point the snails tail, you can take the time to draw out the eyestalks to fine points with little ball ends, your can flatten and cone the shell...take it as far as you want. Keeping it simple and taking it to the stage shown in the pictures takes 5 minutes, but you can spend a half hour on one if you want. Tell them about each of the stages, bending, drawing if you draw the inner point first, coiling, flattening, cutting, splitting and more bending. Talk to them about the temperatures involved. But I find the give away value tremendous. People of all ages, from 5 - 75 yrs old really like getting one of these things.
-
While all of the above projects are interesting to many, my experiences in doing demos makes me lean towards leaf key chains and animals rather than hooks or other hardware. My most popular demo is the snail. 1/4" rod, I work from a 6 foot piece of stock. It takes a total of about 12". I heat the end, coil it till its about 1-1/4" then I leave 4-5" piece of stock beyond the coil and I hot cut on the hardy. I then flatten this section. It is to become the slimy part or foot. After its at least 1/2" wide, use the hardy again to split 1/2" of its tip or end. This split will be the eyestalks. Dress these by hammering to shape. Heat the flat part again and fold it in half, doubling it back on itself, making sure the coiled shell sits in about the middle of this double/folded foot. The eyes are then on the other side. Make sure it sits flat, and the eyes are up and you are just about done. Total time should only take 5 heats and five minutes or so. Brush while hot. Quench, dry, hand to the first person that guessed what you are making and you'll have them standing 20 people deep. Talk to the people about what you are doing, tell them each step as you go. Lady smiths please forgive this remark but its true- chicks really dig this demo. I'm serious about that. Every one likes this one, but the girls will giggle and more. From ages 5 to 75 - It works every time. Hardware can be interesting to guys, but the girls like animals. Both will like to see the process, but this is a crowd pleaser for all ages. I usually give these snails to the young ones or cute ones or just whoever is most interested. Parents usually buy another item if you give their kid one of these. However, I can make a snail every 4 minutes. Thats up to 15 and hour. At $10 each retail, I even make money wholesaling these to galleries. So giving away a bunch is great marketing and not costly. Someone once told me that if I "brought life" to my work, by creating objects that look alive or flow in a natural way, I'd sell tons. Its true for me, the inanimate stuff dribbles out-hardware and the like. But trees, birds, snails and the like all do very well for me in singles and in my sculpture work for galleries.
-
My 200# dated 1919 has them. My 40# with no date does not.
-
Those forges are very cool. Definitely fix it if you can.
-
There are other higher temperature reading pyrometers out there including many hand held units like Multimeters for electrical work. While I don't often need to be that accurate in my work, we use pyrometers for the kilns in both the pottery and glass work that my arts group does. All of them read way over 2000 F. Heating objects in a molten liquid is a great way to transfer heat, much better than hot air in the standard forge fire. There is one danger if you overheat the liquid salt of course, you release chlorine gas, forming dilute hydrochloric acid and sodium. I've worked on wood fired salt kilns for glazing pottery, the sodium being the chemical we wanted and chlorine just the bi product. Chlorine of course is pretty toxic and the sodium can be reactive. Correct me If I'm wrong.
-
tools to clean those hard to get at bits!
frogvalley replied to aaronbear's topic in Tools, general discussion
Rinse in water, or for large pieces with lots of nooks and crannies, I pressure wash then dry as quickly as possible. If left to air dry slowly there is a slight surface rust that shows up. After the pickle bath and rinse/dry, I usually brush with wire on a wheel or by hand to polish a bit. I have a blast cabinet, but rarely use it. Tumbler or pickle or just plain wire brush are my first choices. Of course, who said you gotta clean all the nooks and crannies? -
My spring swages are made for my power hammer and my anvil and require 1/4 inch stock. Over time the 3/16 seem to lose its spring under the power hammer. If you are making them strictly for hand/anvil work 3/16 is fine, but for dual or power hammer work use the 1/4