

metalmaster1766
-
Posts
160 -
Joined
-
Last visited
Content Type
Profiles
Forums
Articles
Gallery
Downloads
Events
Everything posted by metalmaster1766
-
Oil forge design help
metalmaster1766 replied to MetalMuncher's topic in Induction Heating, Oil forges, etc
Sorry for hijacking your thread metalmuncher, I'll try to make it short and add a picture of my oil fired forge OddDuck, I like the idea of using the flange that way and adapting it to a reverb, I think I have a few of those flanges of different sizes laying around, when I get my newest forge finished I'm gonna hafta start experimenting on an oil burning reverb. here is a link to my newest construction, gonna line the inside with fire brick having a 3 inch wall thickness and a 10 inch inside diameter, gonna be oil fired as well. I'll start a new thread on this when I get back to working on it. and here is my oil burning forge with propane preheat and it did run only on propane before this year Ron -
Oil forge design help
metalmaster1766 replied to MetalMuncher's topic in Induction Heating, Oil forges, etc
I am also a BYMC, I go by Ron Smith over there so that makes 4. I haven't been able to do much in either casting of forge work for the past year, but I do get a little bit done every now and then Matt, I built an ursutz type oil burner years ago and I had nothing but trouble with it, I tried a few different designs and I gave up on it after about 6 to 7 months of working on it Ron -
Oil forge design help
metalmaster1766 replied to MetalMuncher's topic in Induction Heating, Oil forges, etc
MetalMuncher, I have built a burner similar to that one, well that's where I got the idea, anyhow I made a few changes as I used whatever I had on hand to build mine, but as for the oil line, I did however cut my oil tube to about 1-1/2 inches short of the burner tube/pipe and it works just fine. Can you get a longer piece of tube/pipe ? if not then how about cutting a bit off the end of your burner tube/pipe, or try it as it is now being 3 inches short of the end and see how it works, then cut a bit off and try until it works. Mine is adjustable and I could possibly move it so it is up inside the end by 3 inches and see how it works, but it may take me a few weeks to get all the stuff moved away from my forge as I have been reorganizing my workshop for the past few months. Good luck, and it took me a few weeks of fiddling around with mine to get it to work properly, I tried gravity feed, then about 20 psi of air pressure, and that is where I have found it to work real good is with a bit of air pressure pushing the oil in, I preheat with propane and after about 5 minutes I start turning on the oil, once the oil is starting to burn I turn the oil up and the propane down until it is running on oil only. Another thing, if you can use flare fittings on all oil lines as they are less likely to leak over compression type fittings, which I only used temporarily until I could replace them with flared fittings, also buy a tubing flare kit. If I can find my pictures and video's I will post them as well one day real soon. Ron -
pattern welded langsax (first short sword)
metalmaster1766 replied to kevin (the professor)'s topic in Swordsmithing
Very nive, I really like that, it has been a while since I have used my forge to make anything but a few hooks, but I think it's time I fire it up and make me a sword kinda like that one, plus the weather is getting colder so I wont freeze whil doing it Thanks for sharing that one, I gotta have one like it now Ron S Smith -
here is a post vise stand i made a few years ago, i used a semi truck brake drum, welded in a 4 inch diameter pipe as tall as the vise, then you can see a smaller diameter pipe welded in so the vise leg wont move around i fill it with sand, lead, or anything with lots of weight, i havent done it yet but i plan on making it so i can bolt it to the floor using the lug holes (for doing those bends that make the vise wanna move in circles) i just need to pour a concrete pad and put some studs in it before the concrete hardens works purty good for me, here is a picture Ron
-
i have cut several propane tanks with no problems at all if you have any fear of it at all, dont do it after taking the valve out, fill with water along with dish soap, refill several times, let sit several weeks before cutting i did an experiment once, after rinsing with water several times, i threw a lite match into the valve hole to check for flammability, it did shoot a small flame straight out the top and made the woooooofff sound, nothing to get excited about again most times i use a grinder and cuttoff wheel to cut tanks with, i leave the tank filled with water while cutting do at your own risk, dont take anyone's word for it that it is safe, because anything can happen Ron
-
very nice work, i love it Ron
-
for your 2nd rose, i say great work, that turned out terrific i dont know if you posted a picture of your 1st rose, if so i missed it keep up the good work, your your worst critic, lighten up you do beautiful roses Ron
-
exactly what i did, cut a hole a bit smaller into a steel table top with wheels, a let the brake drum sit up high enough so i could stack firebricks around it and make it as deep as i want i dont have any good pictures of it, but here is the only pic i do have of it, all you can see are the bricks stacked up to make the fire pot about 5.5 inches deep, it is 3 inches without the bricks there are 10 bricks laying on top to deepen the pot, take them off and the bricks under them are even with the top of the brake drum, they rest on a 26 inch square steel table with a hole cut in it for the drum if you like i can try to get a few better pics of it, i may go and get some later today anyway seeing how i cleaned everything off the top of it last week Ron
-
Phase Converter
metalmaster1766 replied to David E.'s topic in Power Hammers, Treadle Hammers, Olivers
i built me a rotary phase converter a few years ago, it is just a 2 hp motor, they work great and are very easy to build, mine cost me about 2 hours worth of time to assemble, that was after collection the capacitors, which i got from old outside central A/C units i plan on building a bigger one someday the thing about a roto phase is, you idle motor, which is in fact the phase converter itself, can run whatever size motor it is - if you get a 5 hp 3 phase motor and turn that into your roto phase (thats what i call them) you can run a 5 hp machine with no problems, now say you have 4 machines all with 3 phase motors, 1 or them is a 10 hp motor, you can run that by turning on the roto phase (5hp) plus starting another 5hp motor and let it just idle, then you should be able to turn on and run a 10 hp motor and run a full power the hp adds up with all the idle motors thats why i need a bigger roto phase, mine is 2hp i have a 7.5 hp cutoff saw, i hafta turn on all the 3 phase machines and let them idle so i can get my saw to work, i onl;y have 1 other 2hp motor and several 1hp motors, so i hafta turn my roto phase on, then the 2hp motor, then 3 other 1hp motors to get the saw to work, it just about max's out my amps by doing this, but it does work you can buy one for several hundred dollars, or build one for cheap, and if you are good and resourceful at collecting things, you could build one for less than $25 maybe even free (like i did) oh yeah, most small motors (like my 2hp) doesnt need a start up capacitor, most (not all) will start to turn just by adding the 2 single phase 120v power to it, then you use the capacitors to even out the 3rd leg of 120v to as close as the others as possible bigger motors need the startup capacitors, or a pony motor and belt to get the bigger motors to start spinning, you can use a pull rope to start it spinning and then turn on the power, then is will start up, ill look for the link i have about them, the guy lives here in Cincinnati, he sells a disc on ebay on how to build them, it is like $2 and he can email a down loadable file or for $5 he will send a C/D he also will help out as best he can thru email if you have problems building one i bought him breakfast (from Mcdonalds) and he gave me a disc, has lots of info on them i would try to send it to you but it has some type of copy write thing that makes it impossible to do Ron -
irnsrgn thank ya very much for that bit of very useful advice, i was thinking of an easy way to drill holes, that sure sounds easyer to me than a big heavy mag drill Ron
-
thanks for the ideas irnsrgn i really like the holes in the table top, think that may be the 1st thing i do to it, along with a few nuts on the bottom side i had planned on doing something to the bottom, those shelves are full of sand, stones, mud and a bunch of other unwanted stuff still undecided about cutting it in half Ron
-
this table didnt follow me home, it just showed up one morning oh i knew it was coming, i just didnt expect it this soon, what a surprise, was woken up early a dew days ago to a loud crashing sound, so's i commenced to looking out all the windows, when i get to the front window theres my friend rolling the table up my driveway about the table, it is just a few inches shy of being 8 feet long by 4 feet wide, the table top is 1/4 inch thick, it has some very nice wheels to move it around its just a bit to big for my shop, im thinking maybe to shorten it to about 5 - 6 feet long, unless i can better organize my shop, then ill leave it alone or maybe cut it in half, make it so's it can be put back together rather easy for those big jobs that i know will happen as soon as i cut down be like dadgum i wish id'a left this thing alone Ron
-
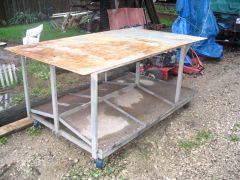 it is about 4 feet wide by 8 feet long table with wheels 1/4 inch top
 -
i dont use a blown burner in my forge, but i do use a blown burner in my large foundry furnace, i think its a 1.5" burner pipe, .25" orifice for the gas at about the same pressure you use, 1-2 psi i can run mine for about 8-10 hours, i have set it in a shallow pan of water to keep from frosting up, i also have an old waterbed heat i was gonna try next time i need to run the furnace for that long, not sure if it will work or not Ron
-
i was gonna say almost this same thing carbide tooling is great, when used at hi speeds, HSS is more versatile, i like the quick change tool post because setting a lantern type tool post with each tool change can get rather bothersome, i still use one all the time, mainly depends on the job im doing, i use whatever i can for HSS bits as well, broken taps, center drills, some drill bits, i just make a tool holder to hold a round HSS broken tap and sharpen to do the job another thing about a lathe is its versatility as well, with a bit of experience and imagination you can machine all sorts of parts Ron
-
i made it, the pattern welded billet that is, its mainly for show, made from 1060 steel thanks everyone
-
after a little over a year, i decided to finish this dagger, mostly i had the handle to do, so i whittled something out of a few pieces of wood i found, wasnt what i was after when i started, but this is how it ended up the handle is 3 pieces of wood, i think the guard is a bit large, and i wish i would have made it of metal oneday, maybe ill change it the blade 8 inches long, is made up of approximately 160 layers of 1060 steel, i started with 11 layers 3/4" by .045" by 8 inches long, forge welded together and folded 4 times here's a few pictures Ron Smith
-
ok i did a search, all i can come up with is that the only bandsaw blade that is 15n20 is 4 - 6 inches wide i have some, 1", 1.25", and 1.5" wide blade, about 1-1/2 TPI all i know about it is, is was all from a wood cutting bandsaw i havent had time to do any spark testing, but i think ill grind/cut all the teeth off before trying to forge weld together if it appears to be a bi-metal blade anyone have any idea what type material these blades are? thank you very much Ron Smith heres a picture of the blade
-
get the mortar out, and the borax, that causes it to flux at high temps just use fireclay and sand, 2 parts sand and 1 part fireclay has worked for me, make sure you let it cure, then fire it, heat it to about 2000 degrees and hold it there for a bit, its a lot like ceramics (refractory that is) Ron
-
thanks again, i should be able to get it in working order for him Ron
-
thanks Finnr, i can see from that picture much better than the rest, any more pictures would be greatly appreciated i dont think much is missing from this vise, just the foot pedal any ideas about the rack gear on the pedal side? thanks again Finnr Ron
-
i have a friend that has a vise exactly like Rich's vise, posted by Jerry Carrol back in 2005, i think he called it a foot vise, its missing a few parts for the foot pedal, anyone have or know of any pictures of one? the pics on that site DONT show it from the side id like to see, just like to see it from the opposite side for the foot pedal linkage, here is my friends vise for all i know, this could be the same vise, my friend bought it at another friends auction that has since passed, i believe he bought it at quad state in 2005 or it could have been 2006 any help is greatly appreciated, all my searchs have turned up empty Ron
-
i have an old Wilton vise, i haven't weighed it, but id guess its over 150 lbs, the jaws are 8" wide and it opens up to almost 10", i don't have a picture of it since it has been mounted, but it is on a cast iron base (from an unknown machine) and looks right at home Ron
-
after i had to quit work, i missed it so much i made me a lathe just so i could make chips again, anyway, i built the Gingery lathe, made all the patterns and saved all my pop cans, all the aluminum castings are 100% popcanalloy the little lathe just takes up valuable work bench space and collects dust now since then i was able to get a 1895 Leblond 18" lathe, its missing 2 gears for threading, one day i will make the 2 needed gears, this lathe is very very accurate, only thing i dont like about it is, it just runs to slow, im not sure what the fastest speed the spindle bearings can take, but maybe some day i can get a few more RPM's out of it i called Leblond and asked if they had any information on it, all he could tell me was the year it was made and that it is really a 20" swing, even tho it has 18" cast right into the headstock Ron