

Trilliumforge
-
Posts
59 -
Joined
-
Last visited
Content Type
Profiles
Forums
Articles
Gallery
Downloads
Events
Everything posted by Trilliumforge
-
Hi everyone, I'm looking to buy my first gas forge, and I'm looking for some advice and opinions. I'm considering the NC Whisper Baby or the Whisper Delux 2-door. I'm mostly planning to use it for small stuff (I'd rather do my welding and big stuff in the coal forge), but there's only a $45 difference between the two. The Baby is smaller, but I also think it'll have better fuel economy. Any advice?
-
Portable Blacksmithing Toolbox
Trilliumforge replied to Trilliumforge's topic in Tools, general discussion
Weight was my primary consideration. I actually have it down to 30lbs, without having lost much. I took out some of the rivets, files, and punches, but I added in a tool belt and a rawhide mallet. I'm thinking of replacing the toolbox with some kind of cloth bag, but it's a matter of finding a bag the right size. -
 What did you use to seal the edges?
 -
Portable Blacksmithing Toolbox
Trilliumforge replied to Trilliumforge's topic in Tools, general discussion
Thanks for the comments everyone! David: Thanks! I carry it around in a standard metal toolbox, which still has lots of room left in it. I think I'll have to get some cock-grease for it now too... -
Hi Folks, I've just finished an article for the OABA newsletter, and wanted to share it here. I posted a partial version of this a little while ago, but here's the final version. About a year ago, we had a demonstrator cancel at the last minute for an OABA meeting, and I was asked to fill in. I had none of my tongs, hammers, punches, or other equipment, and I found it very awkward to use the ones in the shop. There was nothing wrong with the shop or its tools, it just didn't have the kinds of things I was used to. The demonstration was more or less successful, but not quite what I would have liked. After that, I decided to put together a portable set of tools that I could keep in my car for demonstrations. Over the last year, my toolbox has gone through several changes, both in its content and in the ideas behind it. Its still a work in progress, but I thought I'd share where this project come to so far. If I had wanted a set of tools to do one demonstration, I could keep it pretty simple. If I went to a shop that had a forge, and anvil, and some steel, I could do several demonstrations with only a handful of tools. For example, a demo for a bottle opener would require a hammer, a pair of tongs, and a punch/drift. For a pair of tongs, I would need a hammer, a punch, a chisel, a rasp, and a rivet. I think with these sets I could do the specified demo, but if I wanted to work on something else I would need to look for other tools. If I was going to be demonstrating for an afternoon at a public event, I'd like to be able to work on whatever took my fancy. So, what I would like this tool box to be able to do is: · Hold sufficient tools for several and various demos · Contain most of the tools I might want to work with when borrowing someone else's forge · Have most of the tools I might need for any surprise projects or repairs whenever I happen to be. However, I have two constraints I want to stick to: · These tools must fit in the tool box I have decided to use for it · The toolbox must weigh less than 40lbs total. The tool box, on the left, is one I picked up at Iron in the Hat a while back. I could fit a lot more in another toolbox, but this one fits pretty well in my back seat. The weight constraint is a bit arbitrary, but after lugging that thing around when I had it completely crammed, I think that 40lbs is probably as much as I would want. There was also the problem of over crowding the toolbox. I've had times when I just spent too long hunting through a crammed box trying to find the tool I was looking for, and when I was done it was a jigsaw puzzle to put everything back together. So, with that in mind, I have reworked my tool box to give me the widest range of options while still keeping the weight and the clutter down. This is still a work in progress, but I think I’ve got a pretty good set so far. Toolbox Contents 1 and 3: V-bit tongs Two sets of v-bit tongs, useful for round or square stock from 1/4" to 3/4", and not too bad on stock up to an inch, or on a lot of bar stock. I find these to be my favourite style of tongs because of their versatility and stability. 2: Farrier tongs All around useful tongs, especially for bar stock. I also find them handy to smaller twists and picking up sheet metal pieces. 4: Collapsible Coal rake/poker I like having a very long coal rake, because I find that when I lean over the forge to pull more coal towards the centre, I tend to light my head on fire. After a few times, you start to think of alternatives. It's also handy for poking the forge or saving yourself from a bit of extra back strain. 5: Slice Great for most of my forge maintenance. Helps for pulling clinker, raising up the coals, or for digging through to find that one piece that was too short and got lost. 6: Twisting wrench I made this by welding a piece of scrap onto the end of an adjustable wrench. The two handles make it easier to twist whatever you're working on and keep it straight. 7: Cross Peen Hammer I use this hammer for pretty much everything. It’s a 2-1/2lbs cross peen hammer with a nice long handle. I’ve changed my hammer for this toolbox several times, and have no problem changing it up when the fancy takes me, but I think I’ll stick with cross peen hammers for this toolbox because of their versatility. 8 - 9: Files and rasp I find that a heavy farriers rasp, a rough square file, and a rough round file do pretty for most jobs I might do at the forge. I might include a half round file or something thin to get into small places. 10: Golf ball This is the handle for the files (8-9), and it works very well. I drilled a few holes in it of different sizes, and it fits most file tangs. 11: Small swage block I have one of the small swage blocks from John Newman, and it works very well, but it would be too much weight for the toolbox as I’ve planned it. I made this small block for minor jobs and for supporting bundle welds. 12: Needle nose pliers Handy for little tweaks. I might replace these with heavier scrolling pliers. 13: Heavy flat bristle brush I find these work better and last longer than the softer wire bristle brush. The flat steel bristles are far more aggressive, and remove scale much easier. 14: Drift This used to be a punch, but these days I find it's better to have my punches and drifts as separate tools. I forged this one out of 4140, and its been working very well for me. 15: Ruler Useful when trying to measure distances using standard and common divisions of length, such as inches, or perhaps centimetres. Larger units of measurement may require math (not pictured). 16 and 17: Short punches and punch tongs When I started trying to bring the weight down in the toolbox, I took a look at the number and size of the chisels and punches I had. Most of my chisels and punches were about 6” long, which added a lot of weight to the toolbox. I decided to make a set of short punches, like ones I’ve seen before such as this one http://bit.ly/10oeb1m. I wanted them to be simple and simple to hold, and to not slip or move in the tongs that held them. What I came up with was slightly flattening the side of the punch and putting a round divot in the main body. I then made a pair of tongs just for holding the punches which has an angled jaw for holding the punches, and a wing bolt that I can adjust up and down to sit in the divot to hold the punch in place. The jaws of the tongs are forged from an old crowbar, and the handles are mild steel. I used mild steel for the handles because I wanted to be able to use the back of the handles as a set of fullers for pinching down pieces from the top and bottom simultaneously. I've been really happy with this set of punches so far. These are all made out of 2" of 3/4” 4140, and together weigh less than one of the punches I took out. I feel there will be many more to come. 18: Centre punch Very handy, especially if I have to drill anything after forging. This is much more convenient as a thin long punch, so I doubt I'll replace it with a shorter one. 19-20: Hot cut chisels Nice thin hot cut chisels. I have a few short chisels in with the punches, but I wanted to keep two long chisels in the box. The first one is just a flat chisel, and the second one is for slicing a hole through a bar. 21: Leather glove and Safety goggles (not pictured) Usually just for my left (non-hammer holding) hand. I don't normally wear gloves, but sometimes its handy. As for the Safety goggles; Never forge without them 22: Earplugs For not hearing with. 23: Anvil Devil I used to have a hot and cold cutting hardie in this box, but they didn’t always work in other people’s anvils. Fred Johnson told me about the Anvil Devil he had picked up at CanIron VIII, and how it worked as both a hot and cold cut, and had held up very well. I picked up one from Canadian Farrier Supply in Orangeville for about $6, and so far its working just great. This is the perfect tool for a portable box, as it took the weight down by three pounds while not losing any functionality. 24: Touch mark I made a touch mark a while back by simply notching a standard letter punch. Those interested in learning which letter I chose could consult my name for a clue. 25: Chalk There is usually a busted piece of chalk or two somewhere in the toolbox. Generally handy, and much more reliable than paint markers and silver pencils. 26: Rivets Various rivets in an unfortunately round container. Looking to do better. 27: Borax There are some welds that the Iron Mountain isn't great for, especially bundle welds, so I like to keep some ordinary borax around as well. I like old pipe tobacco tins for this, as they're pretty good at keeping moisture out. However, again, it's not the best shape for saving space, so I'm looking for something better. 28: Beeswax A simple finish for a lot of pieces. I keep it in a ziplock bag just in case it gets too hot in the car. 29: Iron Mountain flux An anhydrous borax flux with powdered iron for filler. Makes for some pretty easy welds, but if you're not carefully it can also lead to bad habits. Okay, that's it! If you have any suggestions that might help, just drop me a line at oabaeditor@yahoo.ca. If you’d like to take a look at what I’ve put together, just ask next time you see me at an OABA meeting. Sean Stoughton
-
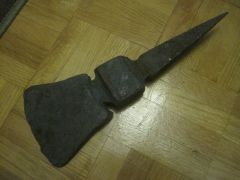 I spent two hours trying to make this axe head out of 4140, then realized that it was completly fractured at both of the fullering spots. Not trying that again...
 -
Hi folks, I have a cheap "anvil" (cast steel block that is vaugly anvil shaped) that I picked up a while back, and I've been trying to make some improvments. I've spent some time putting a point on the horn, but I still have a big problem with the hardie. It's supposed to be 1", but its a very poor casting, and I can't get any of my hardie tools into it. This is an anvil I use with my tiny home made gas forge, so I can't make new hardies to match, and I really dont want to have to remake all of my other hardies (all at 1"). So, my question is, is there any good way to open up a hardie hole? I can't really get files down into it, and even if I could I'd be filling forever. I've thought about throwing the whole thing into a forge and pounding a drift through, but I'm a little nervous about that. Any suggestions?
-
Update! So I went ahead and made the tongs. They work much better than anything else I've tried. The v side holds the various shapes of the punches securely, and the bolt sits in the round notch on each punch and stops it from sliding out of position. I forged the jaws out of an old crowbar, and the reins out of mild steel. The reason for the mild handles is that I wanted to use them like a top and bottom fuller; just put the piece in between the reins and just pound. This let me take the vice grips, old punch holder, and and old spring fuller out of my toolbox. I think this is what I'm going to go with. Thanks for all the suggestions! Sean
-
Okay, I made a larger bolt for the top that is much easier to tighten by hand, or by holding the punch in the pritchell and tapping with a hammer. I tried it with a wing nut to work as a jam nut, but it didn't make any difference. I'm starting to think that I'm just going to bite the bullet and make some holding tongs...
-
TheFullSmokingBar: I like that idea! I'm thinking of making a new handle like the one I've already made, but with flat bar for the handle instead of square (more grip when tightning), getting a wing bolt for the bolt, and putting a wing nut on it below the head of the wingbolt. I'm going to try that before I start thinking about tongs. Bob: I don't quite follow you... are you saying the handle should be a threaded rod? John: I've seen those, but I'm trying to not make an extra pair of tongs for my portable kit (I have it down to three). I've also used ones like that before, and I just don't like how much the punches can turn. Perhaps I could make them hexagonal... windancer: will do! When I write my article about my portable tool box, I'll post that too. I have a list and image of it's contents so far, and I'm always looking for suggestions for improvment there too. http://www.iforgeiron.com/gallery/image/37072-img-1159-copy/ yesteryearforge: What kind of punch handle? Do you have a link? I couldn't find anything on their websites. Thanks for the suggestions everyone!
-
Hi all, I've been working on a portable tool box, and I'm doing everything I can to keep the weight down. One of the things I've done to help this is make a set of chisels and punches that are made from 2" of 4140. Each one has been slightly flattened, and had a round indent put into the side, so that they can be held in the special "wrench" I made for them. They work very well, and I like the idea, but I'm having a few problems. When I use the punches in the wrench, the bolt that I use to tighten them loosens off after a few hits. I'm looking for either a way to make this more secure, or a new holder that could do a better job. I've tried using another pair of tongs from my set, but the punches slip in the jaws. Vice grips work, but are a little bigger than I'd like, or too small to keep my hand away from the heat. I've seen similar punches that have an indent all the way around, but I don't want my punches to turn or spin. I also would rather not dedicate a pair of tongs to these, as that would be adding a lot more weight to the box. Does anyone out there have any suggestions? Thanks! Sean St.
-
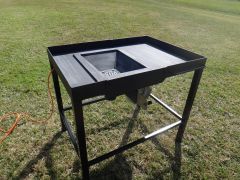 I'd suggest making the wheels detachable, so you can use it inside or out.
 -
That's a very slick unit you've put together! Are you going to add on any kind of chimney?
-
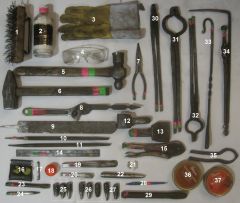 For an article I'm working on for the next OABA newsletter. A tour of my portable blacksmithing set, and where I want it to go: 1: Heavy flat bristle brush I find these work better and last longer than the softer wire bristle brush. The flat steel bristles are far more aggressive, and remove scale much easier. 2: Iron Mountain flux An anhydrous borax flux with powdered iron for filler. Makes for some pretty easy welds, but if you're not carefuly it can also lead to bad habits. 3: Leather glove Usually just for my left (non-hammer holding) hand. I don't normally wear gloves, but sometimes its handy. 4: Safety goggles Never forge without them. 5-6: Hammers I use these two for most everything I do. The ball pein is about 2.5lbs, and the cross pein is about 3lbs. The first was a crappy hammer from the surplus store that I reforged and gave a new handle, and the other was one my dad found on a runway in the 70s. 7: Needlenose plyers Handy for little tweaks. I might replace these with heavier scrolling plyers. 8: Twisting wrench I made this by welding a piece of scrap onto the end of an adjustable wrench. The two handles make it easier to twist whatever you're working on and keep it straight. 9 - 11: Files I find that a heavy farriers rasp, a rough square file, and a rough round file do pretty for most jobs I might do at the forge. I might include a half round file sometime later. 12 - 13: Hardies Cold cut and hot cut. These are both really handy, and if they don't fit the anvil of the shop I'm at, they can also work well just clamped in a post vice. 14: Ruler Useful when trying to measure distances using standard and common divisions of length, such as inches, or perhaps centimeters. Larger units of measurement may require math (not pictured). 15: Vice grips Useful, but I may replace them with a smaller pair. I mostly use this to hold the short punches (25-27), so it's not one I'm positive I need in this box. We'll just see. 16: Earplugs For not hearing with. 17: Touchmark I made a touchmark a while back by simply knotching a standard letter punch. Those interested in learning which letter I chose could consult my name for a clue. 18: Golfball This is the handle for the files (9-11), and it works very well. I drilled a few holes in it of different sizes, and it fits most file tangs. 19-20: Hot cut chisels Nice thin hot cut chisels. I've made a lot of short punches recentally, but even if I make some short chisels I'll still keep one with a handle for cutting through thicker peices. 21: Chalk There is usually a busted piece of chalk or two somewhere in the toolbox. Generally handy. 22: Drift This used to be a punch, but these days I find it's better to have my punches and drifts as seperate tools. 23: Curved chisel Mostly for making decorative curves. I don't use it much, so it might be one I eventually take out of this set. 24: Centre punch Very handy, especially if I have to drill anything after forging. This is much more convenient as a thin long punch, so I doubt I'll replace it with a shorter one. 25-27: Short punches When I started trying to bring the weight down in the toolbox, I took a look at the number and size of the chisels and punches I had. I've seen similar sets of punches and chisels, such as this one http://bit.ly/10oeb1m, and I've been really happy with them so far. These are all made out of 2" of 4140, and together weigh less than one of the punches I took out. I feel there will be many more to come. 28: Silver pencil A little clearer than chalk, but not as easy to replace, unless I'm in Princess Auto on a day I remember to buy refills. So far this has not happened. 29: Cold cut chisel Deffinatly handy, and deffinatly going to be replaced by several new short punches. It's nice, but it's too heavy for this set. 30: Farrier tongs All around useful tongs, expecially for bar stock. 31-32: V-bit tongs Two sets of v-bit tongs, useful for round or square stock from 1/4" to 5/8", and not too bad on stock upto an inch. I find these to be my favourite style of tongs because of their versitility and stability. 33: Slice Great for most of my forge maintinance. Helps for pulling clinker, raising up the coals, or for digging through to find that one piece that was too short and got lost. 34: Collapsable Coal rake/poker I like having a very long coal rake, because I find that when I lean over the forge to pull more coal towards the centre, I tend to light my head on fire. After a few times, you start to think of alternatives. It's also handy for poking the forge or saving yourself from a bit of extra back strain. 35: Spring fuller Not sure about this one. It's handy for a lot of differnt tasks, but I'd like to figure out something else that's a little more multipurpose, and not just a bit of scrap that I banged out when I was in a pinch at a demonstration. 36: Rivets Various rivets in an unfortunatly round container. Looking to do better. 37: Borax There are some welds that the Iron Mountain isn't great for, especially bundle welds, so I like to keep some ordinary borax around as well. I like old pipe tobacco tins for this, as they're pretty good at keeping moisture out. However, again, it's not the best shape for saving space, so I'm looking for something better. That's it! Sean St.
 -
Asking for suggestions for my new axe
Trilliumforge replied to Trilliumforge's topic in Axes, Hatchets, Hawks, Choppers, etc
Thanks everyone! I took a few more pictures of the axe head. It still needs to have an edge put on it, but I'll do that when I'm done with the rest. http://s8.postimage.org/qlg19ji91/IMG_0631.jpg http://s8.postimage.org/l3iu7zxnp/IMG_0630.jpg http://s1.postimage.org/vfvcf5i1r/IMG_0629.jpg http://s7.postimage.org/simqfqluj/IMG_0628.jpg I think I have my plan for the inlay (like this: http://s9.postimage.org/50eol0fe7/IMG_0618.jpg), but I'm really curious about what people would recommend for a colour for the stain to contrast the heavy copper. -
Hi folks, I'm working on the handle for a new axe. It's my second attempt at an axe, and I'm pretty happy with how this one went. It's forged from a single piece of 4140 (scrap piece from the metal supplier). I'm going to do some copper wire inlay in the channels I've cut into the handle, but I'm not sure what colour I should stain it before I do. I'd like something that contrasts with the black steel and the copper. Any suggestions? Part of me is thinking blue, or a medium brown that leans towards yellow. Let me know what you think!
-
Looking for suggestions for my coffee can forge
Trilliumforge replied to Trilliumforge's topic in Gas Forges
Quick Update: In an attempt to foolishly push limits, I tried welding in this forge.... and got it! I got a very light weld on two pieces of quarter inch, using Iron Mounting forge welding flux. I didnt really forge it in, but the weld was strong enough that I was able to pull the two bars apart without breaking the weld, and I had to do a fair bit of yanking to get it to fail. Who would have believed it? -
Looking for suggestions for my coffee can forge
Trilliumforge replied to Trilliumforge's topic in Gas Forges
Hi everyone! Forge update: I picked up some kaolin and zircopax from a local pottery place (in Kitchener, Ontario), and plastered the inside of the forge. Using the same torch, I was able to get a hacksaw blade up to a welding heat! Not muich, but hey, its an improvment. I ran some tests with a 1/4" square s-hook I had made way back when, and here are the time/colour results: 1 min: Mostly red 2 min: orange 3 min: bright orange 4 min: orange / yellow. Again, not crazy, but should be good enough for heat treating, small jobs, and annealing copper. Any other tweaks you guys could recommend? Can't think of what to do for a door... but would a door help? Updated photo: Updated video: http://youtu.be/VCJ9N0P68sQ SEan -
Looking for suggestions for my coffee can forge
Trilliumforge replied to Trilliumforge's topic in Gas Forges
Would drilling out the air holes on the torch help get more oxygen, or would that just be a good way to get no more torch? -
Looking for suggestions for my coffee can forge
Trilliumforge replied to Trilliumforge's topic in Gas Forges
This stuff, or something else? http://www.homedepot.ca/product/latex-ite-91m-30ft-pli-stix-permanent-crack-filler/994397# I updated the files to make them a little easier to download. -
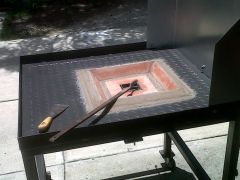
Hi Folks, I've made a very small forge in an old coffee can. It uses a swirl torch (http://bit.ly/MMiI94) for a burner, and is filled with ceramic blanket insullation. I was wondering if anyone has any suggestions for improvment of this forge (so "get a new burner" or "throw it out" doesn't really count). I find that if I shrink the inner space to about 2-3" diameter, I can get an orange to bright orange heat on 1/2" square, but it takes a little while. It's not bad all in all, but I'd like to see if I can get a bit more heat out of it. Any suggestions for internal arrangment, positioning of insulator, firebrick vs blanket, angle of burner, etc? Here's some photos: http://dl.dropbox.co...os/IMG_9723.JPG http://dl.dropbox.co...os/IMG_9724.JPG http://dl.dropbox.co...os/IMG_9725.JPG http://dl.dropbox.co...os/IMG_9726.JPG http://dl.dropbox.co...os/IMG_9727.JPG http://dl.dropbox.co...os/IMG_9731.JPG http://dl.dropbox.co...os/IMG_9733.JPG http://dl.dropbox.co...os/IMG_9737.JPG http://dl.dropbox.co...os/IMG_9738.JPG http://dl.dropbox.co...os/IMG_9739.JPG Here's a quick video of it in action: [media=] Thanks! Sean