
Rashelle
-
Posts
504 -
Joined
-
Last visited
Content Type
Profiles
Forums
Articles
Gallery
Downloads
Events
Everything posted by Rashelle
-
I'll third the look into the NWBA comments. I'll also say welcome.
-
Groups near Eureka/Medford, Oregon
Rashelle replied to Nobody Special's topic in Events, Hammer ins, Where to meet
Between Eugene (which has the 5160 club) and Seattle there is Fort Vancouver in ...... you guessed it Vancouver. Can't play unless a volunteer there but can see the shop. -
Japanese technique for preserving wood shou subi ban. Suppose to make it pest resistant and water resistant, As well as removing slivers when charred. Heats the handle also for adding oil or wax. That is why I char my wood handles.
-
Yeah, I think her forging may of been cleaner then mine on my first one.
-
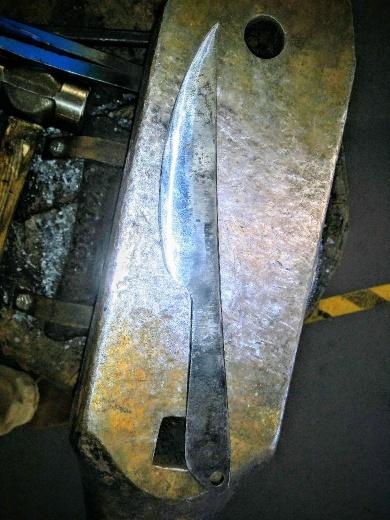
Here it is after grinding and wire brushed. It was made intended to be an integral handle so handle was purposely left wide with rounded edges. She went ahead and drilled a hole on the end just in case she later wants to wrap the handle.
-
LOl yup. Though her grind on the initial butter knife she made was pretty good, same as for the grinding practice neck knife.
-
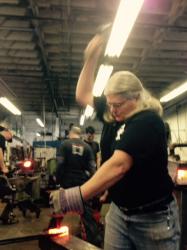
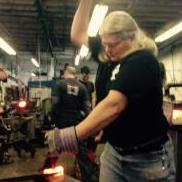
The following is made by a youth student of mine, as forged of 1080. I am proud of her. Oh yeah this was her second day bladesmithing.

-
Hammer quenching frustration
Rashelle replied to Cast and Forge's topic in Heat Treating, general discussion
In regards to uneven heating in a gas forge. I rotate my stock in the forge to ensure there is an even soak,especially when working larger tool steel. -
I used to do something like a pretzel till I somewhere along thelines stopped using them. I like the idea of your design though.
-
I generally teach people to draw out square. Only going octagon to round if round is the desired end. Drawing out in general is square, almost always. For my beginning students the only exception is when I teach them to forge a slightly tapered hex on the end of their hot work tools. That way they have a visual reference when it is a hot work tool, get the struck end taper in, and learn to forge hex all at once.
-
There is the NWBA conference this month in Longview. You might want to check it out if only to meet more from your area.
-
I also tend towards low temp welding rather then the higher end. If I get to the higher end solid fuel or gas I'm more likely to burn the piece. Thus I swim in the low end. A good example is just last Saturday, I got distracted while showing the weld on a strap axe. Made a real good example of what burnt steel looks like though. As it didn't fall apart. Got promptly tossed under the forge, then started another but had someone asking questions, that one got tossed under the forge also. Third one turned out great. Luckily they got the drift of what to do on the first one, then were working on their projects when I went to do the second, rather then making them sit thru the demo again. Thus the urgent questioning where I just tossed the second under the forge. Third one went great and then demoed the spreading the bit and drifting, etc. steps.
-
I tried the belt sander leavings cause I wanted to eliminate it as a source. Unless it worked. I used band saw cuttings cause I wanted to see if it would work as a source of iron/steel to add to the mix. I was experimenting to control variables and find limits.
-
Oh I did try a version with leavings from the belt sander too. That did not work well at all. Had to scrape it off to get it to weld.
-
I've been real sloppy with my measuring and proportions lately Frosty. It's still been working. My initial ones were precisely measured by volume. Also the bandsaw filings one was really sloppy measuring . Just grabbed a handful threw it in a can and added what anhydrous I had within reach which was a sloppy measurement. I'm not sure yet which I like better. Both seem to compare to iron mountain in useability to do an initial low temp tack. Using 1095 is a finer product that is a little cleaner in the fire though. Not so clumpy looking when you take it out. I demo'd it again today using the bandsaw filings. Oh yeah thank you Benona for the link. I'll try to remember to email Steve my recipe.
-
Almost immediately upon learning to blacksmith I was fascinated with the magic of forge welding. So rather then doing my requisite 50 good nails for the apprenticeship at Fort Vancouver I jumped ahead and started forge welding. That was a little while ago. I've experimented with all sorts of concoctions, including sand from the bags that were left behind from redoing the brickwork on the coal forges. (Works fine BTW). All the way to no flux welding. Main thing really is the person doing the weld's. Myself and another blacksmith would bring in new concoctions all the time. It seems to me to really come down to timing, temperature, pressure, and cleanliness. Those are the four aspect I tell my students to pay attention to. Much of the time I just use borax, (I mainly use a propane forge naturally aspirated anymore) every once in awhile if there is a chance the material may shift I'll use anhydrous (which like Jennifer pointed out is chemically different). If the students are having a hard time I will bring out the magic fairy dust (thank you Mark Aspery for the name for my little mix). All the magic fairy dust is is roughly 50% powdered 1095 and 50% anhydrous borax. I've used iron filings (from a chemical supply) in the past. And a few months ago went to the bandsaw took a bunch of the filings from it mixed it very roughly 50/50 with anhydrous borax. Then proceeded to do oops I lost my heat red/orange heat tack welds. Consistently. Works the same as iron mountain, or, mixing powdered 1095 with anhydrous. I'll be demoing this and "magic fairy dust" low temp tack welds at the NWBA mentoring center event in June. In the end it really doesn't have to be complicated.
-
Take the length of 3/4 sq make 1/2 round, turn that into 3/8 sq then........ heeheewell ok you could add in a few more sizes such as 3/4 sq to 3/4 round to 1/2 sq heehee.
-
Bronze axe with wolf head poll
Rashelle replied to Rashelle's topic in Axes, Hatchets, Hawks, Choppers, etc
Thank you. I've looked and can't seem to find anything other then my notes. I know there are a couple small articles out and about on the wolf heads. I really did enjoy his class. Once upon a time after watching one of his demo's I figured out that he was doing the projects at a speed of 32 times faster then me.Yes I went and got that exact with it. -
Sourcing steel / SW Washington or Oregon
Rashelle replied to kerryd's topic in Knife Class Reference Material
I've found that while metalsupermarkets doesn't stock a bunch of stuff they have almost always gotten the stuff at my request. Whatever it was I was looking for. -
Sourcing steel / SW Washington or Oregon
Rashelle replied to kerryd's topic in Knife Class Reference Material
OHHHHHHHHHHHHHH iron ore........ We got to talk one of these days Thomas. I've gotten all of those metals from Kelly Cupples out of Yakima. Could probly also get them from pacific steel and metal supermarket in Portland. -
When to use mild or tool steel for certain "tool" uses
Rashelle replied to somber crow's topic in Tools, general discussion
Like Thomas said. I have hacksaw frames made out of mild. Used to be people would sharpen shovels and such. Re-reading my post I usually have them use spring steel. I also frequently have people case harden or use super quench if mild steel was used. Most of the tools I made or have others make are medium or high carbon. Coworkers have asked if I'd make garden/hand rakes and such for them as the ones they buy aren't very durable, so spring steel will be what I'll use when I get around to it. It's non wear tools that are usually mild such as compass, dividers, saw frames, brackets. I have some set tools as well as side sets that have been in use for years that are mild that was case hardened. -
When to use mild or tool steel for certain "tool" uses
Rashelle replied to somber crow's topic in Tools, general discussion
It all depends on your use and desired durability. Like mentioned before for wear higher carbon would of been forge welded on. For hori hori's I have people use 5160. For other garden tools I've had people use mild or a spring steel. Compasses and dividers I normally use mild. If I intent to use as a scribe on steel I have used spring steel. It's sort of frustrating when you make a tool and it bends or deforms in use. So it really depends on the intended use. Not'm also in Portland. -
Hand-powered “treadle” hammer?
Rashelle replied to JHCC's topic in Power Hammers, Treadle Hammers, Olivers
You can see where the treadle attaches. It seems to me it's unattached so he can throw his whole body weight into it. Sort of like swinging a sledge down but not having to pick it up and not having to worry about missed blows. -
Bronze axe with wolf head poll
Rashelle replied to Rashelle's topic in Axes, Hatchets, Hawks, Choppers, etc
That is who I learned wolf heads from. From looking at the pictures and descriptions he does things a little different now. Main thing is the preform. Which is the 3 sided taper, then the 3 sided shoulder, chamfer the edges. From there V the forehead a little, raise the ears, use ball fuller and sink the inner ear, do mouth around the chamfer, do the ruff underneath, split upper lip, do nose, then last set eyes in. That is sort of a oversimplification but it in a nutshell. -
Bronze axe with wolf head poll
Rashelle replied to Rashelle's topic in Axes, Hatchets, Hawks, Choppers, etc
I took a class with Darryl Nelson on animal head making. Is how I learned wolf heads. From this I think I can do a cats head with some differences flatter face, shorter muzzle, etc. There are a couple small wolf head making articles out there, While at work I'll see if I can remember where I saw them. One or two of which are from people who took Darryl's class.