

Phillip Patton
-
Posts
120 -
Joined
-
Last visited
Content Type
Profiles
Forums
Articles
Gallery
Downloads
Events
Posts posted by Phillip Patton
-
-
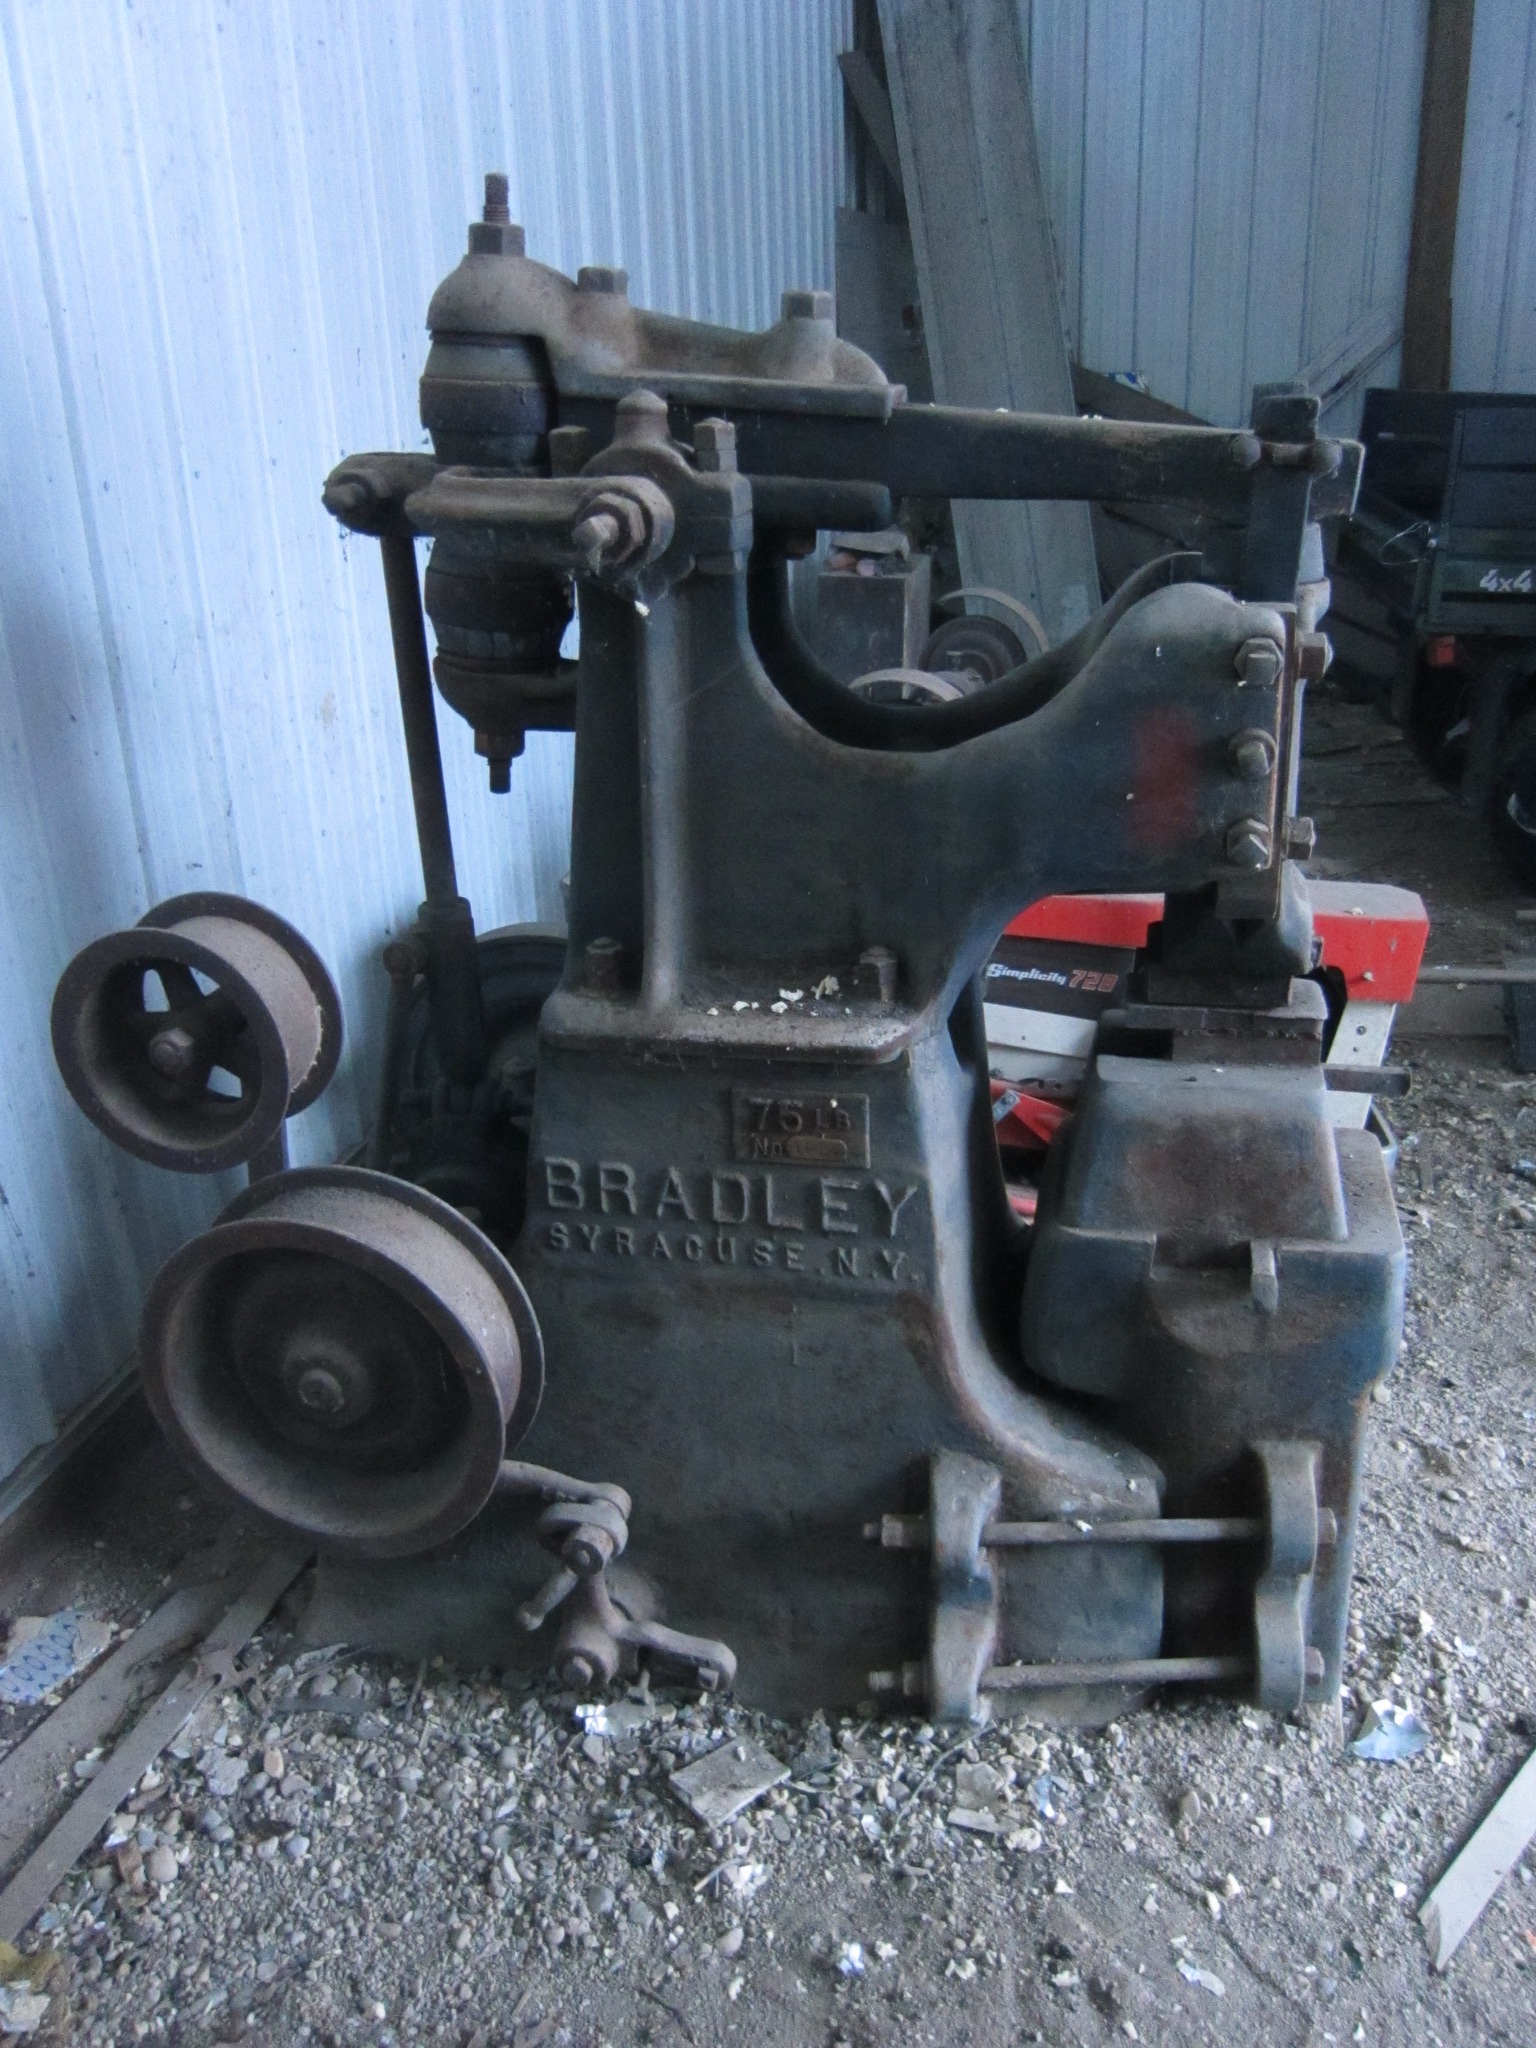
Hey all,
I don't know where to look for this information except here, so I was wondering if someone would know how old my hammer is, and would you mind sharing that information? :)
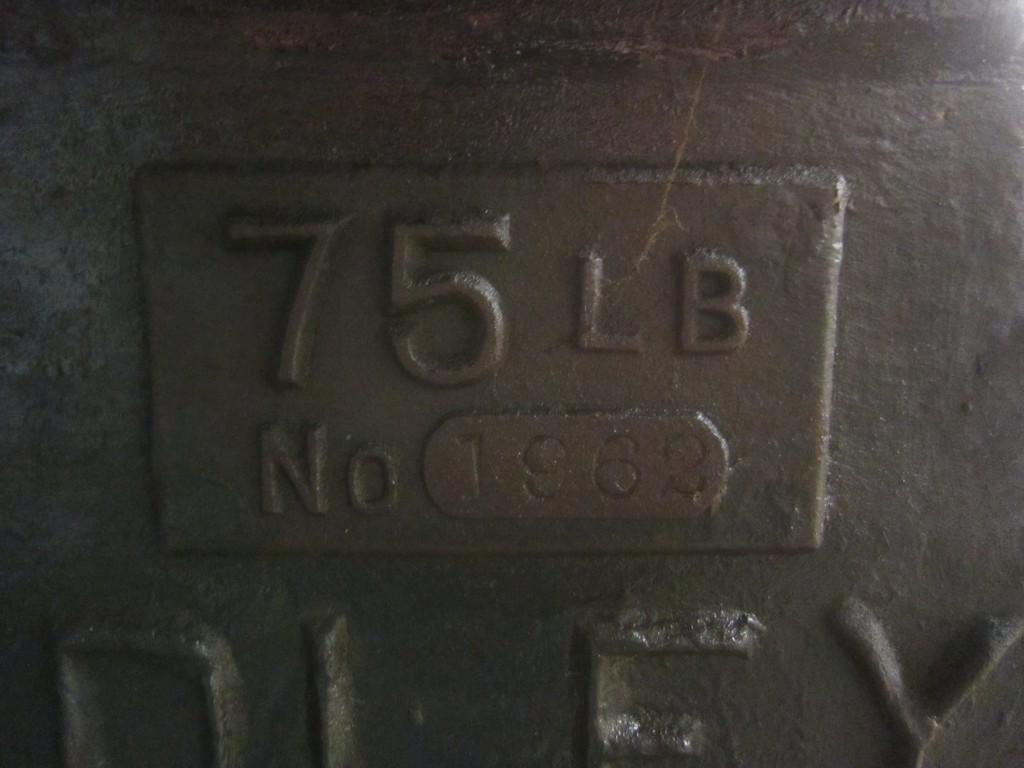
It's a 75 lbs, guided helve, serial # 1962.
Here's a couple pictures:
If you need any more info, let me know.
Thanks in advance,
Phillip
-
ok thanks i thought it looked like a cool idea
Yeah, it was a good junkyard anvil, but the shape wasn't very versatile. I'm still using two of them as a base for my "real" anvil. -
hmmmmmmmm...............sorry for posting about an anvil in your sword post....
No problem. :-) If you were asking about the round anvil, it was made of some rollers from a steel mill. They were H13. I've since graduated to a Mankel anvil. -
Thanks for the kind words everybody! Now that I've had it for awhile, I don't really see myself throwing this one in the river. ;-)
I'm working my next one, and also a katana. I'll probably be posting some in progress pics sometime.
what is your anvil made from?
Steel. -
Hey all,
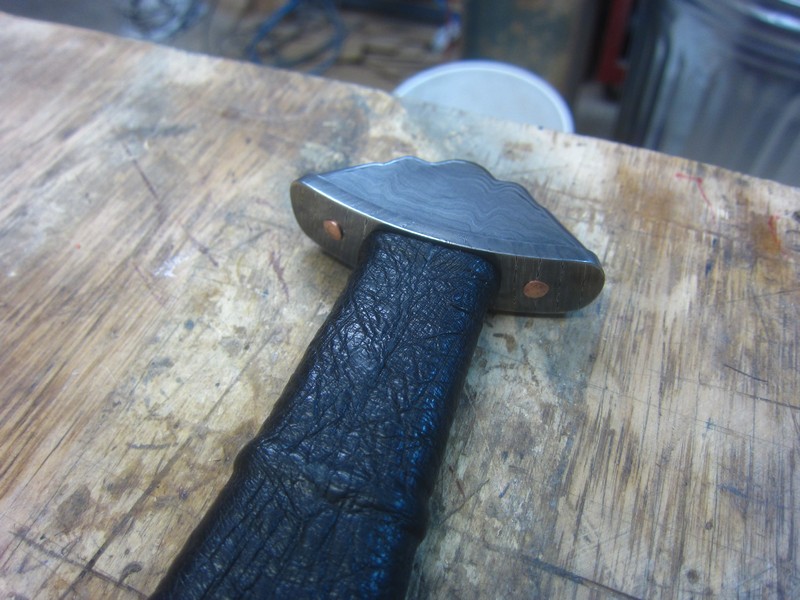
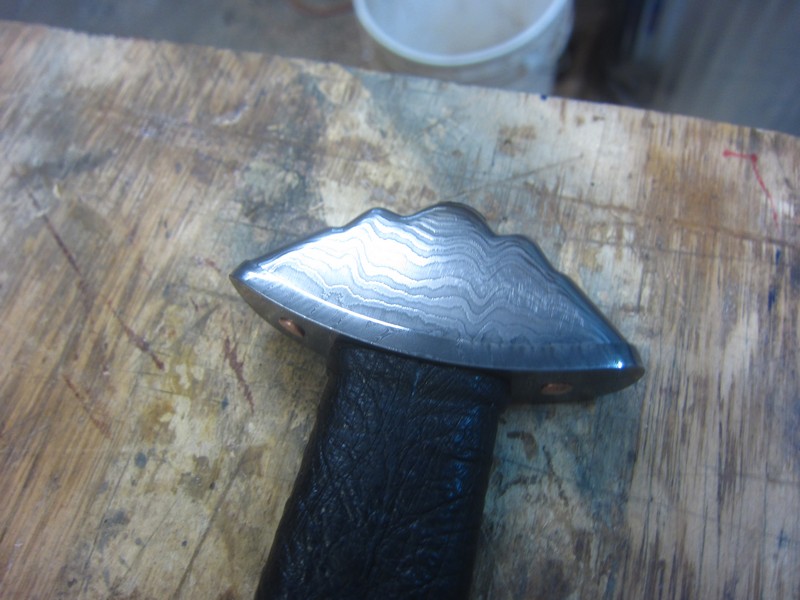
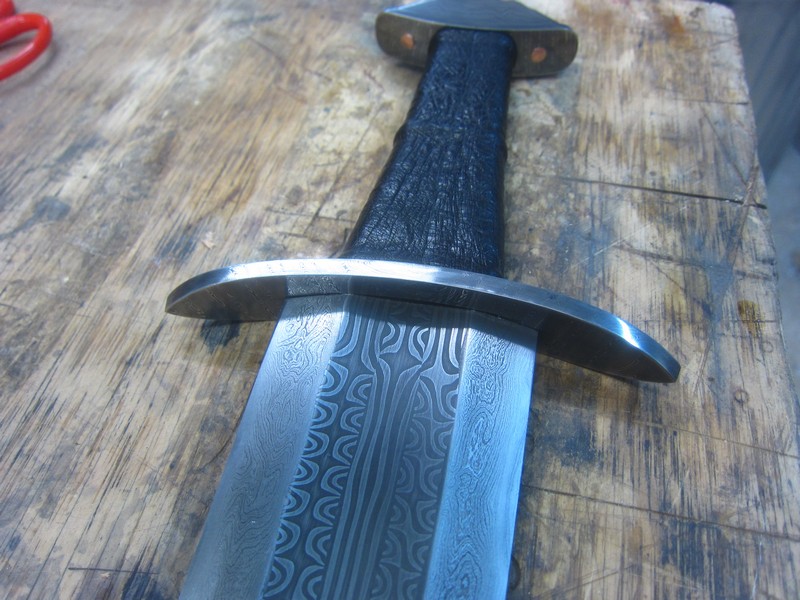
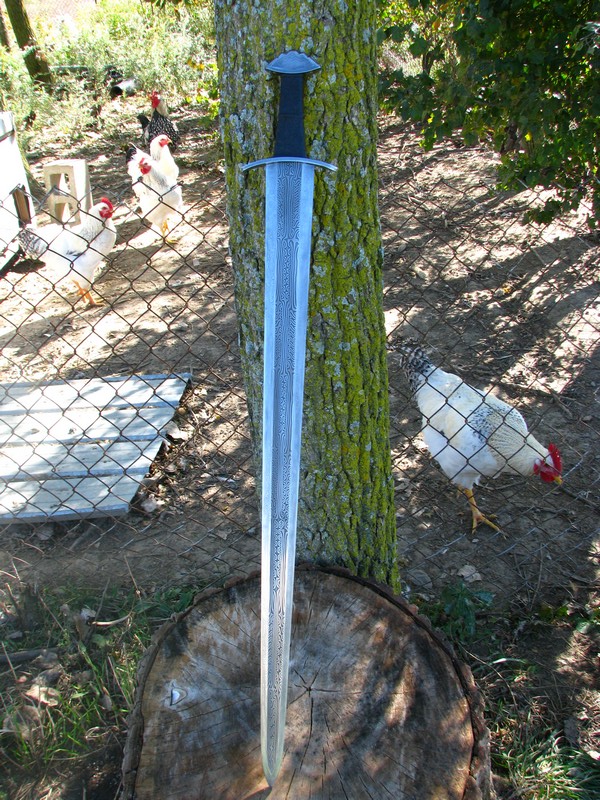
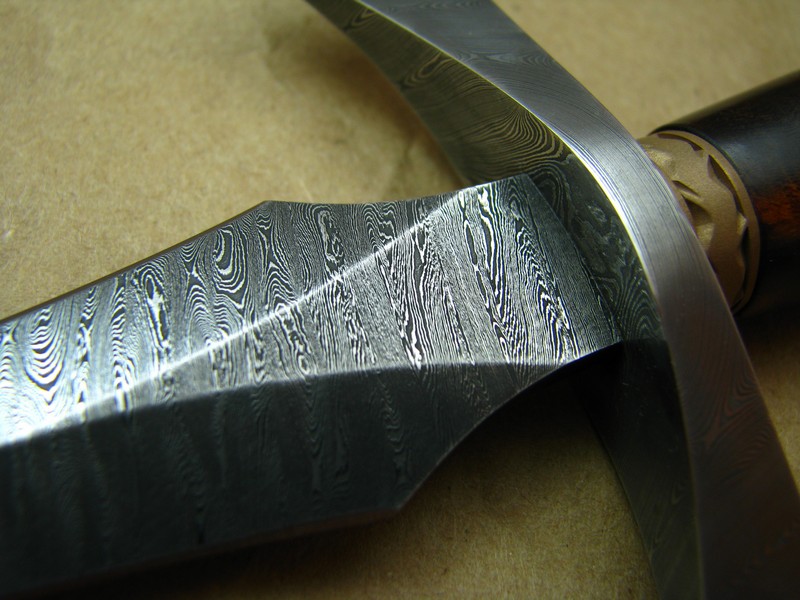
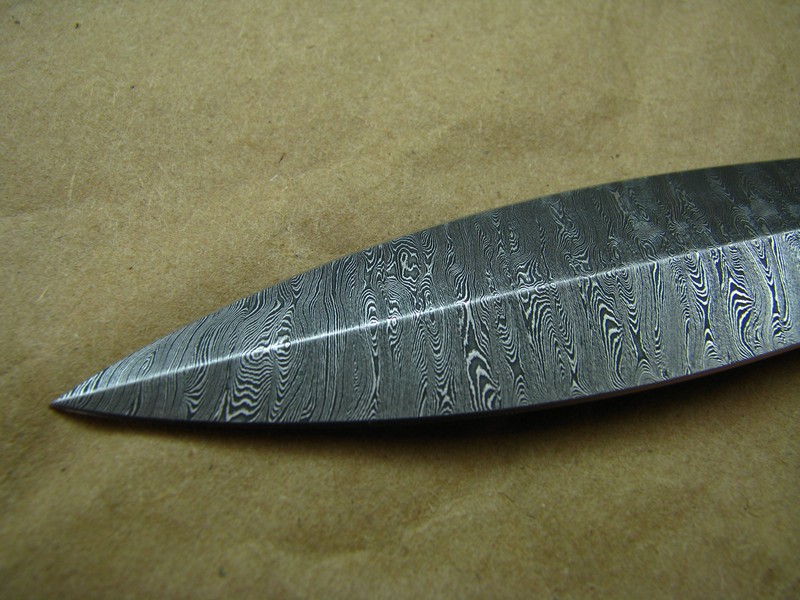
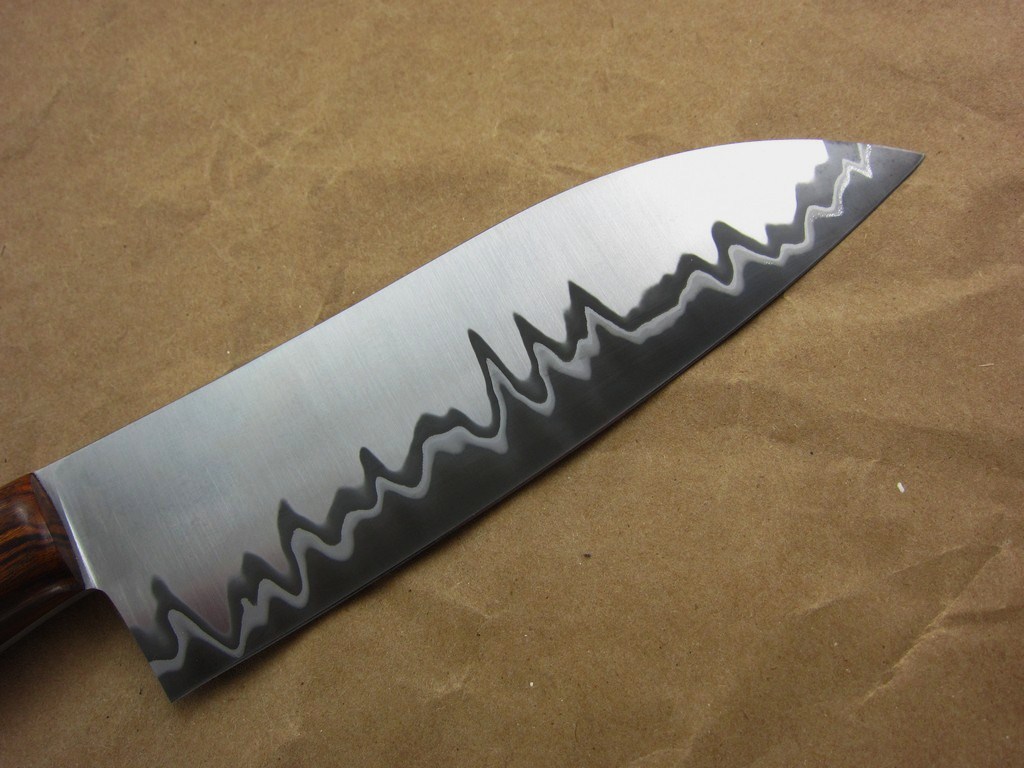
Just thought I'd share some pics of my latest sword. I started it three and a half years ago, and just finished it last week.
It’s similar to a Petersen Type L. The blade is 30-3/4″ long, and is pattern welded with three core bars, and high layer edge wrap. Steel is 1084 and 15n20.
The fittings are also damascus (O1 and L6), and the grip is desert ironwood covered with leather.
The whole thing weighs 23.7 ounces. It balances about 6" from the guard.
Some pictures of the finished project. Well, just the sword. Have to make the scabbard yet.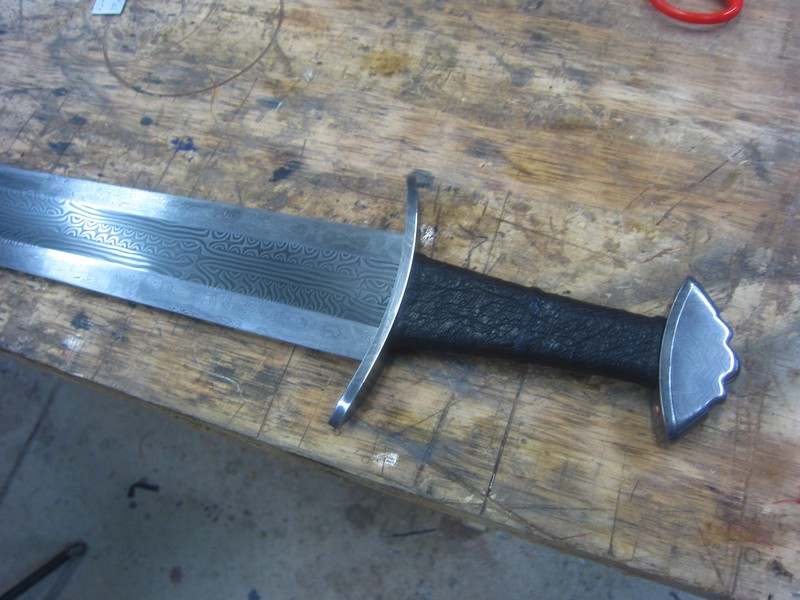
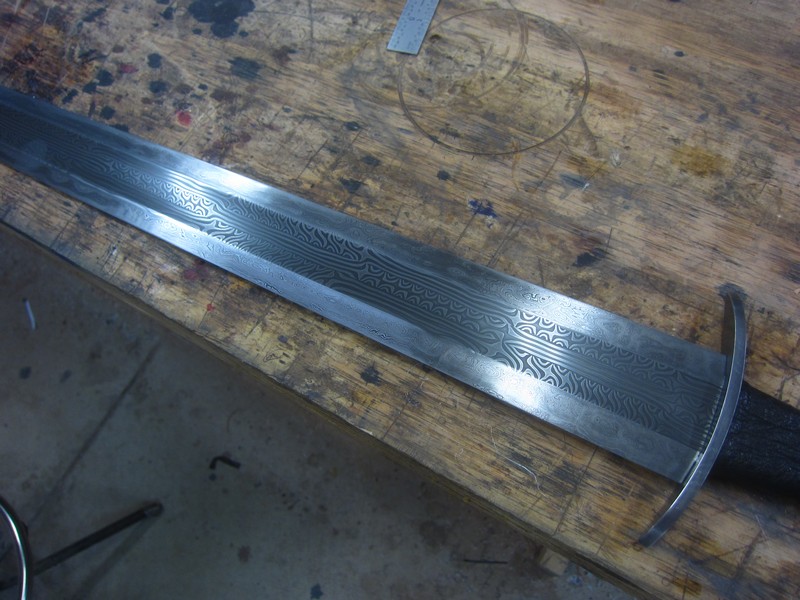
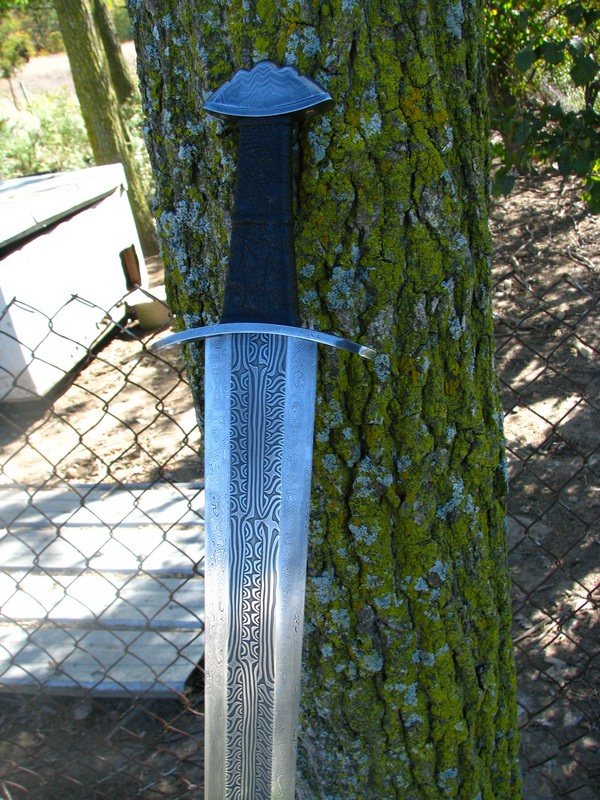
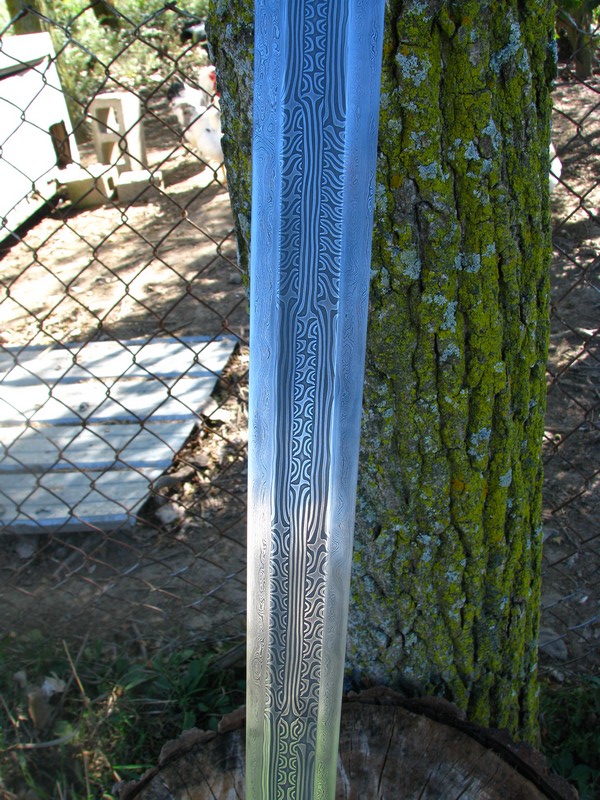
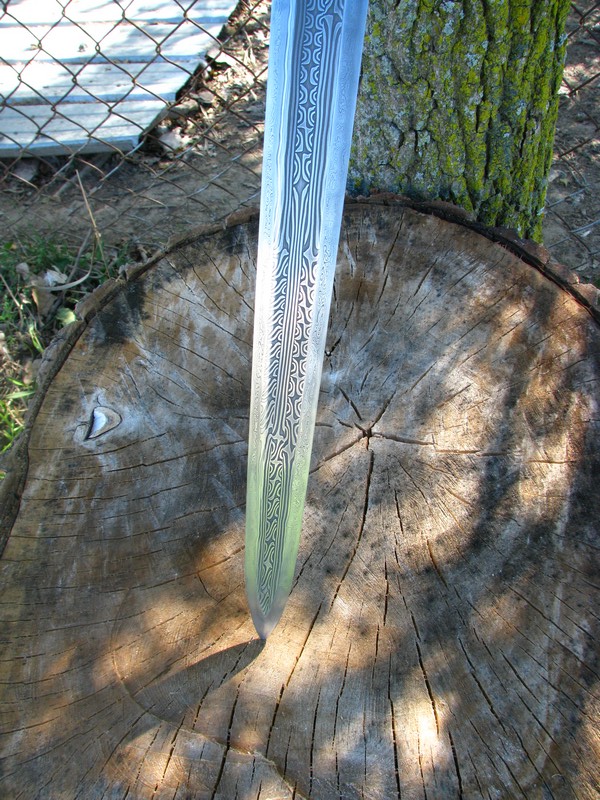
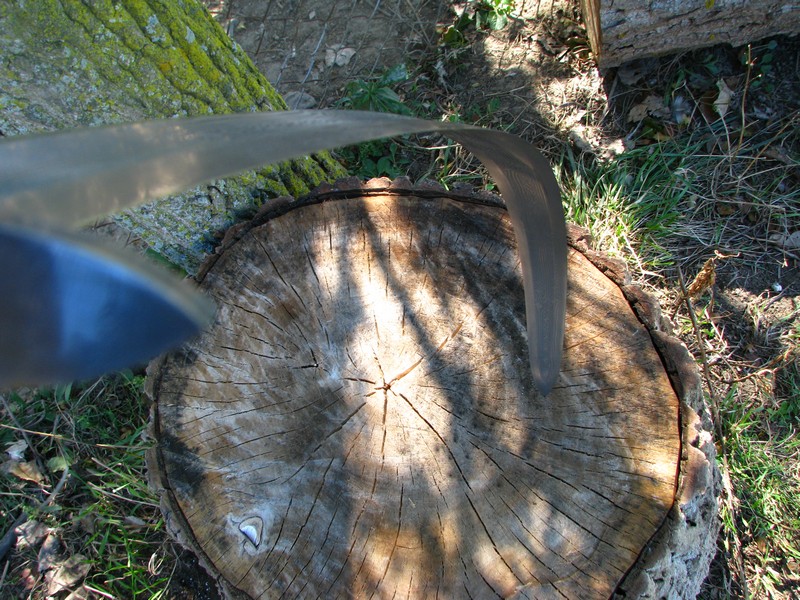
Thanks for looking,
Phillip -
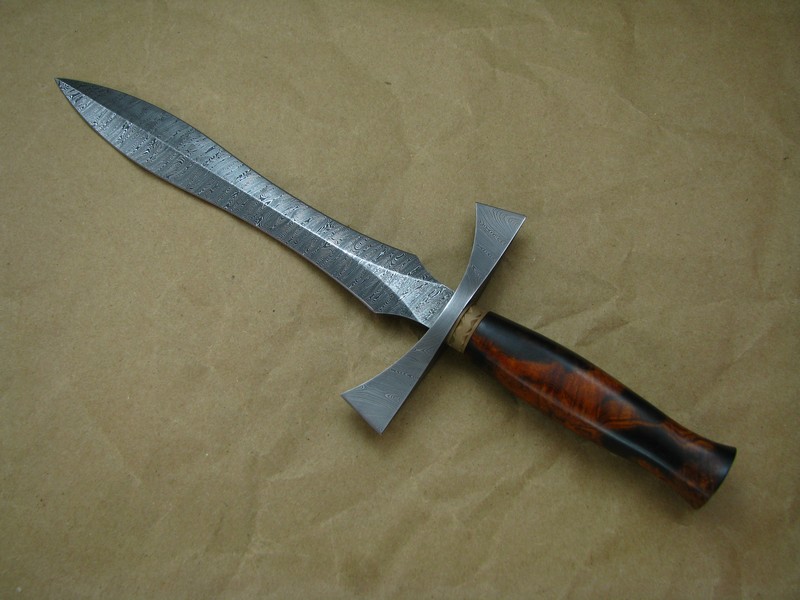
I've been kicking the idea around of making a dagger for my brother for his birthday, and I think I'll model it much like this one. Do you its dimensional specs? Height? Width? Thickness at the base?
The blade is 7" long, 1" wide at the widest, 3/4" at the narrowest, and about 1/4" thick at the guard. -
ok Btw I think you may know my Mother in Law, MaryLou Woodward, used to be your post master until she retired a few years ago
Yeah, I do know her! Well, not personally. Nice lady; I liked her. Small world!
I actually almost stopped at your place last summer. My dad and I were biking the Greenway, which goes past your street. But I didn't know your address. :) -
Thanks all for the kind comments!
Sweet, We need to get together some time, Why dont you ever stop at the IBA meetings? (9am till around noon) 1st Saturday in New Haven, 3rd at Solomon Farms on Dupont Rd. You are not too far from me, so I can give you a ride if you need one....
Hey Steve,
Yeah, we should get together sometime! Problem is finding the time. Same reason I dont go to the blacksmith meetings, I guess.
How about we try for February? -
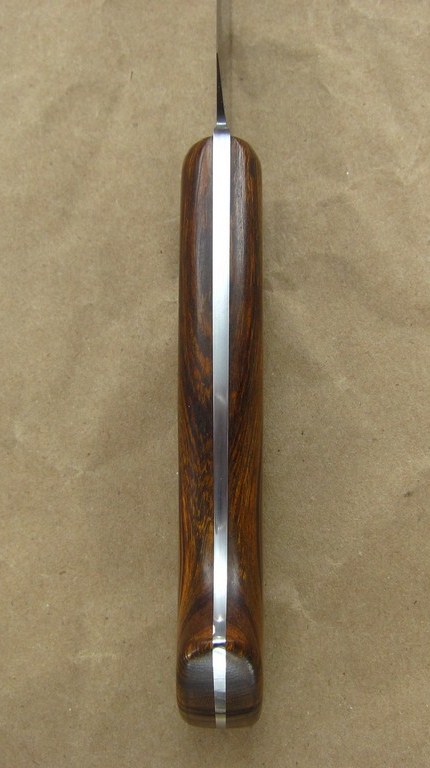
I actually started this one about a year ago, and I’ve been working on it off and on (mostly off) since then.
The blade is 7″ long, Gordians Knot damascus. The guard is opposing twist damascus. The spacer is bronze, the handle is desert ironwood.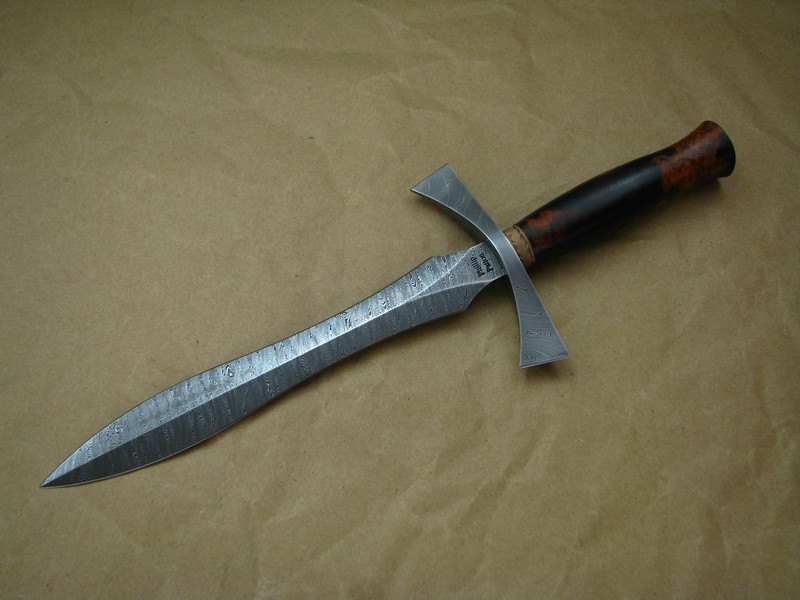
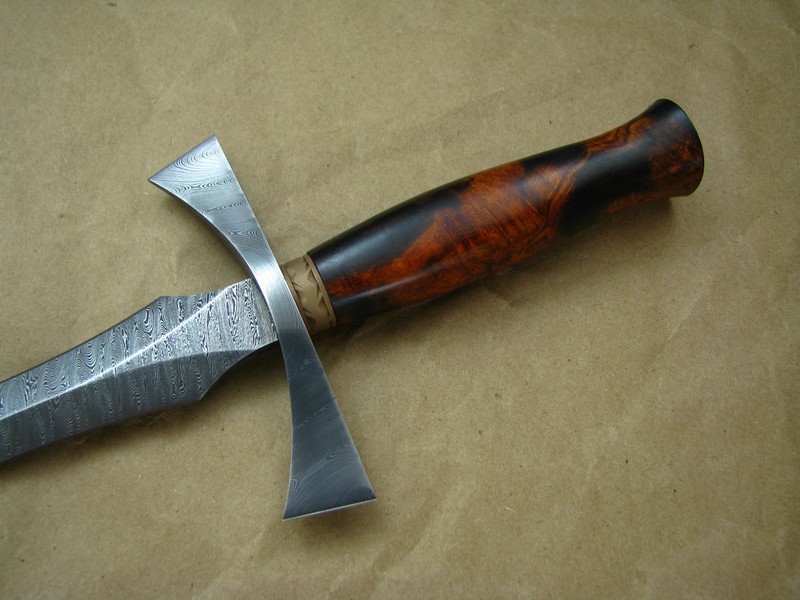

Thanks for looking! -
My 75 pound Bradley has a 99 pound ram. :)
-
I just wish I could get the same prices he does. :D
-
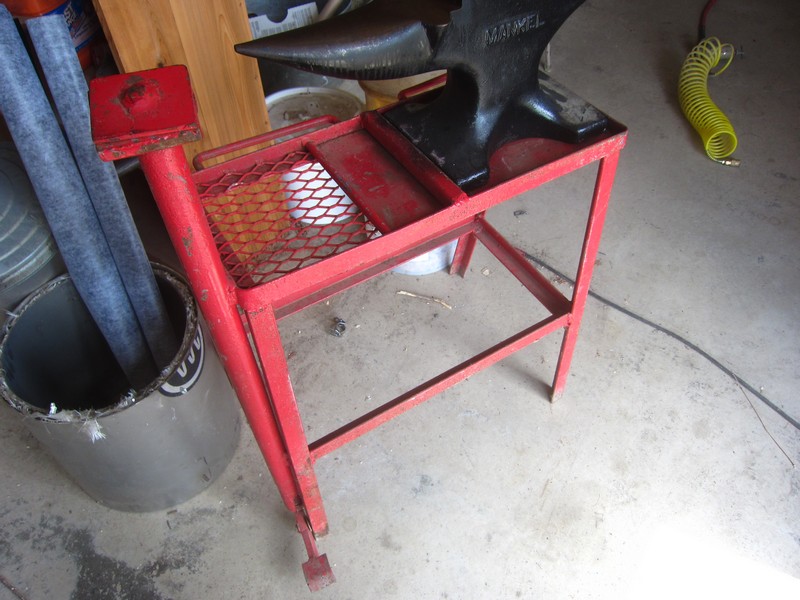
I'd put it on a stump as it's pretty light and that stand looks fairly bouncy too for doing blade work. Lovely condition and those turning cams can be quite useful if you like to pre-bend a blade before hammering in the bevels!
The stand it came with is too tall, and like you said, kind of bouncy, so here's what I have it sitting on: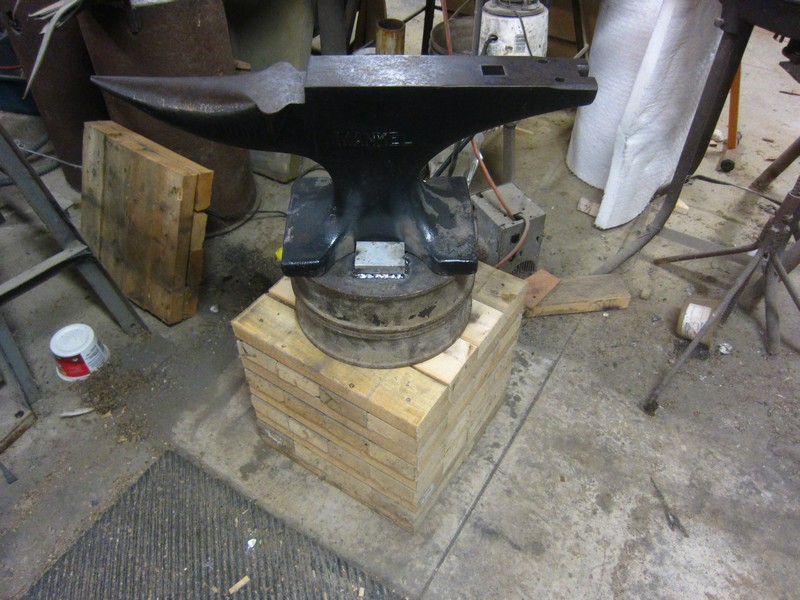
It's a bunch of 2 X 4s stacked, then a couple of big rings which weigh 64 pounds each, if my memory serves me correctly. The rings are a couple of rollers from a steel mill. They're hardened H13. B) -
I’ve been wanting a nice anvil for several years now, but most of the ones I've seen around here are either banged up or too small. Every now and then I check Craigslist, and recently, saw a Mankel anvil only 15 minutes from here, so I jumped on it.
It was advertised as 125#, but when I picked it up, I knew it was less than that. Felt like about 100# when I got it off the truck. By the time I got to the gate, it felt like 300#. When I got it in the house, I was sure it was a 500 pounder.
I weighed it, and it’s actually 111, which is about what the one I have now weighs. But this one is a Mankel, and my old one is a made in Russia ASO, so it should perform much better.
It's actually a farriers anvil, but should work just fine for blades.
My old one: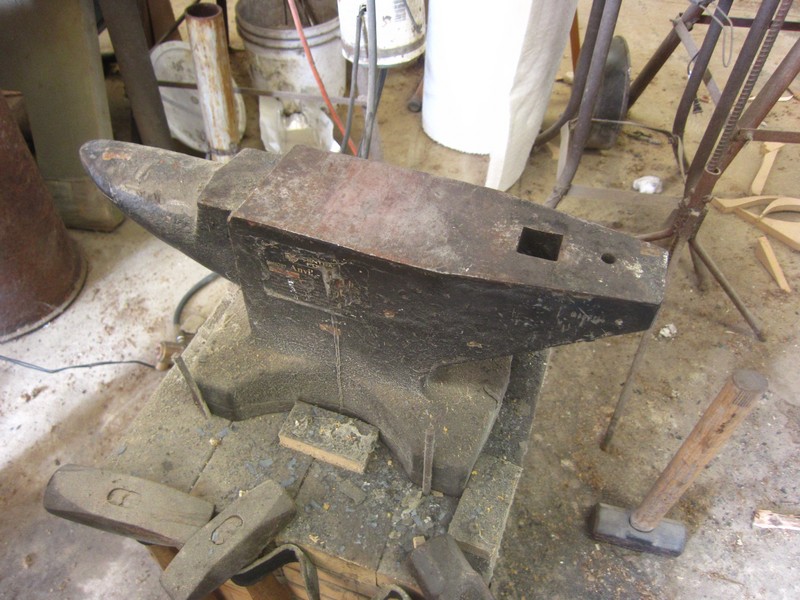
The new one. It’s in almost new condition.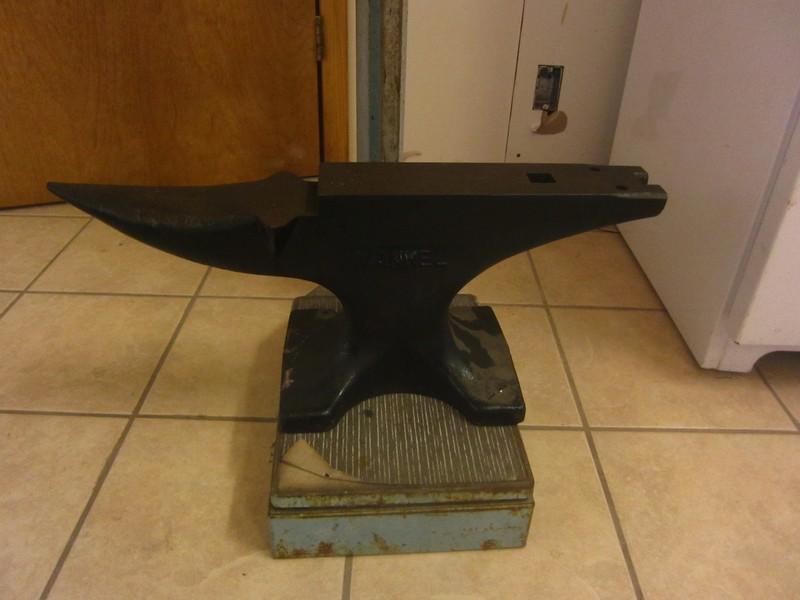
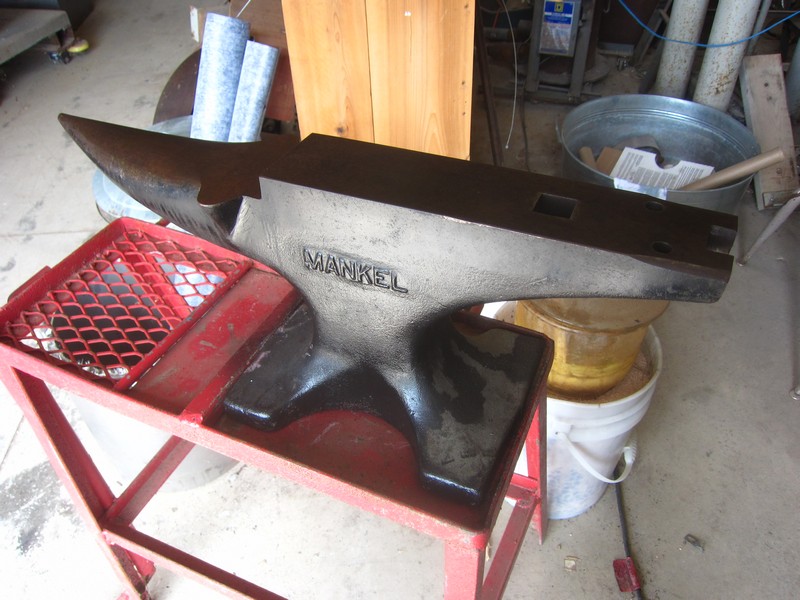
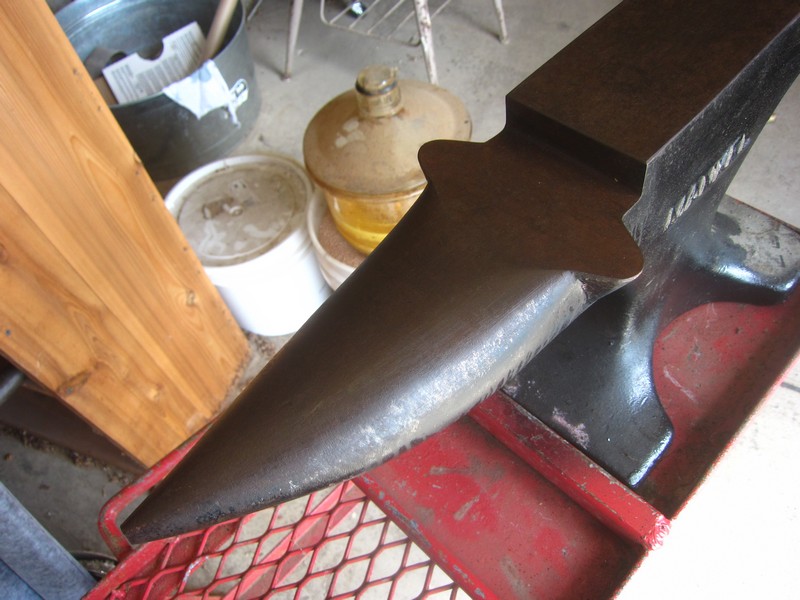
I paid $350 for it plus the stand. Did I get gouged, or did is this a good deal?
This guy has more farrier supplies for sale, in case any one here needs any.
Phillip -
I'm relatively new at bladesmithing, but i was wondering what kind of "etching" you did that brought out the patterning so beautifully. I search the forums for things but there are only so many hours in a day and the search function doesn't help all the much. Is there a link somewhere on here of how to do it? This is a stunning blade. I just hope that someday I'll be up to making one half as nice.
Hi,
I use ferric chloride. I make mine using powder, but I forget the recipe offhand. You don't want it too strong, or the steel will look ugly. I like multiple, long, slow etches.
Phillip -
does it matter what steels you combine?
could you combine stainless with non stainless ?
You should try to use steels that are very similar as far as forging and heat treating properties. 1084 and 15n20 are great together. Stainless and carbon are going to be a big disappointment, unless you use a non hardening stainless and heat treat it for the carbon steel. Even if you get it to work, performance isn't going to be good. -
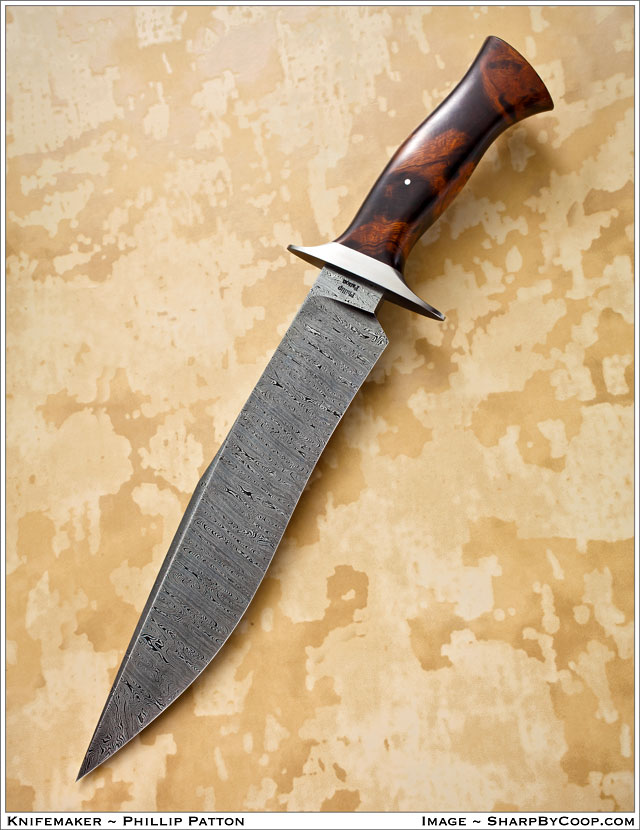
Steel: 416/W2/416 laminate
Hardness: 61-62 RC
Blade length: 6"
Blade thickness: about 1/8" at the plunge grind
Handle material: desert ironwood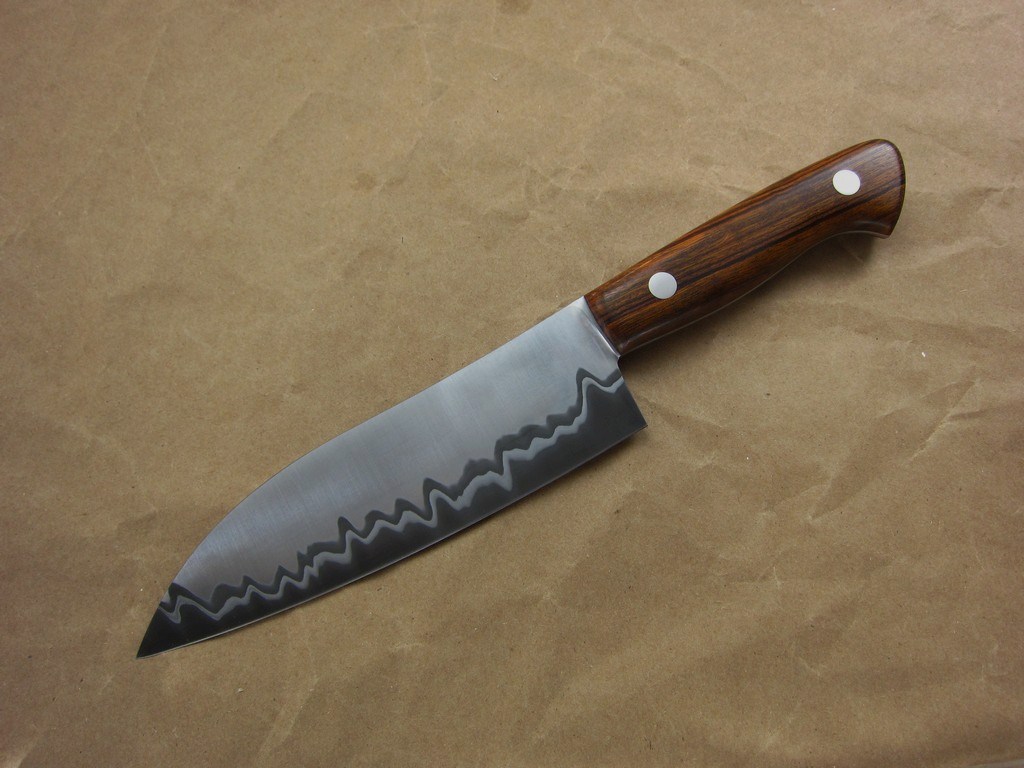
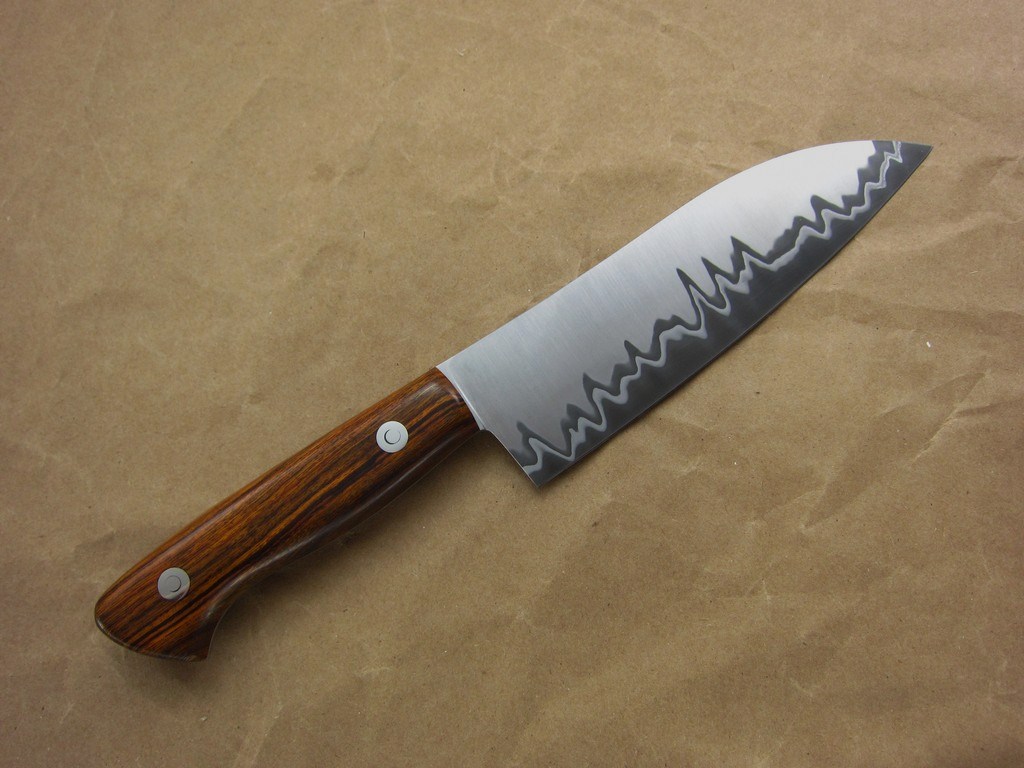
Thanks for looking! -
Glad to hear you got it going! Now, where's the video? :D
-
Well, I just got the pics from the pro photographer yesterday:
-
BTW you have a GREAT website and you do AMAZING work! How about a mandolin with damascus hardware, and a matching damascus rapier, dagger, and buckler!
Well, thank you for saying so! You're not doing too bad yourself, and I enjoy your families website and blogs. Most of the stuff on my website was forged under your hammer. As you said, it hits HARD. I've used it to forge down 2" round CPM M4, which is a very high alloy tool steel.
Did you check out the WIP thread I did recently in the knifemaking subforum? You might find it interesting.
Well...I'm blonde!
Mr. Philip had the valve on there so that the control line that goes to the roller valve, faces DOWN. In that configuration, the top line off the air cylinder went to the bottom side of the valve, and the bottom line off the cylinder went to the top side of the valve. I memorized the configuration of the lines going to and from the cylinder. (Top to bottom, bottom to top....that was easy to remember.) However, when I put the new valve on, I put the control line that goes to the roller valve facing UP. Blonde over here, did not switch the air cylinder lines to account for that!
So, I switched those around and the hammer is running very smooth.
Glad to hear it!I only have one problem left now. I have adjusted the roller valve so that when run "dry" the hammer dies smack each other firmly but not excessivly. However, as the air pressure in the compressor decreases, so does the hammer blow, until it is not hitting at all.
I still do not have the CFM on my compressor. The compressor tank was built in 1989 and from what I've seen/read, older units do not have the CFM marked. However, before purchasing this compressor I did look at similar sizes of compressors and they all pump 17+ CFM.
You have another, smaller compressor, right? Have you tried hooking it up at the same time as the bigger one? If you do this, and the hammer doesn't bog down, then you'll know it's a CFM problem. How warm is it there? You might still want to use the heater on the main valve until the weather really warms up.
The compressors I looked at had 5+ HP motors, ran around 200 max PSI, and had 80+ gallon tanks.
My compressor is a 7.5 HP, the tank is rated for 200 max PSI and is an 80 gallon tank. Based off of these comparisons, I think my compressor should be pumping 17 CFM without a problem.
I would think yours would be big enough. My compressor is only 5 HP, and puts out around 20 CFM. But mine is two stage, and has 4 cylinders, so I'm not sure how to compare the two.
The compressor has a switch regulator that turns the compressor on and off at a certain PSI level. This regulator has a sticker on it marked "ON 95 PSI, OFF 125 PSI."
When the compressor turns off at 125 PSI, anything put under the hammer head is going to get smashed! And I do mean smashed....MAN that thing hits HARD!
However, as it gets down to 105 PSI or so, it stops hitting and the dies just cycle in mid air.
My compressor comes on about 95 to 100, and shuts off around 120-125. Maybe it would work to raise the lower number up to where the hammer starts to bog down? Hopefully someone with more compressor expertise will chime in here.
IS THIS A CFM PROBLEM? If it is, I've got a compressor and air hammer for sale! LOL
Is this a PSI problem? If it is, should that regulator be adjustable or do I have to buy one that is set higher? (I have no paperwork on this stuff! It is what came on the compressor and survived the 40 MPH sling shot off the trailer! )
)
Try doubling up your compressor before you sell it. I really hope it doesn't come to that, but you shouldn't have a problem selling. You got it all fixed up and painted. LOL
Also, if two compressors are sitting side by side and are exactly identicle....for instance 5 HP motors, 200 max PSI...but the CFM of one is unknown, and the other is known to be 17 CFM, can you assume that the CFM on the unknown unit is the same as the known? Or, can you have two compressors that pump the same PSI but a different CFM?
If you do hook the two compressors together, you should probably have check a valve on the lower pressure one, or just set the max pressure to be the same.Finally, if this is a problem that has to do with my compressor, bottom line is, for now I have to live with it. In that case, can I tune the roller valve down so that the hammer dies still hit when the lower PSI is coming through the lines? Or, will tis kill the hammer when it is running at the higher PSI?
Go ahead and try it. I moved the valve around all the time to suit different requirements.
Please pardon, but I am clueless when it comes to pnumatics! ......like you didn't already know that!
Thank you all for your kind help!
I'm no expert either, so I hope I hope someone who knows more will speak up and confirm or refute what I've said. :P -
We've got some blue-limestone chunks that weigh several hundred pounds....not thinking about launching them, but one would make a great counterweight! Maybe it'd launch a 25 pound projectile. We've got 200 yards of pasture with a rock bluff for a backdrop! SWEET!
I got the valve today and hooked it up! Something is wrong though as the hammer won't move at all. I'm 99% sure that everything is hooked up right, but I'm going to check again tomorrow and figure it out! It's got to be a hook up problem.
Yeah, if you have the lines to the cylinder switched, it won't budge. :) -
Thanks to everyone who commented! Your kind words are much appreciated. :)
-
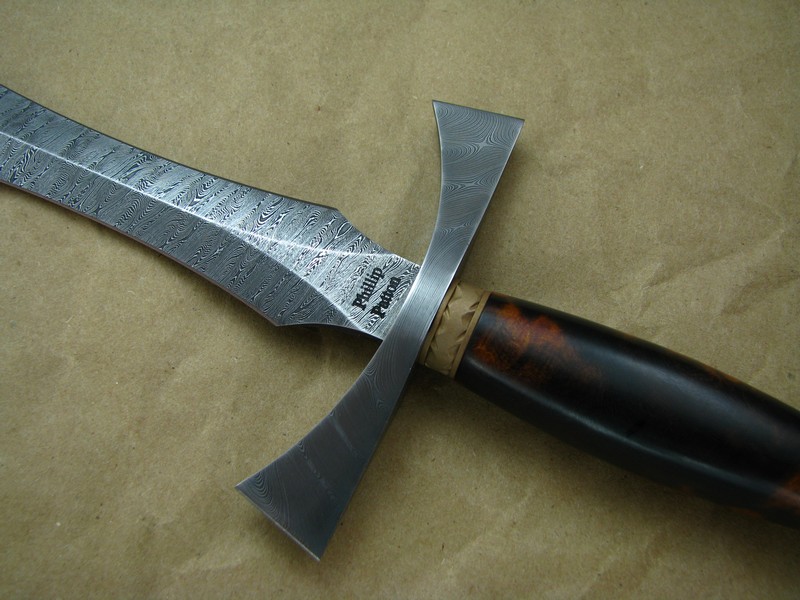
Maybe this picture will show what I'm talking about better.
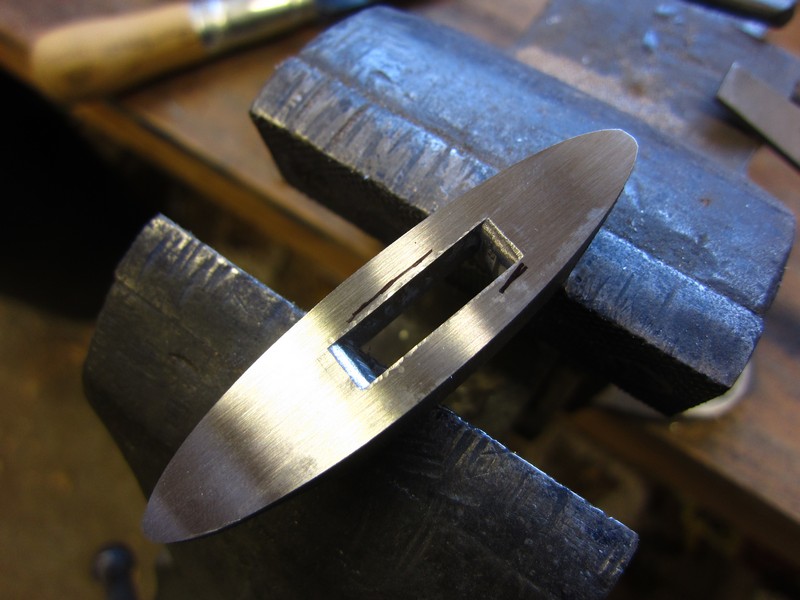
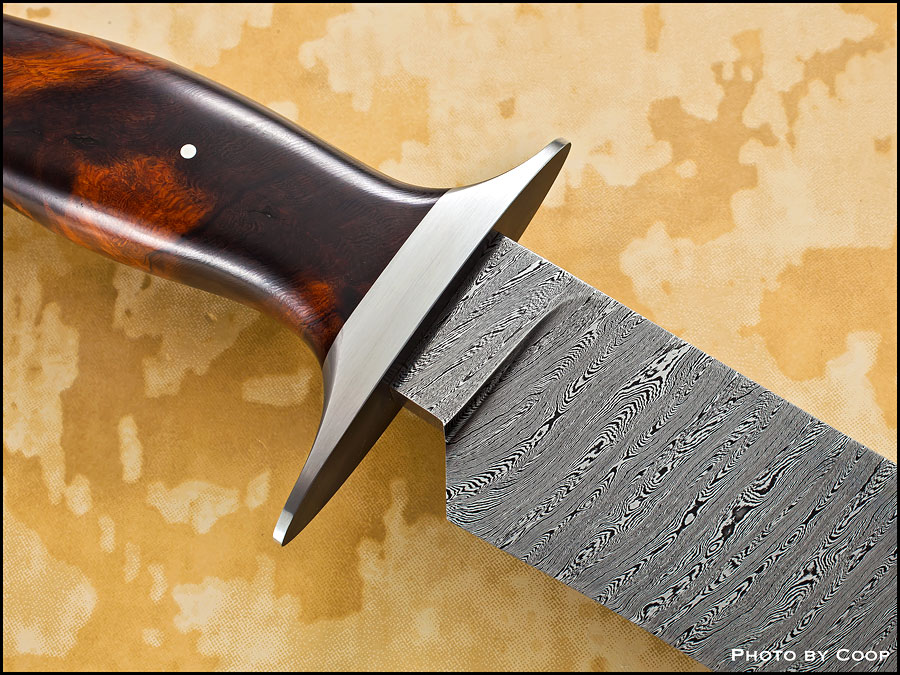
This is the side that faces the blade. Can you see the dimples from the ball peen hammer? They expand the metal at the edges of the slot, and make the slot slightly smaller. Then the guard is driven onto the tang. Then the guard is taken off and the surface ground down until the dimples are gone.
I always try for a fit tight enough that the guard has to be pressed (or hammered) on. This just helps guarantee a good, gap-free joint. I guess I forgot to mention that the tang is slightly tapered. It's thickest at the guard location. -
WOW that turned out amazingly the highlights and lowlights in the wood accent the pattern beautyfully i am thinking about ordering some of that wood, is it consistantly good quality? what is it like to work with?
Hi Josh,
I got that piece from Texas Knife Makers supply, and I've always been happy with their ironwood. They seem to be out of the good stuff right now, but you can go instead to http://arizonaironwood.com/ -
Hi Dave,
I've never used linseed oil on anything but wood, but I think it takes awhile to oxidize and harden. If it's still tacky in a few days you might have a problem.
Phillip
Need some advice regarding forklift fork steel
in Power Hammers, Treadle Hammers, Olivers
Posted
Hey all,
Almost five years ago, I acquired a #75 Bradley hammer, and since then I've been using the dies that came with it. The upper die works fine, but the lower keeps deforming on me. I suspect it may be mild steel.
Anyway, I decided recently to make a couple sets of dies out of a forklift tine that I have since I've read that they are usually 4340 or 4140. So I chopped it up into sections with my bandsaw, but decided to slice off a thin piece and try heat treating it first, before going to any more trouble.
I soaked one sample piece at 1575 F for 30 minutes, then quenched in oil. After it had cooled to room temperature, I tried to break it in a vise, and couldn't. Tested it for hardness, and it's 23 RC.
I have another sample soaking at 1475, and I'm going to water quench it. I expect similar results, though.
So, what do you guys think? My data sheets for 4340 and 4140 say they should have an as-quenched hardness in the low 50's RC.
Have there ever been forklift tines made out of mild steel?
Thanks for your help,
Phillip