
LDW
-
Posts
873 -
Joined
-
Last visited
Content Type
Profiles
Forums
Articles
Gallery
Downloads
Events
Everything posted by LDW
-
Darren arrived at Brians this afternoon around 3:00PM. Brian decided to get him in the fire so he could practice up on striking. Tomorrow is his first day and will make a hammer first thing. By getting some practice at striking today, it should help him relax a little more in the morning. Darren did great today, he was striking hard and true. Instead of waiting till he is finished we will update this thread with pictures as often as we can. This ended up being a great pictorial on making Brians fabulous hot cut hardy. Darren shows a lot of interest, and appears to be a quick learner. This should be fun. http://picasaweb.google.com/LDWynn/DarrenSArrivalToBrianS#
-
I got 7.66 and a 233 time. I think if I did it again it would be better. I was completely wrong on one. Brian Brazeal is the one I want to do this. He has an amazing ability to judge lengths. I would not worry to much about the time, just see how accurate you can be. Thanks for posting this Donaven.
-
We had a great trip. The group in the Northeast have a great gathering to share their blacksmithing info twice a year. Ashoken is a beautiful place in the mountains and due to some backwater issues will be moving to higher ground with new buildings. The food was great, the people were great, everyone showed a lot of interest, this is an inspiration to us all, and Brian put on a great demo. They have a lot of talented people up there. The tailgating was going on and the tools sell much cheaper up there than they do here. Everything was great and I would like to go back one day. Here are some pics, http://picasaweb.google.com/LDWynn/NEBAConference# Thank you all for making the trip as enjoyable as it was. Brian and Karen, thank you for allowing me to participate. :D
-
This has been a good thread. Its nice when questions get asked, answers are given, suggestions are made, and appreciation is apparent in it all. Thank you all for participating. I am heading to Brians to load up and we are going to be gone for 8 to 12 days. When we get back we will have lots of pictures and stories to share.
-
The feet have holes for mounting to the ground. Brian has some big nails he made that we use on the anvil stands and vise stands when we are on the dirt. We use anchors on concrete when we can. If we cannot anchor to the concrete we have to be in the dirt. You lose so much energy if you are not anchored. This allows just about anything you can do with a regular vise to be done with this one. We recessed the vise into the plate to make the stand more stable. Brian noticed that if we cut away the plate on one side of the jaws you can clamp something and allow it to stick down below the table. On the other side the table acts as a support, this works great for working on hammer handles. You can place a block of steel on top of the table to give you support for working on chisels and punches. The height is great for doing a lot of filing this allows you to sit down and work. On this one it was Brians idea to put one leg at a 90 degree angle from the rear leg, this way it does not get in the way of any longer pieces you want to put in the vise, and at the same time makes the footprint more stable.. What started as something that seemed simple ended up being a planned strategy, Brian could forsee what the capabilities of this stand were. Each piece that was welded in place was planned out. This represents a pattern in Brians overall character. The same as when you pull that piece of metal out of the forge and it is hot, you need to know what you plan on doing with it ahead of time. This was a great project.
-
Here is a vise stand Brian and I built to take on the road. I lucked up and got the vise on Craigslist a while back. This is the new and improved model stand, we cannot wait to use it. It will be making its first trip this week when we head to New York. Brian spit shined it today, and we finished off the welding. This thing looks great, I hope these pictures do it justice. Brian has been saying we needed a bigger vise. We definitely do not want one any larger, this thing is not light. http://picasaweb.google.com/LDWynn/StrikingVise#
-
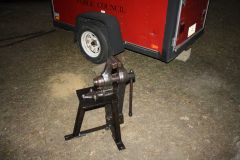 Striking vise stand Brian Brazeale and I built.
 -
Here are the pics I was able to take while Doug was here for a class from Brian Brazeal. He was one of the few that was willing to get on the other side and use a striker. He had no problem with asking me or Brian to strike for him. By the last day he was making hardy tools out of jackhammer bits by himself. You did good Doug. http://picasaweb.google.com/LDWynn/DougSTripToBrians# I am usually around Brian's when I am not at work, I enjoy helping out when I can for a class, no matter what the experience level, you always end up learning something if you hang around the forge.
-
Hey Sean, Copper and steel can be forged the same. You have to do copper at a little lower heat, do not go above a red heat. As long as you have a rounding hammer that comes close to fitting the swage you intend to use, the copper or steel will conform nicely to your shape. I have forged copper and watched Brian Brazeale do it on a larger scale, it is some great stuff to forge. It will teach you hammer control as well as anything because you can see every mark you leave. I do not have a swage block therefore any spoons or ladles I make are shaped with a wood stump. Wood works just as well with steel. Its like everything, the more you forge the better you get. Make several of the same thing. Take a picture of the first one then take a picture of the last one and show us how you did. You will definitely learn something and if you share what you leaned with us we can all benefit from it. Happy Forging, Lyle
-
Thanks for posting the pics, I am glad that hardy fit. Here is a link to the pics I took http://picasaweb.google.com/LDWynn/AlabamaForgeCouncilConference# since I was mainly working I only got pictures when I could. I was surprised that there were so many people that had been on Iforgeiron, in the past I only came across a few. There were several people that said they had only found this site a week or two ago. Ya'll stand up and let us here from you. When you see Brian or I let us know you have seen us here. we enjoy telling people we know someone through this web site. For years I went to meetings once a month to try and learn more about blacksmithing. This site fills in a big void, and gives you access to answers you would have had to wait on.
-
Brian, Karen, and I are heading for the Alabama Forge Councils Conference at Tannehill State Park this morning. We will be making tools in the tailgating area for the next four days. These folks know how to have fun so if you can make time to get there its worth the trip. We will be back Sunday. Again here is the brochure http://www.alaforge.org/files/2010_Sept_conferance.pdf
-
They usually have some at the Alabama Conference next week. And if you contact one of these groups with the Alabama Forge Council they will be glad to help you get some coal. http://www.alaforge.org/
-
Here is a link to the conference brochure http://www.alaforge.org/files/2010_Sept_conferance.pdf And here is a link where I got the brochre from http://www.alaforge.org/ Hope you can make it. I hope everyone from the IforgeIron gang will stop by and say hello to us.
-
My new Rusty style Power Hammer
LDW replied to Mark Wargo New2bs's topic in Power Hammers, Treadle Hammers, Olivers
Good job Mark, thats a good looking hammer. -
5 hours of forging
LDW replied to brianbrazealblacksmith's topic in Blacksmithing, General Discussion
It is awesome hitting a piece of steel as hard as you can with a big sledge hammer. Some of those tools are made from 4140 and some are made from jackhammer bits. The jackhammer bits are more fun to forge, they move a lot easier than the 4140. We cut a round piece of 4140 today that was 1 3/8" thick in 12 hits using one of Brians hot cuts and a top tool chisel. That may not sound like much but that is quick. It is amazing to me that Brian can remember all the different steps to making these different tools. This was a good day, Thanks, Brian. -
I went to Brians yesterday and saw this ball he was working on. This thing is a chunk of steel he had been hammering on,Not sure if you can tell by the picture but that ball is between a baseball and a softball in size. It looked as good as the foot to me.
-
If you do not have one you rely on a file usually. If you have enough practice you can generally tell with a 6" nicholson file when something is around 60 or so. I cannot do it but I have seen someone do it. My brother bought a tester so anytime I have something in question I go use his. I work with cable and learned I was not hardening as well as I thought when using some hydraulic oil we had. As long as you have access to a hardness tester you do not actually have to own one, but without one you cannot control your hardening processes. + or - 1.5 would not be accurate enough for a seasoned knifemaker but someone questioning whether or not they are getting there steel hard would appreciate it.
-
Some observations about twist method for making tongs
LDW replied to evfreek's topic in Tools, general discussion
Here are the two videos Brian has made on forging tongs. This way will create the hinge without twisting. There is a standard for tong reins and rivet sizes for tongs. Once you are efficient in making tongs you can make tongs the way you like them. I like light weight tongs myself. Brian has shown me that as long as your reigns are tapered nicely they will be flexible without bending even when made from mild steel. Your left hand gets as much work or more from holding tongs than your right hand. ( If you hammer right handed) Therefore I like to work with light weight tongs as much as possible. After working with Brian I have learned tong clips are a neccessity as well. The smooth taper allows the tong clip to do a better job. Maybe we can get Brian to put his 2 cents in. http://picasaweb.google.com/brianbrazealblacksmith/TongBlank#5444538182975584098 http://picasaweb.google.com/brianbrazealblacksmith/TongBlankInClay#5444814678944207826 -
We had a great time and John has a beautiful shop. I heard there were 75 people at this event. John welcomed everyone, fed everyone and kept us entertained. I was surprised to see Clay Spencer as I walked in, but this was advertised as being a tooling for the tire hammer meeting so you could not get more appropriate than that. Randal demonstrated making tongs with the tire hammer, and Brian made a hammer, then made his "greatest invention" a tapered, rounded cutting surface, hot cut hardie for Johns anvil. This was with John striking and he did great. We had one of the best Iron in the Hats, Some nice work went home with a lot of people. Sorry if you could not make it but don't miss the next one, It is definitely worth the trip. Thank you, to everyone that made this happen. Here are a few pics to document what will hopefully be an annual or more often event. http://picasaweb.google.com/LDWynn/NorthMSStAnnualBash#
-
I think I attached a picture that shows the hardy tool Brian made. It has the three inch fuller recessed into it. A swage block will work fine, in some of the older pictures that is what was used.
-
Here is the one heat horse head video http://picasaweb.google.com/brianbrazealblacksmith/OneHeatHorseHead#5411969742893139602 and here is the tong blank video http://picasaweb.google.com/brianbrazealblacksmith/TongBlank#5444538182975584098
-
Hey Eric if you want new cable look in the yellow pages under wire rope, I found thats how its listed here. Also I never used anything but old cable from the beginning and it will weld up just the same. Here is an old group of pictures I put together one time, I have posted these before, but I still do basically the same process when I weld cable, accept I made a tool that is easier to use than the step of the anvil. Brian Brazeal made one too, and he welded some cable this way also. Good luck and show us some pics when you get some welded up. http://picasaweb.google.com/LDWynn/BirthOfACableKnife#
-
LRF, these rings were made from 1/4" round copper. I have gotten the large grounding wire from a local building supply store. Not sure if it was #2 or #4 copper, but the largest wire they had worked fine.
-
Thanks everyone for the kind words, but I must say that this is simply a technique. Rather than putting a piece of steel or copper on the anvil and hammering on it. Brian has shown me and many others that you can isolate a part of your parent stock, work the area in between down to the size you want, then work the isolated part into whatever you wish it to be. There are many forging techniques, tapering for an example. It is amazing what you can do with 1/2" square bar in one heat. Whether it is isolating material like these rings are done or doing a taper. Its like Brian says, use the right dies and it practically makes itself. This gets more and more true as you go.
-
This album shows Brian making a flower ring on pictures 64 through 95. I have bought a few of Brians rings and a copper bracelet. I use them as an inspiration to hope I can get as good as Brian one day. I need to post a picture of the bangle to show you what I think perfection looks like. http://picasaweb.google.com/LDWynn/October2009MeetingAtTheMFC#