

Ecart
-
Posts
402 -
Joined
-
Last visited
Content Type
Profiles
Forums
Articles
Gallery
Downloads
Events
Everything posted by Ecart
-
Belly buttons, wings, and things;
Ecart replied to Rich Hale's topic in Blacksmithing, General Discussion
Yep, busted. I went out to the forge tonight to work on a couple of things. I was hammering a semi truck leaf spring, seeing if I could do it without a power hammer. Then the question flashed through my mind, "How are you standing?" I realized that I was standing more like a fighter with my right leg dropped back behind the left and my left arm extended way out in front with the piece of steel in it. Therefore my hammer arm was having to reach out rediculously far to hit the steel. That would explain a few aches and pains I've been feeling this year with the increased forge time. So I made a conscious effort to correct my stance every time I found it was off again. Thanks for this thread. It is proving to be very valuable to me. And no, I couldn't do much with the spring. I am trying to square it up on one end in preparation for drifting for a camp axe. Please though, if you have any suggestions, let's not derail the thread. You can pm me or start a new thread in the appropriate place. Thanks. -
THAT is interesting! I like it. My damascus days are still out there in the distance, but seeing yours sure gives guys like me something to shoot for.
-
Osage is supposed to make a nice bow too. But we don't have any in this part of the country. If I get it, it'll cost an arm and a leg from a specialty woodworking store.
-
That would have the Mimosas that are taking over my yard shaking with fear! If your first knife looks this good, I really want to see you subsequent work.
-
I like it! To me, the unfinished look of the blade adds a ruggedness to a knife. I like finished and refined and I like blades that are skillfully left rough. Skillfully as opposed to. . . well, some of my knives, not so skillfully left rough. ;)
-
At least in the photo, the smudges give it a rough look that is rather attractive. Good job. I look forward to seeing more work out of you. P.S. Unless you want a new addiction, stay away from the forge! You'll soon find that you love it, no matter how many things you ruin in the fire.
-
I like the second and fourth knives the best. Those are nice! Best of wishes to you and the bride.
-
Belly buttons, wings, and things;
Ecart replied to Rich Hale's topic in Blacksmithing, General Discussion
Hmm, wonder if that's why my left shoulder is having a lot of trouble lately. With my work-a-week-off-a-week schedule since January, I've been doing a lot more forging this year. Within the past few weeks, I have had some problems with my shoulder. That's the side I hold the tongs on. Incidentally, I've had fewer problems with my hammer side. :rolleyes: -
I haven't used it yet, but a friend just sent me some Blue Wonder gun black. Their website is Bluing and Protection. I can't vouch for how good it is. I haven't checked out their site yet either. I just saw this thread and thought I'd see if I could learn a thing or two before I applied this stuff to my blade. Maybe this stuff can help you out.
-
Matthew and I are in the same boat. I'm trying to forge closer to finished dimensions, especially at the spine and around the tang areas as I have left a LOT to be ground off in these areas in the past. Getting better, but it takes time. I also HATE grinding. Sanding was my downfall in woodworking and grinding threatens the quality of my finished knives.
-
Just Curious...How many have gotten a Tetanus Shot?
Ecart replied to cbl4823's topic in Safety discussions
Hey, don't blink, it'll be 20. I blinked and it was 20 years ago this past Monday that I joined the US Army. I demanded a recount, but still lost. :rolleyes: -
10,800 lbs. of anvils for sale
Ecart replied to otisdog's topic in Anvils, Swage Blocks, and Mandrels
Some years ago I was talking with a blacksmith (actually borrowed a blower from him until I got my own). He told me of a collector about an hour and a half from here that would buy up every anvil at every auction. The blacksmith brought a budding apprentice who REALLY needed an anvil to an auction. Sure enough the collector was there. The blacksmith explained the situation to the collector and asked if he could let the apprentice buy just one of the anvils. The collector sneared at them and bought every anvil at the auction. So, no, I don't care for collectors myself when they do this sort of thing. I'd love to get my hands on a good old anvil. I actually have a railroad track anvil available to me. I just need to take a day trip and get it. But in the long run, I will most likely end up buying a new one one of these days. -
Just Curious...How many have gotten a Tetanus Shot?
Ecart replied to cbl4823's topic in Safety discussions
Can I put my hand down now? My arm's getting tired. Four years ago I went into the hospital for a few days. They had no clue what they were battling when I got there, so I got every shot under the sun. Still it wouldn't hurt to make sure that one of those shots was a tetanus shot. I know I've had one in the past ten years. It was one of those "Have you had a tetanus shot lately?" while they insert the needle, "Never mind, you have now." sort of things. -
Hi Paul, long time no see. That's a pretty good looking dagger there. I'm hoping to try my hand at a double edged blade soon. The guard looks like it could be a bit tricky to me.
-
Yeah, I believe you're pretty much correct there. A power hammer would be nice! I've got an old ball peined hammer that I am hammering down into an axe head, but I hammer for a while and then lay it aside for a while. It really wears down the arm. The other option is if you had someone to hold while you hit it with a sledge. Or better yet, get them to his it with the sledge. lol
-
It is for me! My piece always ends up bending! :D
-
On the one hand, I say go for it. On the other hand, take some time to learn the basics. And yes, I know that's contradictory. I've been trying for the last four years to forge a knife. Until this year and many mess-ups, I didn't put out a single knife. All this because I didn't take the time to learn the basics of drawing out, upsetting, bending, or whatever else there is. Now I've finally got it through my thick skull that if I get the basics down, I will be a better bladesmith. So give it a shot, but also work on some basics while you're at it.
-
Okay, that came in a bit bigger than I planned. BUT I managed to post a pic. Anyway, the tang was way too big at the ricasso. It was around 1" and was making the handle overly fat in that area. So I ground the tang down to what I hope is more suitable. It is 3/4" at the junction tapering to 3/8" at the end. I'm thinking that I will use the idea of pounding on the bolster. Should I bring down the size of the tang even more, or would it work the way it is? Also, should the knife be heat treated and tempered before I do this? I can think of reasons as to why it should, but they may not be the right reasons. It didn't come out in the photo, but the junction has rounded shoulders. They aren't as square as they look in the pic.
-
Thanks Charlotte. Now let's see if I can post a photo before continuing with this reply.
-
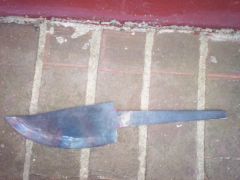 This is a hidden tang skinner that is in progress.
 -
Thanks for that reminder Rich. You made me go back and check my source. The Complete Bladesmith does NOT say to use silver solder because it melts - as you say - at 1100 degrees. What about flux? Will the plumber's solder need to be fluxed? Note to mods: Thanks for putting this thread in its right place. Sorry about that.
-
Reminds me of a star destroyer on Star Wars. I kinda like it.
-
Yeah, I'll bet that does create a tight fit! On this particular knife I am going to get my first taste of silver soldering as there is a gap that can easily be noticed if I don't do something to dress it up. Thanks for the responses. I'd ask for photos, but all I need to do for photos is to look a the threads here in this subforum. As I learn to post pics to the gallery, I'll try to get some pics of this knife posted.
-
This is prompted by my first attempt at making a bolster and butt cap for a skinner a guy has commissioned me to make for him. Here's what I've done so far. I took some quarter-inch thick angle iron and cut off pieces larger than I need for the fittings. I took the bolster stock to the drill press and drilled out a series of holes the thickness of the tang. Then I took it to the forge, heated and chiselled out the remaining bits of steel that divided the holes- there was a long break in the work as I grabbed the business end of the chisel and had to let my fingers get better before continuing . I filed out the piece to smooth the sides. Today I set to work on the butt cap. After drilling the holes and chiselling out the piece as described above, I was stuck with rounded corners that I had a real problem squaring up because I didn't have a file small enough to go into the hole. After a quick look around, I found a file that is probably older than I am. It is destined to become a knife one day. But today it served as a drift to square up the hole in the butt cap. So this made me think. Maybe I should make a few rectangular drifts of different size to square up the holes in the bolsters/butt caps. Here's the plan. Punch or drill the initial hole, then drift it out to the desired size. Really simple. Now, how do my fellow yet more experienced knife makers make your bolsters/butt caps? I know some folks cast them in place. There are many ways. But I was wondering if anyone would care to take us through the steps of how YOU make a bolster/butt cap for a knife. And, what is your favorite material for this purpose, if you can answer that?
-
Chris, we reeeealy need to get together. I don't have a lot of knowledge, and I have very little about forging leaf blades. But maybe we could show each other a couple of things. I think I could help with the tang constrution if we put together a time to meet.