

Paragon
-
Posts
166 -
Joined
-
Last visited
Content Type
Profiles
Forums
Articles
Gallery
Downloads
Events
Everything posted by Paragon
-
are all firebricks create equal?
Paragon replied to jeep4x4greg's topic in Blacksmithing, General Discussion
The insulating brick is some neat stuff. I was playin around with it before and you can drop a melted piece of solder on it and it will stay melted for around 10 seconds. You know how fast solder solidifies. This is why the insulating materials are best for forges. Wanting to makea simple forge with internal area the size of a brick or so. I have searched all over the forum and can't seem to find anything definite on what temp insulating brick is fine for a small propane forge. I have a box of bricks that I think are 2300 -
Great idea. Wonder how well this would work with oxy/acetylene welding.
-
I am assuming that there is flux on the 6011 rods. Is it just due to the different mode of heating (electricity) that flux is needed when compared to gas welding? Have yet to use flux with the oxy/acetylene (just had the first refill on the 40cf tanks before Christmas) I used it on the roses that we made and I really liked how easy it was to shape the weld with the flame in order to minimize hammering and grinding. Anyhoo.. I have never had a chance to stick weld but hopefully some day I will be able to give it a shot. It seems like it takes a real steady hand.
-
Ah.. I see. As for cones.. cheap.. Poor Boy Blacksmith. $18 made with the poor man's techniques. (ebay store) eBay Store - Poor Boy Blacksmith Tools: Category 1 As for cones, Centaur has one for $51 Your best resource for farrier and blacksmith supplies Blacksmiths Depot has one for $60 Blacksmiths Depot | Blacksmith and metalworker tools and supplies Have not done any business with any of these places. Just places I have found while searching the web. poor boy is about as cheap as you are going to get (they use square tubing for the hardy pin) and might be worth the few bucks. Cheapest I can think to make one is to make a frame out of rod and put a skin of sheet metal or something.. possibly fill with a good concrete. Another option that I have seen on here is to use different sizes of steel tubing for the different ring sizes. Not the best if you need a taper for spreading a ring more. Good luck. George.
-
Sorry if this is off topic, but the slot in that last pic.. I believe is called a tong slot or something. How is that used? I have seen a few on the internet that mention the slot but I have yet to see any explanation on how to use it. Just curious. Thanks. George.
-
Anyone see a head like this?
Paragon replied to jeremy k's topic in Blacksmithing, General Discussion
LOL.. priceless. -
That is a neat pen.
-
Anyone see a head like this?
Paragon replied to jeremy k's topic in Blacksmithing, General Discussion
Spike hammers are long and thin. Probably weigh around 10-15lbs. There are usually a few on ebay. I don't think a 35lb hammer could be swung with any control from anyone but Paul Bunyan. My guess is that it was part of a power hammer or something. -
My first rose, my first blacksmithing.
Paragon replied to Paragon's topic in Metal Sculpture & Carvings
Thanks, gents. I will have to make another and try some scrolling pliers on the edges of the pedals. I decided to leave these one as is when I was making it. -
Good tip. The typical 3-4-5 right triangle. Carpenters use that to square up framing. Measure 3' down one side, 4' down the other and the diagonal between the points should be 5' to be square. Can also do any multiple like 6-8-10 or use inches or centimeters. Another easy tip for square up a frame (given parallel sides are the same length) is to measure the diagonals and they should be the same. Keep the tips coming! The simple solutions are sometimes the one's we forget!
-
Well, here it is. This is the rose I mentioned in a few other posts. My first blacksmithing (if you can call it that). I gave the rose to my Mom for Christmas. (new camera so focus is a little off) Rose: 1" & 1 1/4" square tubing. Stem: 1/8"x1/2" hot roll. Leaf: 3/8" cold roll square. Brass wire wheel in the angle grinder and a coat of Beeswax (propane heated). I worked on it for 3 days so I do not know how long it actually took me but I know a second one would be a lot less time. No forge - oxy-acetylene torch for heating. No anvil - 6" block of steel for the flat, 11" long 3/4" diameter center punch (pointed chisel) and the handle end of a 5' long prybar 1" (might be 1 1/4") diameter for the horn. I eventually rounded the end of the large prybar to aid in shaping the bud. Had all the hammers I will probably ever need - most used was the cross-peen and the ball-peen. I used the cross-peen and the edge of the prybar for starting the fullering and finished with the shaft of a bolt (1/2" diameter ?) Fullering wasn't too bad. Localizing the heat to the ring and frequent turning left the rose undistorted for the most part. Also, after I finished with the inner bud, my brother wanted to make one for his girlfriend so I helped him in the middle of working on mine. He did really well (helped I just made on so it was a lot easier to guide him) and it only took us about three hours. I helped with fullering, used a section of stem I had, touched up the leaf a little and did the welding for him. Brass wire wheel in the angle grinder and a quick spray of satin clear. (can't even tell the leaf fell off the stem a few times ) Bud: 1" square tubing. Stem: 1/8"x1/2" hot roll. Leaf: 3/8" cold roll square (phone picture) Anyhoo, I'm hooked. I was lucky to have the materials around (have other welding projects going) Next rose will be a Russian rose. Next project, not sure but I have ideas. Might have to finish up the welding projects first. I'm to the point that I rather make gifts than buy them. Only trouble is time. I have a while for a wedding gift at least. Thanks for looking.. and for the new hobby.
-
-
-
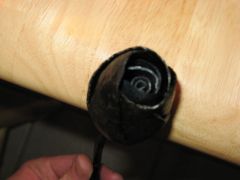
From the album: Roses
-
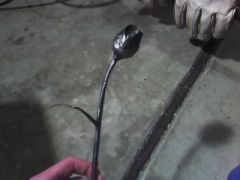
From the album: Roses
Brother's creation from my guidance -
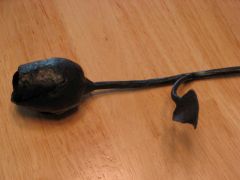
From the album: Roses
-
Wow. Lots of replies. Thanks to all who posted. I would make my own but I'm not sure how hard it would be with no anvil and no forge. I have been looking for the cheapies to modify (non as cheap as I would like) so was just wondering what is out there. I totally forgot about the BlackSmithdepot. I'll check out the other places, too. Bill, thanks for the info. I will check into it. Sounds like a deal.
-
Where can I get a nice pair of round nose pliers. Looking for all metal heavy duty so they can take the heat. The only ones I can seem to find are for crafts, small, and have plastic/rubber handles. Below is what I am looking for. link removed at the request of anvilfire Thanks for the heads up. George.
-
Take your TV remote.. and your cell phone camera (other digital camera with LCD screen may work too) and point the remote at the camera lense and press a button.. you will see the IR LED light up and blink. I use my shade 5 OA goggles sometimes when I'm heating up. I think I need to use it more. (doesn't help I use the OA torch for heating) Might get one that has the flip up lense so I can see easier when hammering. You can see the steel start to get glossy then it goes liquid. Easy to see with the shade 5. Just remember that things are hotter than they appear through the goggles.
-
One more thing.. I was in the chatroom Tuesday and asking about a few things and everyone was very kind and helpful. We got into forges and it was very informative. It is nice to see that everyone didn't mind a newbie coming in and asking questions. Thanks.
-
I just want to say that this site has been wonderful as I am getting into smithing. I helped my older brother make a rose last night (first time he has mashed glowing steel) and he is talking about 'next time' and 'next year' already. The rose turned out great and my bro did most of the work. There were a few times I took the hammer to give the piece a little more brute force (bro is a less accurate and more awkward with the hammer than I) to help him but for the most part, he forged most of the bud and the leaf. He was getting tired by the time we got to the stem so we used a bit that I was working on earlier. I welded the whole thing up and brushed it and now we just need to shoot it with clear. I will be posting pics of his rose and the rose I am making for Mom. Anyhoo.. where was I.. I enjoyed seeing him liking the smithing and I think he was impressed with himself when we finished. This site (and anvilfire) has enabled me to do something that I enjoy and also lit the pilot light in my brother so thanks to all who contribute. I wouldn't worry too much about one person's input but it would be cool to get it back (if someone wanted to spend the time - I could if I had the information and ability on the site) Everyone also needs to remember that whenever you are chatting (especially on the internet) you will find people that have different opinion than you. Take it only as far as the chair you sit in right now. Don;t let it eat you all day. Things pass with time.. it was unfortunate that Alan (never knew him.. but a mind mine for input nonetheless) took it too personal with a closed mind. If you post on the internet, you must have an open mind. I think I said what I wanted to say.. mainly "thanks" for the great resource. I will post pics (might have to be after christmas) as I know we all love pics.
-
Wow.. what a collection. Feels like I am going through a museum.
-
I would think that if you make a jig where you could slip the end of the angle in and wrap it around.. Like a typical scrolling jig but the contact edge would have that 72 deg angle on it. Just bend and hammer it to hold the angle? (Beware, I have not done any scrolling so this is just off the top of my head.. or perhaps near the middle.. somewhere in there.)
-
Is this anvil salvagable?
Paragon replied to Alan DuBoff's topic in Anvils, Swage Blocks, and Mandrels
If it were mine, I would leave it as is and make a square hardy that has sharp edges and a flat top (has anyone actually ever done this?). You never know when a good round corner can come in handy Just my unskilled thought. My current anvil is a block of steel (~ 5"x5"x6") and use a second chunk on top at times (~ 2.5"x2.5"x7") So almost anything is better than that. Also have another block with many holes in it.. one just happens to be able to hold a chisel. Oh. my forge.. an Oxy/acetylene torch in my right hand. Still want to get a piece or train rail. All I have done is twist a square bar 1/4 turn and make my first leaf. -
Still on welding: O/A (oxyacetylene)
Paragon replied to kogatana's topic in Welding/Fab General Discussion
One of the main things to understand with acetylene is that you can only use it at a rate of 1/7 the volume of the tank. What I mean is that if you have the smaller 40 cubic foot tank, then you can only withdraw up to 1/7th that per hour (about 5.7 cubic feet per hour) I bought a Victor SuperRangeII kit and got a #00 tip instead of the #2 that comes with it. Using Aceylene is all about numbers.. If you look at the documents below, you can see what size tips you can use by looking at the SCFH figure for Acetylene. The #0 cutting tip I have I may be able to use if I keep the settings down but I will only be able to cut around 3/8" plate with the 40cf tank I have. If I wanted to cut anything thicker, either I would have to manifold tanks together or get a 80cf Acetylene tank. The Main use in cutting is your oxygen. You can see that an 80cf oxygen will last for about an hour of cutting 3/4" steel. The acetylene flame is for your preheat only so it may be possible to cut thicker plates with patience. I have not tried any cutting yet so I do not know for sure. Same goes with the welding. In order to get the heating and penetration of weld, I would probably have to get a larger tank if I wanted to do anything over 1/8" thick. From what I gather, this is assuming a complete weld all the way through in one shot. You can weld one side and flip the piece over and weld from that side to get the full penetration. I have welded 3/8" square solid to a few thing around the edge but I know it is not a deep weld. Only for a shelf so it doesn't need ot be strong. http://www.thermadyne.com/victor/literature/pdfs/B_WeldNozzle_info.pdf http://www.thermadyne.com/victor/literature/pdfs/D_Performance_Data.pdf As for tanks.. Not sure what fittings you have over there. (would almost assume it is the standard over here so the companies can easily sell equipment there) but I have been welding for a month now, so all I know is from reading. Any questions, let us know. -
That is sime amazing skill there (the welding.. not the peeps) If one swing missed the target, it would have been a busted leg or skull. So wish there was audio.