

mike-hr
-
Posts
826 -
Joined
-
Last visited
Content Type
Profiles
Forums
Articles
Gallery
Downloads
Events
Posts posted by mike-hr
-
-
Thanks, folks! I think this will be a fun demo. fairly fast, simple, and people love to see holes drifted that exceed the width of the parent stock.
-
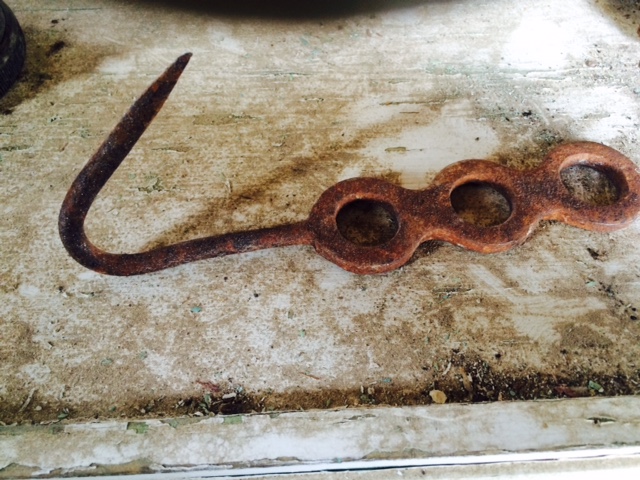
This is on a display table at the Mining Park in Tonopah, NV. I thought I would make one for an upcoming demo I have, but it would be nice to know what it is.
Thanks, mike
-
The lightswitch, and my brain... I would suggest you use the same next time you ask an openended question.
-
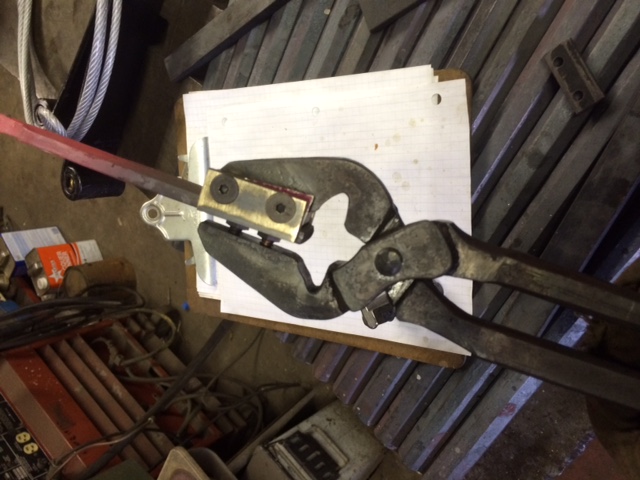
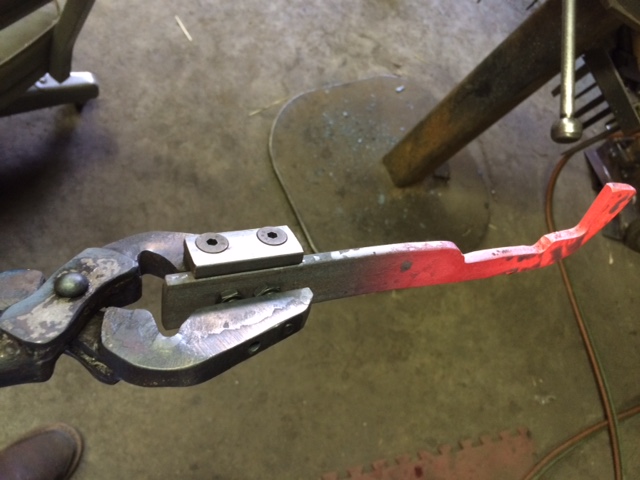
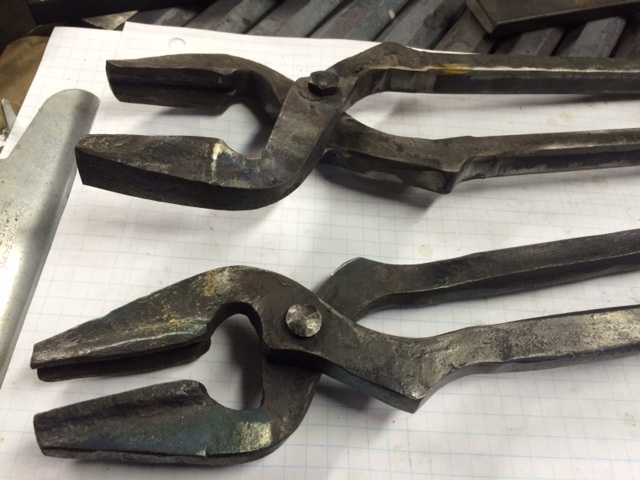
It was awful stormy yesterday, I ended up retreating to the shop all day and addressing an issue I've had. It's a challenge to make a separate set of tongs for every flat bar in the shop. After remembering to stay hydrated, I started sketching, then forging and machining, and the thing works. The tong design came from some notes I took at a Mark Aspery class, 10+ years ago. I revisited the idea recently, and I really like them for square and round. I incorporated the removable bit idea to deal with differing widths and thickness of flat stock. The hex bolts thread to and fro to keep the reigns at a comfy gripping space. Started with 1/2 x 1" flat bar.
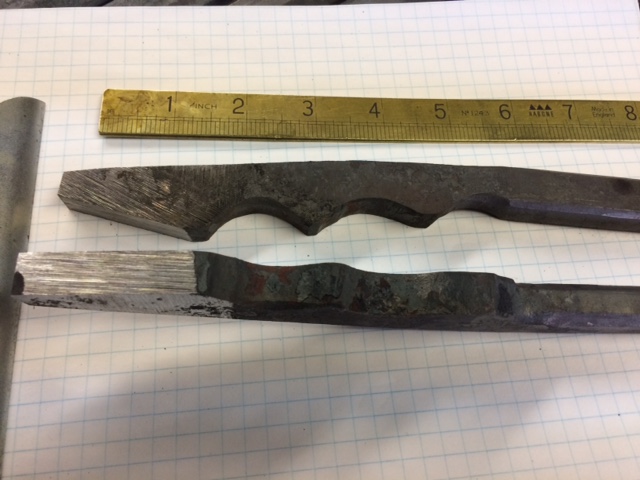
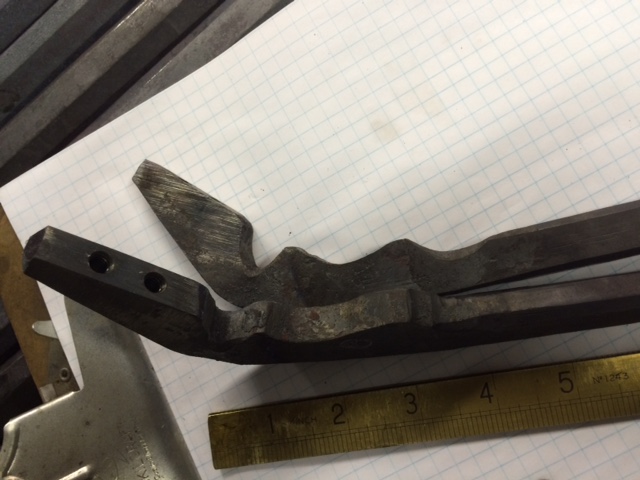

More pics
-
That's pretty nifty. Brazing rod puddles for the stand out part?
-
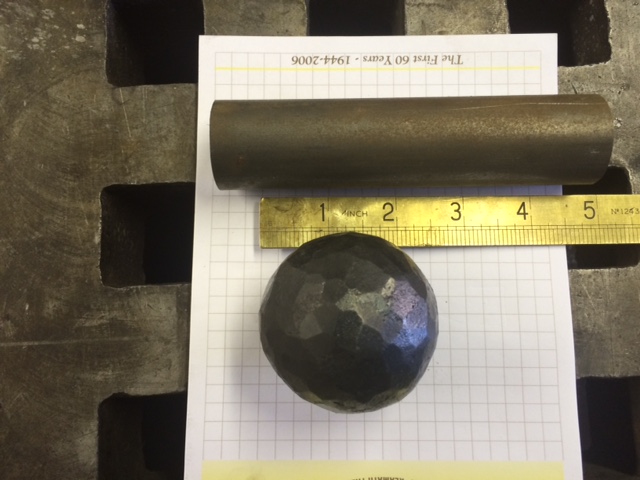
Started with 5 inches of 1-1/4" round. Started upsetting it with the Kinyon hammer just to see what would happen. It started to take on a roundish shape after a few heats, so I went with it. Came out 2-1/4" diameter.
-
Gerald, I just drifted it so it would use my goto handle, 24-28oz machinist handle. I buy them in case lots and try to use them on everything I make, so all my hammers feel the same to my hands.
-
I can't comment on the electrics, but I think there's a basic mechanical problem in your sketch. Your spring, or swaybar is drawn horizontally, and as the hammer raises, the distance from the center pivot point to the slide changes, and I don't see a way to compensate in the drawing. I think a shackle on the front would not transfer power very well.
-
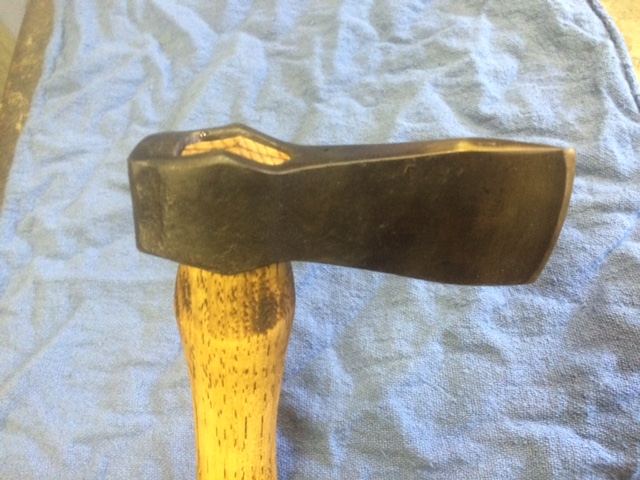
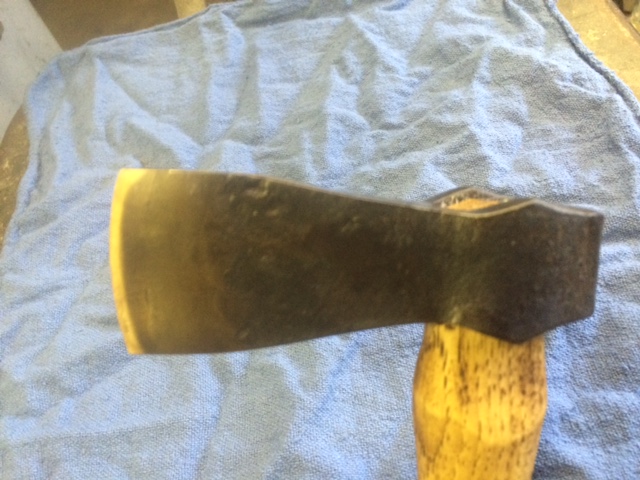
It was 2 weeks before Christmas and I get a call from a lady that doesn't know what to get her husband for a present, but she knows he wants a hand made small axe. I had never made one on the fold and weld style, but I found a nice tutorial by Gerald Boggs on the Mark Aspery youtube channel. Off I went to the shop, and by golly, it worked. I made this one yesterday to keep the muscle memory alive. I messed with Geralds dimensions a bit to make a smaller eye that I already have drifts for. To be honest, I'd rather punch and drift a hole in solid stock, the drifting process on the wrapped style threatens to peel the forge weld apart, and often succeeds. They do have a cool factor though. I inserted a spring steel bit into the cutting edge, and etched it a bit. the dissimilar metals add to the nifty look. After hardening, I did the mandrel eye temper to get some colors, and finished with Renaissance wax.
Thanks for doing that video, Gerald, the husband was all kinds of happy, and I got some cash for Christmas cheer.
-
My best advice would be, 'listen to the fire'. When you are cranking the blower, the fire should have a noticeable roar. If it doesn't, stick the pokey tool to the bottom of the fire while cranking, and give it a slight lift. If it doesn't roar then, clean it out.
-
I was shooting in the dark when I did the lg100, and it was confusing as one of the parts works upside down. I backed off for a couple days, bought a slab of hard maple, glued and squared the wood so it was the same size as my steel blanks. I cut my dovetails and tapers in the maple first. it was fast, tangible, and helped me work out the cobwebs in my head
-
I'm sure you can save it. On the one I did (not saying it was correct), I marked the edge of the lower die that will end up being closest to the operator. I didn't taper this side, so it would lay against the sow block always. I called that point 'Home'. I cut the taper out of the off side, and used the key to drive the die toward 'Home'. Make sense? I think you can re-mill the off side with the 1/8/ft scenario, and be fine.
-
Several concerns.. I see by the mill setup you are cutting the dovetail angle, but is this also tapered? you would need a shim between the die and the mill table.
The LG100 I made dies for, the sow block had approx. 1/8inch/foot taper. I reproduced this by sticking a 1/16" TIG filler under one end of the 6 inch parallels on the mill vise.
I feel your 5 gallons ain't enough, and the heat in the center will temper out any hardening you can get. I used a 15G beer keg with warm water. The die screamed a bit, but had good results.
Read up on Prussian Blue to dial the wedge key in, plan on a good half day to get 90% involvement.
It's been a year since I did this, I'm a bit fuzzy on who is tapered, and who isn't. Hopefully someone will chime in and correct me.
-
I use Norgren valves, 1/2 in ports on the 5-port, 1/4 in port on the roller shuttle. I dont see the need for 3/4 inch ports unless the air cylinder is similar equipped.
5 port valve is Norgren MN01CGA73A000,, Mcmaster # 6124K36
Roller shuttle is Norgren X3064222,, Mcmaster# 8277K14
If you get the hammer running to your liking, I recommend buying spares to keep on the shelf.
-
I restored a LG100 for a museum last year, and floor vibration came up. With the hammer setting directly on the slab, we could feel the shock in our boots from 15 feet away when the hammer was running flat out, forging 1 inch square. One of the guys had been foreman at a big company that had dozens of big punch presses clanging away all day, he suggested vibration isolation pads. They are an engineered wool or felt disc, one goes under the hammer bolt hole, another goes over the base with a big flat washer and nut. I did redneck telemetry after we got the pads installed, I filled several plastic drinking cups with water and distributed at various distances from the hammer on the floor. Kind of a Jurrasic Park seismograph. There were a few slight ripples 12 inches from the base, but farther away than that, nothing! We had various discussions about whether it was good for the hammer to be suspended by these pads over the mounting holes, with no support over the rest of the casting, but Bob the engineer assured us it was fine. anyway, these pads work very well, I'm sold on the idea.
-
I find piles of old buggy springs at auctions for cheap. I cut the tapered ends off at about 8 inches, they made wonderful tapered wedges for layout, fabrication, and general millwright work.
-
Here's my take: The first Kinyon hammers had the air cylinder on top, mounted hard to the slide, and upper die. There's a problem with this, as jarring causes metal fatigue, broken welds, etc. Also, having the air cylinder on top made for high ceiling clearance issues. The leaf spring and shackle allow for the air cylinder to be mounted lower. Since the air cylinder is at a slight angle, the spring shackle moves back and forth to convert the diagonal power to a vertical power for the falling weight. I think the 'whip' of the spring is a tertiary concern, but too light of spring won't transfer a good thump. I put a big hydraulic cylinder, with an auxiliary oiler on my hammer, so I don't have much room to move it back and forth to test harmonics.
Personally, I don't like UHMW for bushings, as they are viscous, and change dimension with temperature. Once you get bronze bushings dialed in, and oil the slides a couple times a day, they last for years, if not decades.
mh
-
You could start up a retirement home for old pirates. Beautiful.
-
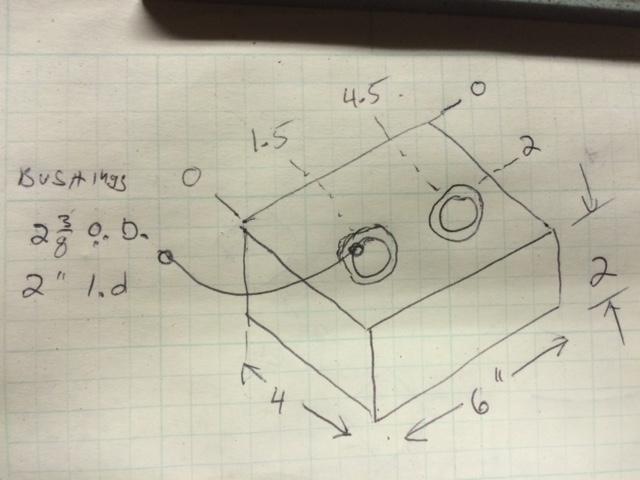
Rheis, here's the dimensions.
-
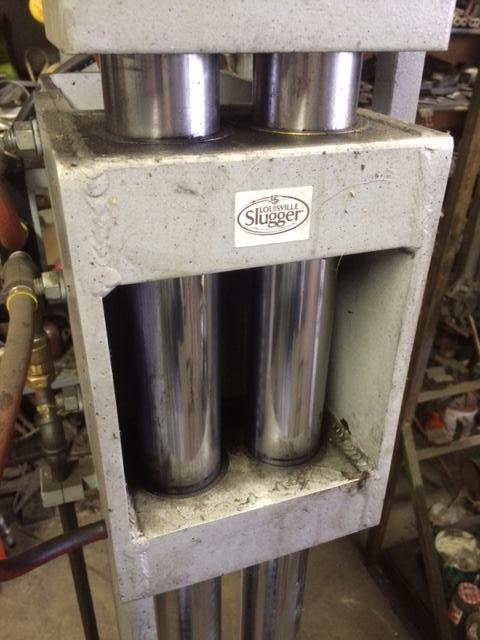
Rheis, No, I'm actually plumb happy with mine. It's hard to throw out specific advice, as your vertical mill probably has a different capacity than mine, etc. etc. If you go with the two round bars for a head slider, line bore the finished head after it's all welded up, then press in the brass bushings, then, since the machinery is already set up, line bore a clean up cut in the bushings, as they distort as they are pressed in.
-
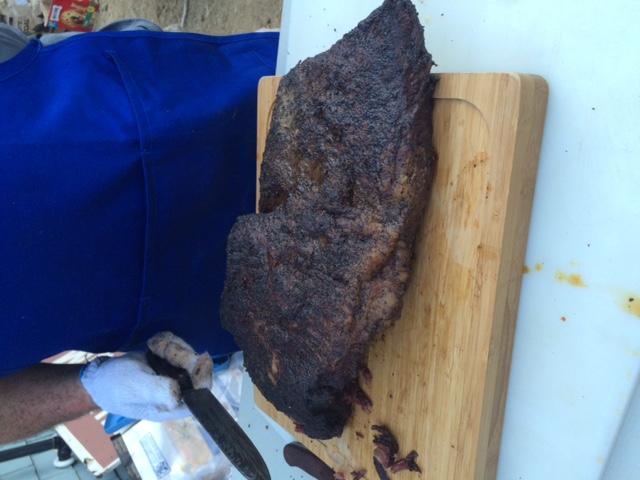
I got volunteered to cook large lumps of red meat at a hammer-in last weekend in north California. I made Texas style low and slow briskets and tri-tips for 40 head, 2 days. The meals came out fantastic, and my new feather knife threw some class into the carving department.
-
Patrick, search youtube for Kinyon Hammer. John Emmerling has a couple under gearhartironwerks, I made videos when I finished mine, under olenemachine. They are a utility hammer that runs off shop air. I like it because the only parts I can't get at the tractor and feed store, are the 2 magic air boxes from Mcmaster, and I keep spare sets on the shelf. They hit real hard, and have uncanny light feathering.
-
I did such on my 100# Kinyon hammer. I saw the video of the KZ hammer, I've never met Ken, but he looks like came up the hard way, I just trusted him. The 1 x 8 plate works great for me. You can see my hammer on youtube, Search olenemachine. I abbreviated the last plate toward the operator 4 inches for operator convenience, I talk about why in the video.
-
Thanks all, I, in fact, do intend to make more pattern welded niceties. I really lucked out with this piece. There were 50 ways it could have messed up fatally. I paid a lot of attention to the number of hammer blows per side, grinding all traces of schmoo off before re-stacking, re-hydrating with the finest single malts on hand, and listening to my mentors. Fluxless welding in a gas forge sho' 'nuff works, with a little soak time, and the right temps. I need to do some practicing on my home forge, which is similar to the one used in this blade, but I live at 4200 ft elevation, and the curve is steeper. I have a raw billet prepped, and will start in on it, as soon as I finish watching Batman.


Foot pedal designs for air hammer?
in Power Hammers, Treadle Hammers, Olivers
Posted
I watched Frank Trousil and Mark Krause do a powerhammer workshop last year. They had a 2B Nazel that ran real smooth. I liberated this idea from them, and am quite pleased with the time it took to make it. There's no return spring on the treadle, it comes back with a counterweight now.