BP0xxx Blueprints
Copyright 2002 - 2007 IFORGEIRON.COM, All rights reserved.
Vise, Maintenance and Repair
by irnsrgn
As most people have different ways of doing things, this will probably go crossways of the thinking of some. It is not intended to cause friction but is just the method and reasoning behind what I was taught and have learned thru the years.

This is the subject of this Blueprint. This is my demo vise and is stored outside in the weather year round.
Leg or Blacksmiths Vise --

All Leg Vises work in more or less the same way, but some are constructed differently. In essence, all leg vises are not created equal. They are just like everything else, through years of evolution and trial and error some improvements have been made.
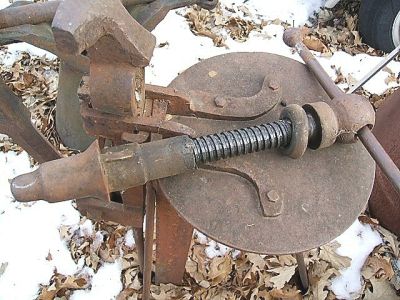
The white arrows point to the forward and rear what I call EARS. My Grandfathers leg vise does not have this feature, but is in excellent shape. I have never heard an explanation of what their function is other than my own. My explanation is that they are deflectors to keep hot scale, filings and saw cuttings from falling directly into the the bearing surface of the front screw handle and the contact area where the screw box sets in the split part of the vise main frame. We all know that any kind of abrasive material will abrade away metal that is in constant motion. Even common dust will do this.
This is what the screw box and screw look like for this vise. Contrary to most belief the threads are not of the Acme type, but are square threads. Square threads do not have tapered sides so thus there is more mass to the thread as it is not narrower at the top and thus will take more torque and the abuse of much use. They are necessarily a little looser than most thread fits and thus do not bind up or gaul as easily as other thread types.

This is the screw box from another vise made by another manufacturer. Notice that it was made with an open end rather than closed like the other one. The Arrow shows the amount of Threads inside the screw box, in this case 3 inches of actual threads were cut inside the casting. these are usually cast iron and are thus fragile. But cast iron and steel or iron make good bearing surfaces and the oily residue on the threads will usually be black because of the hard free carbon in cast iron.

This picture of the end shows that it was cast this way and not broken or cut off by someone at some time.

This is the screw and centering sleeve for the above screw box

This shows the thrust washer and centering cone from the first vise. The arrow points to the rounded taper that does the centering in the outer jaw opening. It also shows a more or less massive bearing surface on the screw handle.

This is the thrust washer and centering cone from the other vise, notice that the bearing surface on the screw is much smaller and is rounded over from wear. This vise is much harder to get really tight and also to release the pressure.
LUBRICATION ---
Any Heavy, Thick or Sticky Lubricant should never be used on the screw of a Vise, as it is like a magnet for any foreign DEBRIS to Stick To. The Only Lubricant that should be used on any Vise Screw is a Light Weight OIL. Light weight Oil has the ability to easily discharge or get rid of any Abrasive Debris due to its Thin Viscosity and it does not HOLD Debris to the screw like the Heavy, Thick, Sticky stuff does.
Once a week or so if the Vise gets a lot of use, the Vise Screw should be unscrewed almost all the way and a good spraying with WD40 or other very light weight oil should be used to wash the Screw Off, making sure to turn the screw by quarter turns and spraying to Wash the Old Contaminated Oil from the screw, I hold a shop towel under the screw when doing this to keep the runoff mess to a minimum.
After the Cleaning Cycle, a Liberal amount of Light Weight Oil should be applied to 4 sides of the screw. I use 10 weight Non Detergent engine oil or Marvel Mystery Oil.

A liberal amount of the same Light Oil should be squirted in the end shown by the White Arrow before the Vise Screw is Screwed Back In. Hold the Palm of your Hand tightly against the opening in the end while screwing the screw back in so it builds up pressure and the Excess Oil you squirted thru the hole will be Pushed Out thru the Internal Screw Box Threads and will push the Old Oil and Fine Debris out the other end. An old rag laid in the scissors part of the jaw legs will cut the mess to a minimum.

On Vises with a Closed End on the Screw box, there are two choices. 1. You can Completely Remove the Screw and squirt a liberal amount in the Screw box before reinserting the screw, or you can Bore and Tap the Screw box in the area shown by the White Arrow and screw in a plug before screwing the Screw back in.

Don't forget to Lubricate the Thrust bearing area near the end of the handle. This area should be thoroughly wiped clean before lubing it.

It is a Good Practice to place an Old Rag at the position indicated by the arrow when filing, or sawing to keep the cuttings from falling down onto the screw. If the Vise Jaws are open quite a ways the rag should cover the Whole Exposed Screw.
TROUBLESHOOTING --

Often after purchasing a Used Vice, you find out the jaws do not close properly.
The Jaws should close almost together clear across unless the Vise is Twisted from Misuse or Abuse.

The Twist is usually in the lower weaker section of the Outer Vise Jaw depicted by the White Arrow. This Problem is usually Easily Remedied by Clamping a suitably thick piece at the Outer Edge of the Jaws on the side that Makes Contact first and Closing the Vise with the Screw. Be Careful as it is easy to Twist the Jaw to much in the other direction. If repeated tries are unsuccessful, it sometimes Requires some heat in the General Vicinity of the Arrow to remedy the situation.

Another way the Vise Jaws can be Sprung is Front to Back and the Top of the Vise Jaws won't come together. The Area where this problem exists is in the weaker section just below the arrow where the Vice is Slit and Drifted to accept the Screw and Screw box and is generally caused from trying to Bend something Cold with the help of a Sledge Hammer. The Easiest Way this can be remedied is to Strip the Vise down and Heat the Area of the Afflicted Jaw at the Slit and after hot lay it over the anvil and Work it Back in Place with Gentle Blows with a hammer. Make sure after the Correction is Made that the Corresponding Piece of the Screw will fit in the opening, Quickly, Temporarily Reassemble the Two Main Parts of the Vise at the Lower Pivot to see if it has been moved the proper amount. Then Cool and reassemble.
A Vise with these Easily Remedied Maladies can be purchased for a good price if the Maladies are pointed out to the vender. Remember you are a Blacksmith, you can Overcome, Adapt and Fix things.
Bench Vise --

Now we come to Bench Vises. This picture shows the Gunk and Crud built up inside the Main Part of the Bench Vise. The Nut usually has a Dovetail on the Bottom of it and it is driven in to a corresponding Mortise in the Bottom of the Vise and secured with a pin as shown or a Filister Head Screw Threaded into the bottom.

The Restraining Pin can usually be Driven Out from the Bottom Side.

The Nut will usually have to be Driven out also with a long punch, just Don't Miss and damage the Threaded Top Part. The Dovetail can be Plainly Seen here. Thoroughly clean the Threads and and Nut.

Thoroughly Clean the Ways or Slides in the Bottom of the Main Body and the Mortise for the Nut.

Remove the Screw and Thoroughly Clean it also. Lube the Ways or Slides on the Bottom of the Moving Jaw and the Vise Screw with a Light Oil, Not Forgetting the Thrust Bearing Area. Replace the Nut and Keeper and Lube the inside of the Nut. Reassemble the Moving Jaw into the Stationary Jaw and you are done.