Latticino
-
Posts
2,161 -
Joined
-
Last visited


-
Frosty, Yeah, on my phone to answer and conflated locker room showers and residential restrooms.... It is exhaust duct either way. We typically don't call it "ventilation" exhaust.
-
In my opinion flexible aluminum duct is not appropriate for either kitchen hood exhaust or forge flues. It is just barely acceptable for laundry dryer or bathroom shower exhaust.
-

Designing a bamboo Forge
Latticino replied to DarkMamba's topic in Solid Fuels: Coal, Coke, Charcoal, Wood, etc
More importantly it might be worth investigating what you want to use the forge for to see if there are more economical alternatives, or if the whole undertaking is impractical. For example if you are only going to bend or twist 3/8" rod, you can likely do it cold with the right leverage. If you plan to make knives, the fuel cost is only a small fraction of what can be required for abrasives to finish the work. Certainly not discouraging you from getting into smithing, but if sourcing a 55 gallon drum is going to break the bank, forging may not be a reasonable path. I see preowned, reconditioned drums around here for around $20 -$30. -
So something like this? curtis jere crane lamp
-
Blacksmith songs and music
Latticino replied to George N. M.'s topic in Blacksmithing, General Discussion
Back in the 70's her album "Recollections" was one of my favorites. I think I still know most of the lyrics by heart. -
Blacksmith songs and music
Latticino replied to George N. M.'s topic in Blacksmithing, General Discussion
Also loved her in the Silly Sister's group. Look them up if you don't know them. Actually also saw Judy a year ago. She certainly still has the charisma, but that polished voice from the 70's isn't quite there. -
Blacksmith songs and music
Latticino replied to George N. M.'s topic in Blacksmithing, General Discussion
I'm a big fan of Steeleye Span as well. Of course, the traditional song/jig "The Blacksmith" that they do has been recorded by a great many artists (it's a fairly popular Irish music staple), but I heard it from them first. There are a couple of other blacksmith themed instrumental Irish tunes as well including: "The Merry Blacksmith" and "The Blacksmith/Blacksmith's/Blacksmith's Daughter", both reels. I also don't usually care for lyric screaming, but each to their own. -
As far as value goes, things are pretty variable. Would cost you around $400 to replace it with a new one, but there aren't all that many being manufactured today. I've seen post vises in that condition sell for anything from $45 (yes I bought that one myself...) to $175. They do sometimes get posted for outrageous numbers, but rarely sell at them. Needless to say, if you want a reasonably quick sale you will want to be closer to the $75-$125 range. The New England Blacksmith group in your area is quite active. Perhaps someone from that group can help you out.
-
Many folks use spiral duct for their forge flues. You are correct that typically this duct has a galvanized coating and, if overheated, can be a problem. In my experience an old school overhead hood entrains enough shop air to cool down the flue gasses to a point where it is not a problem, but the super sucker style is so effective that the flue can get overheated, particularly if you are building a larger forge fire. You can probably go with spiral duct if you have some kind of black steel or stainless connector between the super sucker hood and the following duct. I would use a piece that is at least 3' long for this purpose. Please note that most of the snap together duct with the snap together longitudinal seams that others have been advocating are also typically made using galvanized sheet metal as well. IMHO spiral duct is a significantly better option than snap seam duct, but usually a lot more expensive and only available from a sheet metal duct manufacturer (snap seam duct is available here in hardware stores).
-
Also get the hood opening closer to your fireball if possible and be sure to start the stack drawing fumes by burning something inside the "barrel".
-
To allow the turndown ratio you will want for heat treatment (it is really nice to have the capability to turn down to around 1250 deg. F for a subcritical stress relief pass) I would recommend considering making one of your burners rather small and the other large. The small burner gets tuned for the lowest temperature you want to run the forge at, and the larger one cycles with setpoint. This way the smaller one acts as a safety pilot (if aimed correctly) and you only need one set of controls. I like a thicker castable refractory layer than 1/4", but only if you are using the correct material. A lightweight, castable, high alumina refractory like Kastolite 30 works extremely well, but I like to see it at least 1/2" thick (if not 3/4") for real structural stability. Of course you do have a bit more time to heat up, but there is a thermal mass benefit as well.
-
One of the first steps in forging a hammer head for me is to make the tooling necessary to forge it efficiently. For me, at minimum, this is a hammer eye punch and a hammer eye drift. There are a bunch of different designs for each, but the one recommendation I have is that you size your hammer eye drift with a crossection and taper than matches standard commercial heads. If you then use it from both ends, you will get an hourglass shape that will fit securely on a handle and be able to be wedged. There are also some tricks to keeping the eye punch correctly centered in the billet: Some folks predrill two holes all the way through the billet at either end of the eye before any hot work. Essentially then you use a large slitting punch to remove the web between the holes. Some folks just drill a single hole at the center of the eye that works as a guide for a hammer eye punch that has a center finding face (see the Brazeal style hammer eye punches). This avoids the offset from each side of the eye that can make punching the eye a challenge. Some put a deep centerpunch on each side of the eye to act as a locator (see above). Make sure you look for the center of the "swell" when you flip the billet and start to work the other side as one of the punches will get a bit washed out while you are punching the original side. If you have a coal forge and can selectively heat one side of the eye, you can try to correct a thinner side by heating the thick one when you go to drift the eye. That can even the eye out, but may twist the face orientation a little (easily corrected either hot or cold). Make sure you rotate the billet 180 degrees every couple of strikes to help you punch perpendicular to the face of the eye in both longitudinal and latitudinal orientations. Unless you are using a hydraulic press to punch the eye, ergonomics work against you in punching truly perpendicular. What you have made looks more like a handled top fuller than a hammer to me. However, correctly heat treated, it will likely work for either role.
-
My current gas forge has a 14" long interior, and 90% of the time I wish it were shorter. You are much better off with a 6-8" long interior and doors that can be opened at both ends. This actually works better for forging sword lengths, as you can only hand hammer about that long a section at a time. For heat treating a dedicated vertical 55 gallon drum lined with 1" of refractory blanket (properly rigidized) and a 1" burner works better than any long multi-burner forge I've ever seen used.
-
That's a lot of forge and will be a bit of a gas pig. Depending on how hot you need to get, I would go with (3) nominal 3/4" burners provided you are thinking of standard NA propane burners.
-
Beaudry power hammer
Latticino replied to Simm367's topic in Power Hammers, Treadle Hammers, Olivers
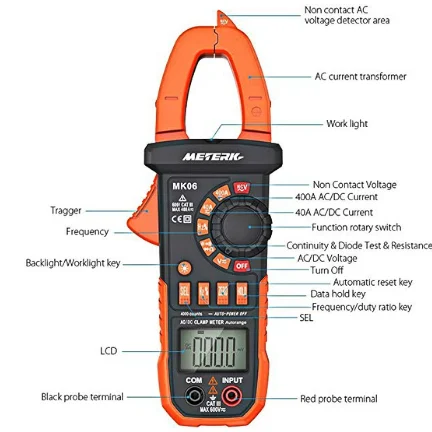
If your motor is up and running (photo shows it already powered), you can put to work and measure the amp draw at each of the hot legs using a strap around (clamp on) ammeter. This will give you a direct measure of the brake horsepower currently required by the motor in question.