All Activity
- Past hour
-
Okay, it does not begin to compare with a single burner Mister Volcano forge, which costs the same price; that is quite true. On the other hand, how much longer will the better forge continue to be offered? They have already taken their burners off the market. If we scoff at every other low cost forge, maybe there will be even fewer choices down the road? I look at that forge, and see how people who are reluctant till build their own forge can improve it, with little effort. Is it very small? Yes; on the other hand, people build coffee-can forges, and the even tinier two-brick forges, all the time, to build, repair, and change hand tools, and jewelry tools too.
-
I think there is a video of a mouse putting tools away. If I remember right, the guys tools he left on the work bench kept ending up in his toolbox over night when he was sure he had left them out. He ended up setting a camera up and caught video of a mouse putting them in the box. Ok so I just looked it up and had remembered a bit wrong, it was just stuff from a parts tub. But hey, Id love if my mice did this for me instead of chewing things up.
-
I didn't see a 2 burner version, I was commenting on the forge pictured above. Helpful? . . . Helpful? . . . Okay, it will be a safe place to burn a mosquito coil when you're propping the door open. Frosty The Lucky. I didn't see a 2 burner version, I was commenting on the forge pictured above. Helpful? . . . Helpful? . . . Okay, it will be a safe place to burn a mosquito coil while it's propping the door open. Frosty The Lucky.
- Today
-
 Nick T joined the community
 -
My first burner designs used a series of holes in a line. The famous Hybrid burners, changed those series of hole to slots, improving burner performance. I came back with rectangular air openings, with beveled edges for and aft, improving them still further. However, simply cutting out the material between the back and forward hole in these burners, will turn them into air slots, which should improve burner performance more than enough for small burners. So, what has size got to do with anything? For some reason that I do not understand, smaller burner sizes tend to run hotter than larger burners; I have had to partially de-tune my smallest burners (1/4" size and under), in order to maintain long turn down ranges. This is the main reason that I am playing with linear burner designs again; they are more than hot enough to serve as miniature burners, and a whole lot easier for people to construct than Mikey burners. Don't worry, though; I've already designed souped-up linear burner versions, which are much harder to build, for the determined hobbyist. Never let it be said, that I let my fellow mad scientist types down
-
"It is kind of odd but being in a war is both some of the best memories of my life and some of the worst. " Billy, truer words were never spoken/written. The other odd thing is how fresh the good and bad memories remain. Some of my memories of Viet Nam feel like they are only a couple of years old when, in reality, they have been in my head for over half a century. And memories of smells and tastes remain very clear. The memory of the taste of C rations or LRP rations (Long Range Patrol rations, freeze dried) is like something I ate a few days ago. GNM
-
 Pick My Online Class changed their profile photo
 -
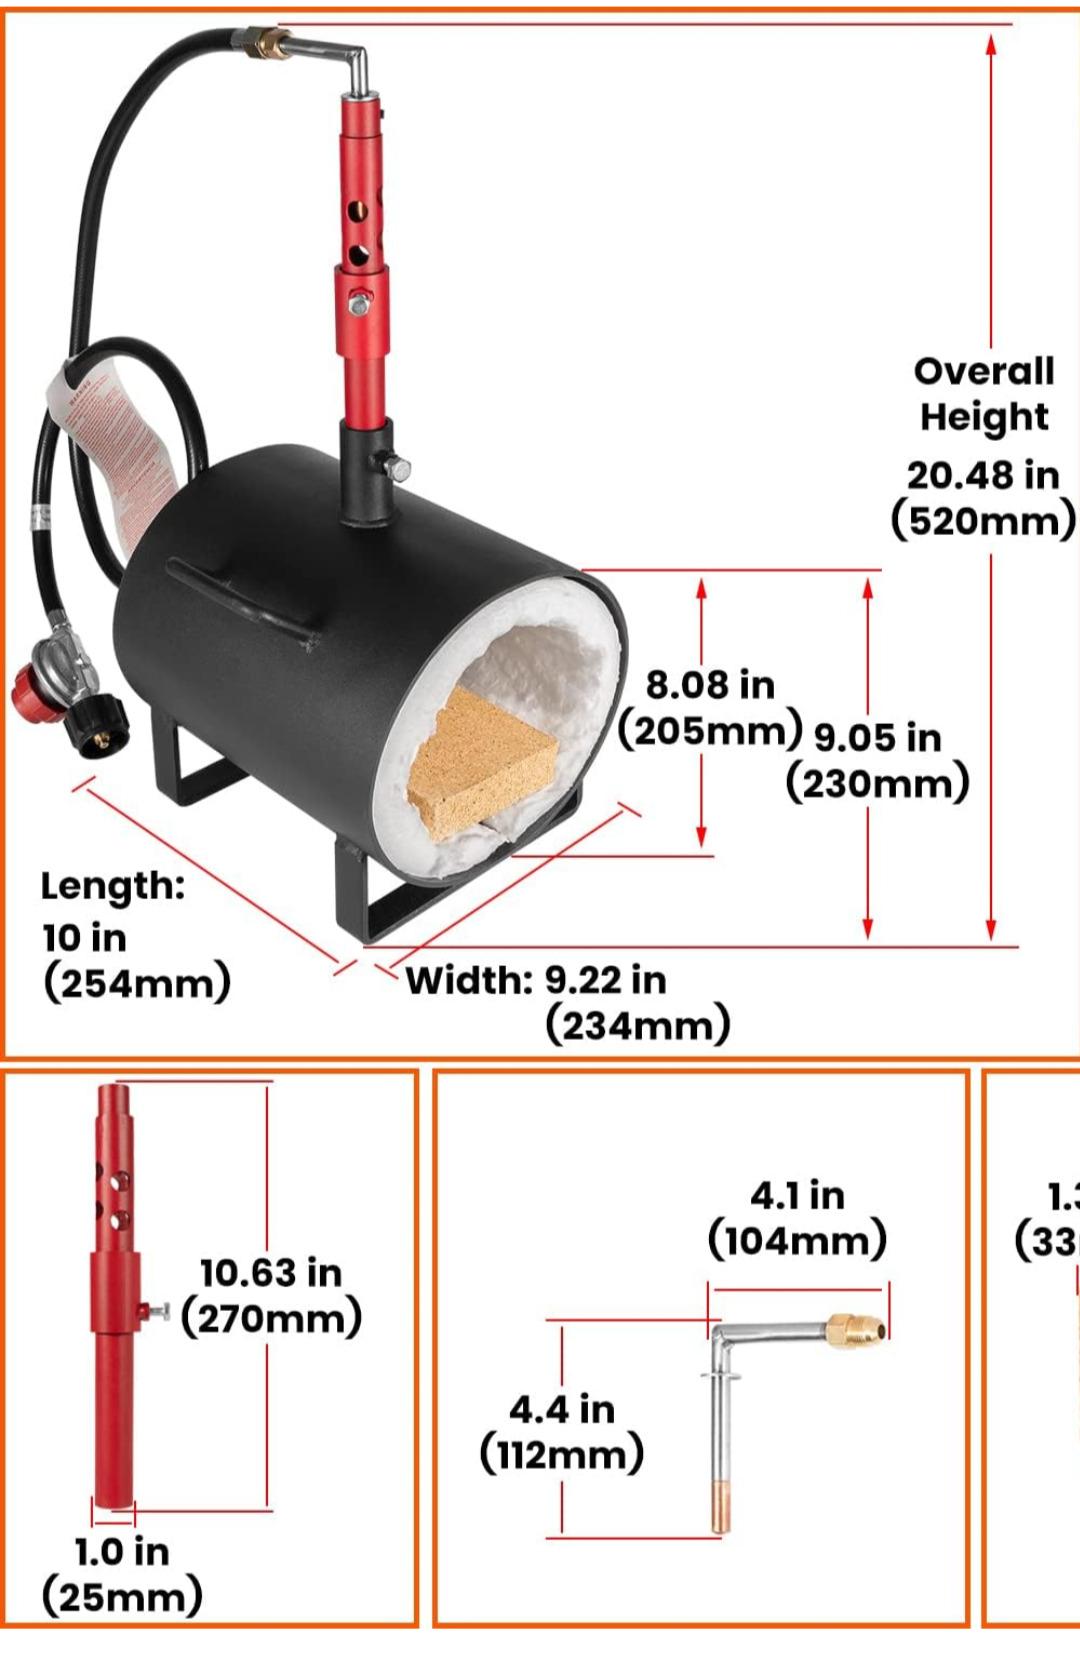
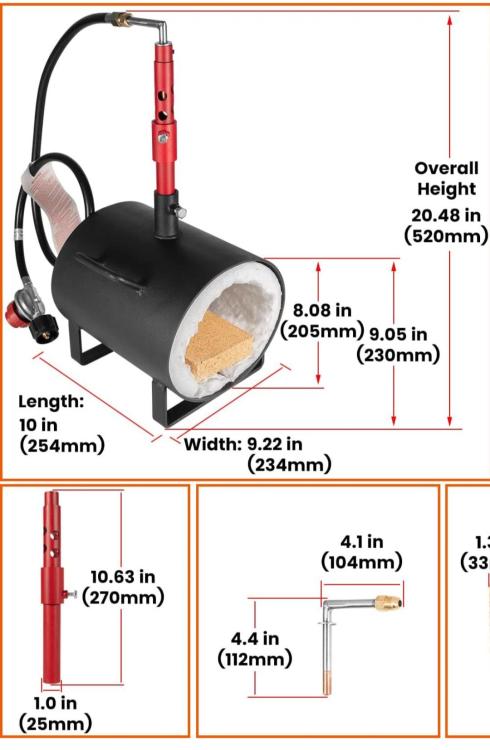
I would lose the brick, and add a 1/4" thick finish flame surface of Kast-O-lite 30, or Plistix 900, instead. This is a much better forge than the one I looked at; not because of its size, which is better because you will want to keep it, even after you build the "forge of your dreams." The best improvement over the other one, is that there is no angle around its exhaust openings to heat up, and be warped out of shape As to providing parts for other forges...if you simply scribe lines between the forward and aft holes on its burner, I think you will decide to keep your "garage heater" just as is People might use the e-cowlboy forge for a fancy door stop? Let's not forget to be helpful, at all times
-
Pick My Online Class joined the community
-
I forgot about the split brick but that's generally my advice about putting a brick in the forge. Forget about it. Like Mike I see so little right about this forge I don't have to "Find" fault. Even the hose is pretty useless being crimped to whatever the "regulator is." One of the guys up here bought one and we discovered the regulator was nothing but a flashy needle valve and did nothing for psi. My best advice is, "Do NOT waste money on it!" It is so badly designed and built I'd be hard pressed to think of anything to use it for. Maybe hardening short blades one at a time. I'd rather build a charcoal fire in the old BBQ. Frosty The Lucky.
-
Good Wonder Billy. I think it's just the thing to let the experienced trainers figure out. Frosty The Lucky.
-
Wonder if they could be trained to put my tools away in the shop?
-
Reindeer, welcome aboard. My dad was a combat engineer in Vietnam. He was a heavy equipment operator, later went artillery. I chose the route of my granddad and road a tank around the ME. The Bedouins used to come running up to our tanks wanting food and water when i was there. We had one guy come looking for medical attention for his wife. While one of our guys was bandaging up her foot the husband tried to give me and a couple other guys his daughter. Not to "use" but the take back to the states with us. It is kind of odd but being in a war is both some of the best memories of my life and some of the worst.
-
Just rethought about that math, because math is awesome. You also have to subtract the volume of the split brick (another 50 in³). I get approximately 80 in³ if another layer is added, and the brick is included. The fit of the brick would be interesting too. Might have to cut it down or chamfer the edges. Would be even less volume if refractory is applied.
-
 Al Bawadi Metal Industries joined the community
 -
I use ¼ inch OD stainless brake line with my orifices. Used to be mig tips, now I use 3D printer nozzles. I turn the threads off and silver braze them in. Also, as usual, my math mostly agrees with Frosty’s.
-
You might want to refigure the volume. As shown I see 283 cu/in volume and if you ad another inch of ceramic wool barely 125 cu/in. The measurements shown are the outside dimensions you have to calculate volume with the inside dimensions. Frosty The Lucky.
-
.thumb.jpg.dffdc87c1637487228f5e63224bed4f3.jpg) delhicg joined the community
delhicg joined the community -
 rachellewisblog joined the community
 -
I do believe I confused the burners I was looking at on AliExpress with the one I pointed you towards. I blame old age. You're right. It isn't copper but it appears to be the same diameter as a mig tip in the photo attached The forge I was looking at with the relevant picture is no longer showing in a search on Amazon. I apologize for the wild goose chase. I wasn't really focused on the forge but the gas tube did catch my eye. The forge and burner is, how did you put it, a garage heater and a good base of parts. If their dimensions are accurate, it could fit another layer of inswool and a refractory coating and end up with about 300 cubic inches. Throw in a decent burner and it might heat some metal.
-
I would guess that is you are adding something new or relevant to the thread that would be OK. But bumping it just for the doing it or for personal gain, like the tail gating section, that would be frowned upon.
-
 rubyrise77022 joined the community
 -

Casting a Gingery Lathe
Frosty replied to Nobody Special's topic in Smelting, Melting, Foundry, and Casting
That's Way too hot. Did you look up the melting temp of aluminum? 1220f is pure al, casting alloys tend to run lower say 1150f +/- depending on % and alloying metal. You should just be able to see red in a dark room, at orange temps it's oxidizing as soon as it starts to pour and the flux is no longer keeping air off it. 1250f is pushing too hot but should be okay. It isn't filling fast enough, hotter is not the answer. You can see how it was solidifying by the swirl patterns in the casting. You need to improve the flow rate so it fills the cavity before it cools. Aluminum has a low specific heat, it loses temperature fast, the greater the temperature differential the greater the change. That is why making the melt hotter doesn't do any good. You have a flow problem. Look to your runners, gates and fill cup to increase the flow rate. You want the fill cup to gulp the melt, not drain nicely. Frosty The Lucky. -
dgr, I had a look, but did not find any e-cowlboy forge photos of their gas pipe and MIG tip. So, all I have to go on is my own previous experience; that tells me that copper pipe is quite unlikely to be used as a gas tube. A brass gas tube is far more likely. Old brass parts sometimes look like copper in photos. As to how they get a MIG tip with 1/4-27 thread to screw into a 1/4" outside diameter tube or pipe, the gas tube is probably 5/16" outside diameter by 3/16" inside diameter. Although, MK brand MIG tips have smaller diameter thread, which would probably just barely work in a 1/4" gas tube; hey are a superior tip, but I quite using them, because they are just too hard for people to find. By the way, their photos show a lemon yellow incandescent interior, which is consistent with 2000 to 2100 F heat range. 2700 F interiors are white hot. But the worst thing I see about these forges are the exhaust openings and doors. They look nearly guaranteed to warp from the heat of exhaust gasses. I could go on picking out things I don't like about this forge...but, enough said. "Last thing for Mike's new book. I've seen it mentioned in your writing that mufflers are zinc coated. I installed a few mufflers in my younger days and never saw the telltale yellow soot of zinc when welding them. I believe non-stainless modern exhaust components are aluminized and not zinc coated steel." Ups! Suppose I'm showing my age Thanks for the update.
-
Casting a Gingery Lathe
Nobody Special replied to Nobody Special's topic in Smelting, Melting, Foundry, and Casting
For the incandescence, I checked it with the lights off for a couple of seconds, poured at red, not incredibly dark, but not really sure yet if it wanted to go light red to orange. Say about 1400, and I know that's less than 1500...at least in steel, and I spent a long afternoon once hunting down articles on incandescence - what it looked like at the time is that most materials, and certainly metals glow once you get past about 1000 degrees, with about the same color at similar temperatures. Of course, I've slept since then, and I may have read it wrong, and I certainly wouldn't want to trust that as a method in the daylight, but my little laser pyrometer doesn't go nearly that high, and the texture/resistance also felt right. -
Mike, if you get bored, look at an e-cowlboy forge on the jungle. Not because it's anything spectacular but look at the burner. More specifically, the gas jet mount. The pictures aren't great but it looks like they're using a mig tip threaded into a copper pipe that is then threaded into an off the shelf plumbing fitting for the flare connection. What caught my eye is the copper pipe appears to be the same OD as the mig tip. I thought maybe they swaged or soldered it but one of the reviews shows a bunch of swarf that was pulled out of it and the reviewer said he unthreaded both ends to get the swarf out.. My curiosity said, how'd they get a 1/4 diameter mig tip threaded into a 1/4 OD copper pipe? Has anyone looked at the cast iron wasp waisted burners on AliExpress? They're pictures give some ideas. One of them showed compression ferrules on a 6mm gas tube. A 1/4 comoression x NPT might be a slick way to mount an adjustable gas tube. Last thing for Mike's new book. I've seen it mentioned in your writing that mufflers are zinc coated. I installed a few mufflers in my younger days and never saw the telltale yellow soot of zinc when welding them. I believe non-stainless modern exhaust components are aluminized and not zinc coated steel. Cheers
-
That's where I saw it, thanks for the memory jog. I can't control the wind, all I can do is adjust my sail’s. Semper Paratus
-
That's about $165 today.
-
Looks like cast iron to me but malleable cast iron isn't the same as cheap Chinese ASO cast iron. This is all I found regarding the manufacturer and it looks like there were financial issues over quite a bit of it's history. http://vintagemachinery.org/mfgindex/detail.aspx?id=3485&tab=0 I didn't see anything about anvils or other blacksmithing tools or equipment but I'd say from your picture they made anvils at least. Frosty The Lucky.
-

Steel from old garage door springs
PaperPatched replied to Ronin66's topic in Blacksmithing, General Discussion
And if you can tolerate paying more any good hardware store will have new ones. -
Yeah, I was cross checking a 1910 S&R catalogue and the most expensive vise I saw was a $4.97 swivel vise! Keep it fun, David
-
Casting a Gingery Lathe
Frosty replied to Nobody Special's topic in Smelting, Melting, Foundry, and Casting
You're progressing pretty well for not having hands on instruction. when you say you're judging the al temp by incandescence, incandescence of what? Certainly NOT the aluminum, it should barely show color in night time dark. Judge it's readiness to pour by how it feels when you stir it. You DO stir it in the crucible, at least when mixing the flux, yes? Molten aluminum has a distinctive feel when it's the right temp to pour, getting it hotter doesn't help and often makes things much worse. Next time melt at least 50& more than you think you'll need. Weigh the most complete one you've cast and add at least 50% more to the melt. That is why you make ingot molds after all. BECAUSE there is always extra melt and you'd be crazy to let it freeze in the crucible. Yes? Make ingot molds from angle iron in lengths about 1/2 the depth of your crucible. Weld a bunch touching sides between a couple pieces of strap stock. You don't need to weld the ends solid the al will solidify before much can leak through a tight contact fit. Once the ingots are cooled flip it over so it bangs on the ground and the ingots will fall right out. Muffin tins work but pressed steel ones don't last very long but cast iron ones don't take to being banged. Then again I've seen corn bread pan ingots in the shape of little cobs of corn. Soooo. Frosty The Lucky.