MonteCristo
-
Posts
57 -
Joined
-
Last visited
-
There looks like more detail in the vine itself on the first business card holder. What technique did you use to get those intricate lines?
-
Welcome to IFI Thinus!
-
Hi Mike! Welcome to IFI! I hope you enjoy your stay here. The members are very knowledgeable and helpful! There is also a ton of information(as well as projects) to help get started in the blueprints section. Do you have any equipment already? And people here love to see photos Welcome again!
-
Thanks Frosty, I definitely was working the 1st one cold at one point. I shall avoid that in the future. I was also wondering if the nails need to be quenched, right out the header, or is quenching dependent on the use of said nail? I think I quenched the 2nd but not the first. If I get decent at it and start selling some nails, what is the safe route for the quench issue?
-
Trade Big Anvil for a Welder
MonteCristo replied to Bill_49's topic in Blacksmithing, General Discussion
Made by John Deere? Good luck in your search Bill -
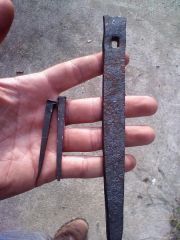
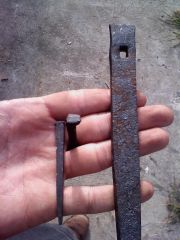
I had not even punched through a piece of steel before, so I decided to give it a shot after looking through my book on Practical Blacksmithing Projects and read the section on nails. I figured why not try to make a nail, ugly as mine may be. I made a rough header out of a flat piece of stock by punching through just enough to break the other side, then I punched from the other side. The header is relatively flat, but I may change it at a later date. I probably will add a bulge to help shape the heads. I only made 2 nails, but I made them two different ways. The first one with the larger head, I cut to a size I thought would be right, tapered it first and left enough for the head. The second one I just worked the end of a 1/4" square rod and then cut it to length. The second one was thinner & I did not leave enough for a head on there and ended up hammering it right through the header from one side. (The hole is a little large...) The 1st one I made a little too tapered I think and ended up splitting it. Is there a way to avoid that? They came out looking more like spikes but they drove into the wood good and are now holding some tools in the shop. I'm not sure how big the market is for handmade nails, but I saw that you can sell a handmade nail for a buck a piece(and that's a small one). I would love to try and make a replica of the Williamsburg style nail maker setup, that i've seen posted in other threads.
-
-
-
More Nails
MonteCristo replied to brianbrazealblacksmith's topic in Blacksmithing, General Discussion
Amazing again Brian! Will you keep us updated on the artist's use of the nails? I would love to see what he does with them -
Tragic loss, mourning my Brian Brazeal tools
MonteCristo replied to ironstein's topic in Blacksmithing, General Discussion
That is unfortunate! The work of Brian Brazeal I have seen on here has been so inspiring and high quality that I too would be upset if I lost such items. Be thankful you still have some things, plus got to work and learn from him! -
Nice work luken and nice setup! I really like that anvil. It sits low and squat. Do you know what make it is?
-
Roger Lorance firepot, swage blocks
MonteCristo replied to ironstein's topic in Blacksmithing, General Discussion
Forgive my ignorance, but are the depressions on the edges of the swage blocks to be accompanied by a top fuller in order to make rounds, etc? -
nice polishing job on that mate
-
Welcome BadKarma! You'll find tons of info and help here to get you started. This is a great community!
-
Cleaning off metal. A warning and a question.
MonteCristo replied to Junksmith's topic in Blacksmithing, General Discussion
Thanks a ton dsopac! I appreciate it! I am gonna give it a try on some stuff I made recently. -
Bolt cutters also work quite well for cutting stock.