

mudbugone
-
Posts
191 -
Joined
-
Last visited
Recent Profile Visitors
2,685 profile views


-
I just noticed the anvil movement in the video...I also noticed your ability to correct things by looking at the anvil construction...figured you'd addressed that issue on your own... I'd still kill for it...Great hammer ! After reviewing the original pictures when you started... the finished project evolved from a pile of pieces into a Swan. It resulted from your attention to details... The "helve" was transformed from a stick of lumber into a formed beam that looked like something a factory might build. Way back you expressed concern that an example I posted put yours to shame... You don't need to worry about that one... Yours far exceeds that example. Glad you got it finished so you can use it..... Now ENJOY ! LOL
-
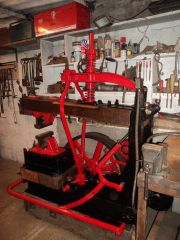
Some might not be aware they can click on the image above the video post and gain access to your gallery pictures of the building of the hammer. The transformation from rough build to finished hammer is pretty astounding... But the pics show the process you went thru to fabricate it... The antique oil cups on the helve pivot and the crank add a lot to the impression it's an antique hammer brought back from some obscure state of neglect. I'm still fascinated by those rail lock spring contraptions you used.
-
 Absolutely ! It came out better than your original description and looks better than most of even the antique hammers I've seen. The spring assembly and arm make it "mechanical" and interesting to watch... Great Job.....
 -
Glad you got it finished and I think everyone will agree It came out "SWEET" Nothing there to be ashamed of. It looks like your anvil post might be a little too lite ,but that's an easy adjustment if that's the case. It looks like an antique hammer and a fine example... Love the action of the helve in relation to the springs... Great idea. Please feel free to share photos from various angles ..... I'd sure like to see it better now that you made it pretty as well as functional.
-
Great buy--- You might find the following site helpful.. http://web.archive.org/web/20070519172426/http://home.woh.rr.com/rcbattelle/bandsaw.shtml They are still in business ( http://doallsawing.com/pages.aspx?idpage=1 ) and parts can be had from other sources as well... BTW you stole that saw...LOL...ENJOY it !
-
Hardly ! besides yours isn't finished yet. I haven't figured out if that one is home built or an old original ...maybe a composite of parts ? I try to save any info on similar styled hammers ... you never know when someone else has a method of construction which will come in handy.... (Like your rail chairs--LOL) I'm anxious to see how you assemble the spring/bumpers for yours.
-
I found the following video a while back .... Thought you might enjoy it...
-
Nice pictures... Good Luck...
-
I kept looking & thinking--- http://www.socalautoparts.com/index.php/sway-bars-amp-bushings-c-1261_0_1314_1501 I really miss the old VW's cheap to operate & even cheaper to fix... That assortment of axle bumpers might be what you're looking for. The fancy ones that come as a pair are bright... LOL Many trucks use rectangular axle bumpers which have two bolt mountings which you might check into also.
-
I got to searching for some sort of rubber bumpers that might be usable for a scaled down helve hammer much like the rubber bumpers used on a Bradley. I was surprised that finding something was easier than I thought. I found examples of truck loading dock bumpers Axle bumpers Even some Volvo springs with interesting rubber bumper inserts http://www.ebay.com/itm/98-00-Volvo-S70-set-of-left-and-right-rear-coil-springs-bump-stops-isolators-/360721958014?pt=Motors_Car_Truck_Parts_Accessories&fits=Make%3AVolvo&hash=item53fcb4447e&vxp=mtr Jeep Wranglers had nice square rubber bumperettes too. It would just be a matter of checking many sources to determine if they had rebound enough to stand up to something like the constant hammering they would face. I thought the used Volvo snubbers would definitely hold up (but might be too long) The truck loading dock bumpers (the rubber ones not the tire ones) are probably durable also. Thanks for getting me to thinking outside the box and looking into the options. There may be even more ....Morris Minors use a cone shaped axle bumper,but I couldn't tell it's size. Good Luck in finding something I just thought I'd share what I found in case you hadn't found anything yet.
-
I considered the rubber cushion route and if I ever run across something like large axle snubbers from some big vehicle I'd be open to such a design. If I'd ever had a leaf spring explode in my face I'd understand your feelings...as it is I may add some sort of spring wrap if I get the feeling there is too much tension being placed on such a spring configuration while in operation. I don't think the stresses on a double spring arrangement like this will be as great as those on a single leaf spring arrangement where the spring is actually a major part of the working assembly. Usually we work around what we have available to make things work. I "have" several sets of small leaf springs from old golf carts...LOL I will mention that the Bicknell hammer evolved into using rubber snubbers in later configurations (1904). The upper & lower single springs became more rigid arms and the rubber snubbers controlled rebound while the spring arms became more a part of the frame much like the larger Bradley hammer designs. I finally found a photo of that later configuration (the earlier design is far different)... http://www.vintagemachinery.org/mfgindex/imagedetail.aspx?id=7003 You're doing just fine as you are. There are many variables when building from scratch and unless it doesn't work it's just fine. You may find a source for large rubber snubbers in some automotive application.
-
The few inches of movement at the eccentric translates to quite a bit more movement at the hammer head. Should be interesting to see how you build in adjustability for thickness.... Some sort of turnbuckle arrangement in the connecting rod ? I've been designing a similar type hammer & taking design clues from several antique hammer patents. The Bicknell's power hammer(first design 1903)while not having a patent number (picture only) shows a dual single leaf spring (top & bottom of helve)which looked compact & simple enough to replicate using common small trailer springs instead. After I sketched up drawings ( and still researching ) I found I was not the first to imagine such an assembly. although I think the Bicknell hammer inspired that configuration as well. The Hathorn helve hammer design is one example of a similar type hammer that incorporated not only an adjustable height feature ,but a slide arrangement to adjust the hammer impact as well...patent number 758,361 in 1904. It originally featured a slotted attachment thru the beam which was obviously later changed to a slider located on top of the beam. This was done probably for simplicity of construction or strength of the beam structure or both. This is shown in later Hathorn hammers as well as the Rochester Helve Hammer (a later configuration of the Hathorn design) The later slider design consists of two plates on top of the beam which allow the U-shaped leaf spring strap to be slid front to back causing the helve to hit harder or softer. In order to utilize a double leaf spring design (like the junkyard hammer) & retain that adjustability some sort of roller assemble would have to be designed that would allow the entire spring assembly to be slid forward & back (rollers?) but still maintain rigidity as well as some way to lock things in place much like the Hathorn latch assembly. I'm amazed at the way the old hammers were designed from scratch..at least we have the options of their design imagination and knowledge to draw from as well as modern bits & pieces to speed the process along..... and they designed & built & sold them for around a $100...How cool is that. Thanks for sharing you're efforts with all of us.. I'm enjoying your labors and learning as well.
-
Ahhhhh ! That explains a lot..Thanks. You may be alright with those spring clips..(you could add some sort of retainers if it becomes a problem)..rails usually are exposed to a lot of movement (maybe even more than you'll have for the hammer) rail cars shift & move a LOT while in motion. If they function as you hope...You may have requests for dies & mounts from others as well...LOL. You're rails are designed different than ours are. Those almost look as if they could be turned over and used upside down. Careful you might have a side business ???? to pay for other toys.. Can't wait to see this in operation.
-
I keep looking those rail chairs over trying to figure out how the rail is held in place ,but I don't see any bolts to clamp the rail ???? Surely the chairs aren't slipped over the rails and then bolted down ? Just curious & intrigued by their design. They really do fit that hammer well.
-
I really like those rail chairs... They add not only weight to the structure ,but looks like pretty stable attachment of the rail dies too. They give the hammer a vintage look instead of totally fabricated..as if they were ment for the purpose you're using them for.. I've never seen anything similar around this area ---Unfortunately--- or I'd have to copy that design.. (what's S&H from the UK ? LOL ) just seems to fit a helve hammer.. What do they weigh ? also ... what will the hammer head weigh(the rail & the rail chair)? Sorry you've been down & hope you're feeling better.