
Smokin' Coke Forge
-
Posts
34 -
Joined
-
Correcting a warped tray?
Smokin' Coke Forge replied to Smokin' Coke Forge's topic in Problem Solving
Thanks all for the replies. Charles - The tray is only warped along the length. It's still flat across the width, probably because there isn't enough metal in that direction to noticeably stretch. Thankfully, it did't twist along the diagonal length either. Biggundoctor - I'll probably try your suggestion first, since it seems to be the least aggressive solution. Are you suggesting that I evenly heat the entire bottom, or just a smaller section in the center? Neil - Great explanation about stretching the bottom side with a steel hammer vs shrinking the top side using a soft hammer. It sounds very similar to the stretching behavior that occurs on the outside of a bend vs the upsetting on the inside of the bend, but with much more finesse. It's the lack of finesse that got me into this mess in the first place, so a great suggestion that I use it when trying to get out of it. Thanks again. If I can get these techniques to work for me, I have a bunch of ideas for how I might be able to use the lesson to add some intersting "features" to some future designs. -Jim -
Correcting a warped tray?
Smokin' Coke Forge replied to Smokin' Coke Forge's topic in Problem Solving
Would it make sense then, to gently heat the plate from the high, top side, across the narrow width near the center of the tray, then cool just the top side? I'm thinking that if I do a little at a time - heating across the width of the high side, cooling, then repeating while gradually moving away from the middle, it might pull the far ends back up? Based on what's been described as the possible cause, and what I've read in another thread from back in May that contained some good information about "line heating" to straighten thick plate, it seems that I may be able to reverse the warp usng the same priinciple if I go slowly without applying too much heat. Barring any other ideas or suggestions to the contrary, I'll give that a shot tomorrow and reply back with the result. Thanks for the input! Much appeciated. -Jim -
So, today I was working on finishing up a candle tray for holding 4, 3" pillar candles. The tray is 4 1/2" wide x 21" long, with a 1 1/2" rim welded around the circumference at a 45 degree angle to the base. The material is 3/32" thick. The legs are 3/16 thick by 3" wide, and will be riveted to the base of the tray where the scrolls meet. Before riveting the legs to the tray, I heated the tray, using a rosebud tip, to a black/dull red heat. Once heated, I applied a wax finish. Next I waxed the legs. The next step would have been to rivet the legs to the tray, however, I noticed that after waxing, the tray had warped about 1/2" from left to right along its length. (It was perfectly flat before heating for the wax finish) In this pic the tray is set on the legs but not riveted on. Here, the tray is upside down with a rod agross the length to illustrate the warp. Does anyone know of any way that I can correct the warp? I saw a post that suggested heating the convex portion of the curve, then applying a wet rag to cool just the top side of the plate, but I'm not sure if this would work considering the rim that's welded around the outside. I'm hoping that this can be salvaged, since it is supposed to be a Christmas gift, and I won't have enough time to make another. Thanks in advance for any suggestions. - Jim
-
Are you talking about installing a coal forge? You might want to consider that the chimey on a woodstove works a little different than one for a coal forge. Generally, a woodstove uses a 6"- 8" flue pipe, whereas a coal forge works best with a 10"-12"+ chimney. You'll likely find that the smaller pipe from the woodstove is inadequate for drawing the exhaust from a coal forge. Also, most building/fire codes that I have encountered don't permit sharing a flue pipe between 2 systems.
-
Worst Weather You've Forged outside In
Smokin' Coke Forge replied to NickOHH's topic in Blacksmithing, General Discussion
There isn't too much weather in our area of SE PA that keeps me from forging, except for 20+ mph wind. Rain & snow can be defeated with a pop-up sunshade. I did learn that MIG welding on my driveway in the rain was a really bad idea, though. I only had to try that once! Really bad experience. Forging in bad weather doesn't really compare. :^) -
If you decide to plug weld from behind, you can remove the heat signature by using a torch, or reheating the entire piece in the forge to bright red/orange. After it cools to a black heat, you can apply wax or oil for an even black finish.
-
Laws of Blacksmithing
Smokin' Coke Forge replied to Glenn's topic in Blacksmithing, General Discussion
You can make a thousand nails for practice, and each one comes out perfectly . . . until you demo making a nail for a crowd - then it will jam itself in the nail header every time. -
Ummm, coal?
-
What size anvil you use the most?
Smokin' Coke Forge replied to Glenn's topic in Anvils, Swage Blocks, and Mandrels
My main/favorite anvil is a 200# Fisher. I also use a 225# Columbian, but i need to replace the stump, since it's sunken about 2 inches . I'm also in the hunt for a 100# portable anvil, since the other 2 are too heavy to take to demos on any type of regular basis. - Jim -
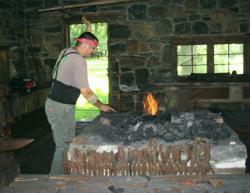
Very nice forge Dave! Mine is nearly exactly the same, except for the klinker breaker. I had drilled 16, 1/4 inch holes through the square plate before I welded it onto the handle, thinking that I'd get better airflow. Because of that, I'm not sure if I'm getting too much air now. Please let us know how you like the solid square one. I may have to change mine over to solid. The other forge I use is an orignal open hearth stone forge from 1730 (see my profile pic). It has a solid klinker breaker as well and still works like a dream. Maybe I overthought the design when i made mine? Thanks, - Jim
-
According to AIA, the top plate was pre-heated, then placed at the bottom of the casting mold before the cast iron for the base was pured in. The welding took place during the casting process as the molten cast iron was poured in, over the plate. Edit - Reference added: Anvils in America, Richard Postman, 1998, pg 148-149.
-
When are you considered a blacksmith?
Smokin' Coke Forge replied to mk74's topic in Blacksmithing, General Discussion
I prefer to keep it simple and objective - Merriam-Webster's Dictionary defines a smith as "a worker in metals" and a blacksmith as "a smith who forges iron." Do I work in metals? Yup. Do I forge iron (or some alloy made from iron)? Yup. Why make it more complicated than it needs to be? Call me what you want, but I'm a blacksmith by definition. -
NIce Job! I've not seen that design before. Is it a Daniel C original? I usually make mine by punching and drifting then end of a RR Spike, then dimpling the near side of the hole to catch the edge of the cap. If you can duplicate these with any consistency, you should be able to sell them quite easily. The RR spike openers sell faster than I can make them, so I'll bet you would do well with this unusual design. One suggestion might be to try a little heavier stock next time for even more rigidity beween the jaw and the scroll. Even so, great job!
-
Hi, and welcome to IFI ! I'm from SE PA as well - Aston. Based on your description, I have a very similar setup to yours. 3 1/2'x4' outdoor forge table that I wanted a hood to keep the smoke from blowing into my face. I used the "Super Sucker Side Draft Forge Hood Plans" by Lester Beckman. I built mine over a weekend using 1/8' sheet metal for the hood. Rather than bending the top, back, and bottom as illustrated in the plans, I just cut the individual pieces out and Migged them all together. The Chimney is 12" diameter, made from 2 four foot sections of 6" black stovepipe opened up then joined and screwed along the seam for the section connecting to the hood. I used the same sized pieces of Galvanized HVAC pipe for the second 4 foot section to save money. Don't used Galvanized pipe to connect directly to the hood - It could get hot enough to burn off the zinc galvanization which could really ruin your day. The top section on mine has never gotten too hot to touch, so not a problem (at least for me). Even though the chimney isn't the optimal 10' high, it still draws very well. - Jim
-
Hi, and welcome. You should be able to find beeswax at your local arts & crafts supply store. I know that Michaels and AC Moore both sell it. Another popular finish is made with equal parts beeswax, boiled linseed oil, and turpentine or mineral spirits. Gently melt the three together, then pour into a metal container and let solidify. I like to rub it on the finished piece while still at a black heat, although you can apply it cold as well. I've also found that this finish also works well for waterproofing my leather boots! Enjoy - Jim