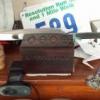
Swords9023 Posted March 30, 2015 Share Posted March 30, 2015 A friend asked me to try and forge him a small hunting knife. Here are my results.1084 H. Carbon. Quenched in motor oil (I'm going to try vegetable oil soon). Tempered at 410 for 1 1/2 hours.10" long overall. Blade is 6" X 1 1/2" X 1/8".Handle is Stacked leather with mild steel finger guard and cap. Quote Link to comment Share on other sites More sharing options...
Benton Frisse Posted March 30, 2015 Share Posted March 30, 2015 That's a beautiful polish you've got on there! Nice knife! Quote Link to comment Share on other sites More sharing options...
ThomasPowers Posted March 30, 2015 Share Posted March 30, 2015 How will it be used? The fat bevel looks more like a chopper than a slicer but the smaller tang makes chopping or other stresses more like to cause issues.If it will be used in wet conditions the gap around the tang at the guard may cause moisture to get under it and into the handle for hidden rust. Bedding it in something like jb-weld or using a low temp silver bearing solder like stay brite can prevent this.Your stamp looks very well done and the leather stacking looks good too. Quote Link to comment Share on other sites More sharing options...
Swords9023 Posted March 30, 2015 Author Share Posted March 30, 2015 How will it be used? The fat bevel looks more like a chopper than a slicer but the smaller tang makes chopping or other stresses more like to cause issues.If it will be used in wet conditions the gap around the tang at the guard may cause moisture to get under it and into the handle for hidden rust. Bedding it in something like jb-weld or using a low temp silver bearing solder like stay brite can prevent this.Your stamp looks very well done and the leather stacking looks good too.He wanted a short knife in the style of a hunting knife but he won't be using it for rough jobs. Just odds and ends probably. Its got a good edge on it for slicing and not really designed for chopping like you said. He is a welder and is going to seal up the top by the guard and on the bottom of the cap. Probably use solder or at least thats what I suggested. I need to get some smaller files to get a perfect fit next time to further prevent creeping moisture. Electro-chemical etched makers mark. Thanks for the feedback. I'm going to keep that all in mind on my next one. Thanks TomAnd thanks Benton! Quote Link to comment Share on other sites More sharing options...
Charles R. Stevens Posted March 30, 2015 Share Posted March 30, 2015 It looks nicely done, I find it asteticly grating, but it may grow on me. Take that with a grain of soot, as I'm a knife ab user not a knife maker. Might I make a suggestion tho, "hunting knives" mean different things to different people I know, most things I see promoted as hunting knives are actually either Bowie knives (fighting knives like a kabar) or a French triad/butcher. If you look at knives actually designed for processing game they have a different design, a slightly cubed belly is better for skinning and slicing meet, wile a bulbus protrusion behind the point on the back alows you to turn the blade over and run it under the skin wile the bump keeps the point from cutting into the meat or evisara. The top one is an American butcher knife, it has been used since pre colonial times as a "hunting knife as it is built to skin and cut up game, add a belt axe and your in business. The middle one is a skinner, or what around here is known as a pig skinner, used specifically to skin large animals and the bottom is a French butcher, used to process the meat. It takes the two bottom blades to do the job of the top one, tho they do make the job easer. The blades are thin. Many "hunting" knives aren't so much for game processing but are for bush/woods craft, many of which resemble a French butcher on steroids. Really not a hunters knife, but a "camp" knife. Not to forget hunters swords like the "arkensa" toothpick, a dagger that is useful torsos patching wonded animals. so have I confused things? Just to add to the confusion, ovoid "gut hooks" they are for cutting rope and canvass not flesh, and if you make them for that, do not sharpen the "blade" Quote Link to comment Share on other sites More sharing options...
ThomasPowers Posted March 30, 2015 Share Posted March 30, 2015 (edited) And thank you for taking my suggestions as they were meant to be: how to improve things in the next one---I'd still lengthen the bevel more---have you tried draw filing it (before heat treat of course!). If the pommel is already on he won't be able to solder the guard as it will burn the leather. In my early years I would sometimes hard solder a piece of copper wire around the tang hole in the guard (with it off the knife of course), and then hammer the soft copper tight against the blade to hide the gap using small punches made from square cut masonry nails and a tiny hammer---couple of ounces. (epoxy or silicon caulk bedding under it of course.) Using a thicker guard of a soft metal---copper or silver for instance I would sometimes just go around pushing the guard against the tang---if done carefully you get a nice "line" on the guard that looks like a design feature instead of issues with getting a perfect fit. (I was never a big fan of soldering a guard to the tang though I have done that as well)If the handle is in complete stage then you might think of soaking the leather in a leather conditioner/sealant. Did you build a fixture to compress the leather on the handle before seating the pommel? Edited March 30, 2015 by ThomasPowers Quote Link to comment Share on other sites More sharing options...
Swords9023 Posted March 30, 2015 Author Share Posted March 30, 2015 And thank you for taking my suggestions as they were meant to be: how to improve things in the next one---I'd still lengthen the bevel more---have you tried draw filing it (before heat treat of course!). If the pommel is already on he won't be able to solder the guard as it will burn the leather. In my early years I would sometimes hard solder a piece of copper wire around the tang hole in the guard (with it off the knife of course), and then hammer the soft copper tight against the blade to hide the gap using small punches made from square cut masonry nails and a tiny happer---couple of ounces. (epoxy or silicon caulk bedding under it of course.) Using a thicker guard of a soft metal---copper or silver for instance I would sometimes just go around pushing the guard against the tang---if done carefully you get a nice "line" on the guard that looks like a design feature instead of issues with getting a perfect fit. (I was never a big fan of soldering a guard to the tang though I have done that as well)If the handle is in complete stage then you might think of soaking the leather in a leather conditioner/sealant. Did you build a fixture to compress the leather on the handle before seating the pommel?I have not tried draw filing. I would need to build the jig for it. I know thats what I need to get a perfect bevel every time. For now I do it by eye on my 1 X 32 belt sander. (Until I get my 2 X 72 grinder that is). What kind of sealant should I use to treat the leather as I was wanting to do that for future works? I used Gorrila 5 min epoxy for the handle in my vice to keep it secure. I left the tang a few inches long to secure it and trimmed it off afterwards. Again good ideas for the guard. Quote Link to comment Share on other sites More sharing options...
Swords9023 Posted March 30, 2015 Author Share Posted March 30, 2015 Charles I had a whole response to your post thanking and talking to you as well but I don't think the sumbission went through. Quote Link to comment Share on other sites More sharing options...
ThomasPowers Posted March 30, 2015 Share Posted March 30, 2015 A jig for draw filing? You take a piece of square tubing a bit smaller than the width of the knife. and place it horizontally in the postvise and then C clamp the blade to it where it would rest flat on the tubing and file away. The surface will tell you if you are doing it right.Roughing out with a grinder can speed things up; but the file will get the bevel "nice". My student found that after he removed the scale and did some roughing out with an angle grinder that the surface had hardened---so we drew temper all the way to gunmetal gray and he was back in business with a file again. I'm a big believer in "teachable moments". Recently he told me that the colour charts differed in two books he was looking at and which one should he use---"The one that gives the best results for the alloy you are working with!" was my reply... Quote Link to comment Share on other sites More sharing options...
Swords9023 Posted March 30, 2015 Author Share Posted March 30, 2015 Perhaps jig wasn't the right word. The setup you described, how would I keep the file going at the same angle each time? Would I not need the file attached to something that would keep it at the same angle each stroke? Quote Link to comment Share on other sites More sharing options...
ThomasPowers Posted March 30, 2015 Share Posted March 30, 2015 How do you walk without falling over each step? Do you have an attachment that moves your legs the same way each time? Or did you practice it until doing it correctly is second nature?The swordmaker I studied under could get perfectly straight grind lines on 30+ inches of blade length just holding the steel in his hands against the belt grinder. I am not a big fan of jigs over expertise.... Quote Link to comment Share on other sites More sharing options...
Swords9023 Posted March 30, 2015 Author Share Posted March 30, 2015 If I'm going to go through the trouble of draw filing, I'd rather it be as close to perfect as possible. I'm learning how to get an even bevel on the belt sander. I know what you mean by feel over jigs though. I hope I can get good lines one day even on a knife let alone a sword when I start making them. Quote Link to comment Share on other sites More sharing options...
Swords9023 Posted March 30, 2015 Author Share Posted March 30, 2015 A jig for draw filing? You take a piece of square tubing a bit smaller than the width of the knife. and place it horizontally in the postvise and then C clamp the blade to it where it would rest flat on the tubing and file away. The surface will tell you if you are doing it right.Roughing out with a grinder can speed things up; but the file will get the bevel "nice". My student found that after he removed the scale and did some roughing out with an angle grinder that the surface had hardened---so we drew temper all the way to gunmetal gray and he was back in business with a file again. I'm a big believer in "teachable moments". Recently he told me that the colour charts differed in two books he was looking at and which one should he use---"The one that gives the best results for the alloy you are working with!" was my reply...GENIUS!!!! I didn't think I could keep a good line even to rough out a bevel with an angle grinder but I gave it a shot and WOW! Gave me a great even line with a better slope than by eye with my belt sander and in only 10 minutes or so!!!! Because the angles were correct when I went to stone sharpen it also took less time. This cut my sharpening stage down by like 80% I'm SO HAPPY right now! Thanks again for the advice! I'll be able to crank out better knives and more quickly to boot! Quote Link to comment Share on other sites More sharing options...
Charles R. Stevens Posted March 31, 2015 Share Posted March 31, 2015 I like neets foot oil (liquid fraction from renderd animal fat) i also like soaking leather in heated wax. Carnuba makes a very durable finish for leather and wood, but bee's wax or paradin work well to. I use cheap $10 crockpots to heat oil and wax, have 4 identical ones, i taged my three to discorate the beter half making of with themAs to loosing a post...lost 3 this week, lol Quote Link to comment Share on other sites More sharing options...
BIGGUNDOCTOR Posted March 31, 2015 Share Posted March 31, 2015 Sanding the leather so it is smooth then burnishing it will do wonders for the looks. If you want it sealed up, just use some Sno-Seal. It is a snowproofing agent that is used on leather hiking boots. It is beeswax based, so all you do is rub it on, then use something like a hairdryer to warm it up till it soaks in. Apply it until the leather will not take any more, then buff off the excess.I never used any jigs when draw filing pitted firearms. Watch where the metal is being removed, and adjust the angle to get it where, and how much you want.As to the aesthetics of the knife, the offset handle is really odd to my eye. I understand how it happened, it just looks off in so many ways to me. A wood handle that could have the offset for the tang may have been a better choice. With stacked leather the tang is usually down the middle so the top edge of the leather is lined up with the spine of the blade, or close to it. Quote Link to comment Share on other sites More sharing options...
Swords9023 Posted March 31, 2015 Author Share Posted March 31, 2015 Sanding the leather so it is smooth then burnishing it will do wonders for the looks.If you want it sealed up, just use some Sno-Seal. It is a snowproofing agent that is used on leather hiking boots. It is beeswax based, so all you do is rub it on, then use something like a hairdryer to warm it up till it soaks in. Apply it until the leather will not take any more, then buff off the excess.I never used any jigs when draw filing pitted firearms. Watch where the metal is being removed, and adjust the angle to get it where, and how much you want.As to the aesthetics of the knife, the offset handle is really odd to my eye. I understand how it happened, it just looks off in so many ways to me. A wood handle that could have the offset for the tang may have been a better choice. With stacked leather the tang is usually down the middle so the top edge of the leather is lined up with the spine of the blade, or close to it. That is exacly what happened Doc. As I was trying to say to Charly before the post got lost, as soon as I stacked the leather I realized it wouldn't look right but my friend said he liked it that way and didn't want me to change it. Despite my protests that it looked so goofy. I will look for that Sno-Seal. That seams like a good plan. Thanks for the advice! Quote Link to comment Share on other sites More sharing options...
rockstar.esq Posted March 31, 2015 Share Posted March 31, 2015 I found using a huge magic marker on the blade helps a great deal in seeing where you're cutting and where you're not. Clean ink lines are indicative of straight grind lines. Quote Link to comment Share on other sites More sharing options...
Recommended Posts
Join the conversation
You can post now and register later. If you have an account, sign in now to post with your account.