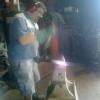
Jacques Posted February 1, 2012 Share Posted February 1, 2012 I had this strange idea for a powerhammer and the video is just proof that it really exist. It took me about 100 hours over a period of six weeks, including my Chrismas holidays, a lot of those time standing and figuring what the hell I am going to do next, and I only used off-cuts and stuff I had in the workshop. The body is made from 27mm MDF that got a bit wet and was given to me for free. I mostly used threaded rod to assemble everything and had to buy some bolts and the dome nuts which were expensive and put the cost of the powerhammer up to R200 (about $25) I do not know how good is the long term viability of a machine like this, but I take comfort in the knowledge that I can replace any part easily and cheaply. The one part that I do not have faith in is my wheel mounting that is quite wobbly, and I really should have a slower motor, but that one was free. It hits harder than I can and it will do it for longer. Shaya means to hit or strike in Zulu, and the spelling was approved by the Zulu's working with me There is some modifications ongoing engineering changes to be made. The first 30 seconds of the movie is to prove that it exists and works, the rest is just a lot of pictures I took during the building process. Quote Link to comment Share on other sites More sharing options...
Countryforge Posted February 1, 2012 Share Posted February 1, 2012 Let me the first to say that is amazing, great job and it hits great also. Fantastic!!!!! Quote Link to comment Share on other sites More sharing options...
basher Posted February 1, 2012 Share Posted February 1, 2012 how cool is that!! Quote Link to comment Share on other sites More sharing options...
Sam Salvati Posted February 1, 2012 Share Posted February 1, 2012 That is quite amazing! Quote Link to comment Share on other sites More sharing options...
Dan P. Posted February 2, 2012 Share Posted February 2, 2012 Excellent! Quote Link to comment Share on other sites More sharing options...
CHPerdue Posted February 2, 2012 Share Posted February 2, 2012 That is a cool hammer. Great job and innovation. I love it ! "Who needs a 3B, don't need no stinking 3B" HH CH Quote Link to comment Share on other sites More sharing options...
Backwoods Blacksmith Posted February 3, 2012 Share Posted February 3, 2012 Man!!!!!!!!!!!!!! That is just too neat. Great job Quote Link to comment Share on other sites More sharing options...
Stormcrow Posted February 5, 2012 Share Posted February 5, 2012 That is beautiful execution on a great idea. I have a buddy thinking along similar lines that I'm going to show this to. I agree that the wheel being that wobbly would make me a bit nervous. The contact wheel on my 100 lb. guided helve's tire clutch is steel oilfield pipe, by way of suggestion if you want to change out the nylon contact wheel you said slips too much. Quote Link to comment Share on other sites More sharing options...
clinton Posted February 5, 2012 Share Posted February 5, 2012 I am impressed, that is a lot of work to be done in the time you spent. I find myself going one step forward then two steps back when I am doing custom fabrication. You had a good plan going into this I bet. Quote Link to comment Share on other sites More sharing options...
Jacques Posted February 8, 2012 Author Share Posted February 8, 2012 That is beautiful execution on a great idea. I have a buddy thinking along similar lines that I'm going to show this to. I agree that the wheel being that wobbly would make me a bit nervous. The contact wheel on my 100 lb. guided helve's tire clutch is steel oilfield pipe, by way of suggestion if you want to change out the nylon contact wheel you said slips too much. The nylon were the first piece to be replaced with a grooved steel wheel, but the motor speed is too fast, and I'm thinking up some sort of jackshaft. The wobbling is getting worse, and I'm busy redesigning that entire part of the machine, making it smoother running and stronger. The hammer part broke today. After being used daily for a whole seven days it collapsed completely on me today after raining splinters for two days. In retrospect using wood for hammering wasn't a good idea but now I know what doesn't work, and the next version will be heavier, stronger and slightly more useful. Another change that is coming is the hammers I use for the anvil and the hammer. I will grind them down so that the hitting surface is smaller, concentrating more energy into a smaller spot. (Think fuller) Other than that I like using it, it has saved me quite a bit of time and my arms didn't get tired. "Prototyping never stops." Quote Link to comment Share on other sites More sharing options...
ptree Posted February 9, 2012 Share Posted February 9, 2012 Great job with available items. For a motor mount, may I suggest a square tube for the vertical? I also used the entire rear spindle and bearings from the rear axle of a front drive Chrysler minivan. It unbolts from the rear beam axle and has a nice bolt flange, I welded a plate to the vertical member on my hammer and bolted the hub assy and it has been working solidly for years. Ohh, another thought. Many folks use a textured, or knurled surface on the steel contact wheel against the rubber tire. That reduces the ability to feather and get slow speed, and quickly eats the tire. Mine is a simple as turned surface, and also has been working for years. Quote Link to comment Share on other sites More sharing options...
Francis Trez Cole Posted February 11, 2012 Share Posted February 11, 2012 Great Job I to would up grade the tire you could easily change the wood parts to metal if you need to you have a working pattern Quote Link to comment Share on other sites More sharing options...
Frosty Posted February 11, 2012 Share Posted February 11, 2012 Nice job! Sure it's going to take some tweeking to get right but it's a perfect example of what a little vision and a full toolbox (skills) can do. I'm thinking a counter weight should help with or eliminate the bounce but I don't know how to calculate it. Well done, you get an attaboy! Frosty the Lucky. Quote Link to comment Share on other sites More sharing options...
woodsmith10 Posted March 7, 2012 Share Posted March 7, 2012 great work! that is truly amazing and inspiring at the same time,please post your progress Quote Link to comment Share on other sites More sharing options...
Jacques Posted May 6, 2012 Author Share Posted May 6, 2012 The powerhammer has now been bolted to the floor with some conveyor belting underneath, and runs quite well. The motor mount has been changed completely, and the connection with the treadle has been made more robust. Instead of just relying on gravity to connect everything I now have a definate connection with some spring tension. Control is quite good and I can vary the speed quite a bit with the top rate about 250 hits per minute, and if I practise a bit more I should be able to do single hits.. The hammer has been made more solid and it is now 12kg. I had to purchase another length of flat bar so the total cost has gone up to R400 ($50). And just after the video were shot the front end of the helve that have to lift the hammer broke just next to the welding line. Quote Link to comment Share on other sites More sharing options...
Frosty Posted May 7, 2012 Share Posted May 7, 2012 After watching the videos more and thinking on it a couple days I think most of the wobble will go away if you use a more robust axle for the tire. As mentioned already using a rear spindle or a trailer spindle will steady the tire down in use. The hammer head anvil can be changed out for different shapes, a fuller, flatter, texture, etc. The hammer will take a little more engineering to make easily changeable but still not a big thing. This is a sweet light hammer and so suitable for so much. Frosty The Lucky. Quote Link to comment Share on other sites More sharing options...
kevan Posted May 10, 2012 Share Posted May 10, 2012 Jacques Ireally must come and see this most excellent construction of yours. I will give you a call over the weekend· Quote Link to comment Share on other sites More sharing options...
Bentiron1946 Posted May 11, 2012 Share Posted May 11, 2012 Nice hammer! The only critique I can offer is that the anvil could be made of something heavier. Yes, using two sledge hammer heads is nice but the bottom one should be a bit more substantial in my mind. I think this is a beautiful machine overall in appearance. Quote Link to comment Share on other sites More sharing options...
Recommended Posts
Join the conversation
You can post now and register later. If you have an account, sign in now to post with your account.