Don Nguyen Posted November 9, 2011 Share Posted November 9, 2011 Hello all. I started knifemaking about 2 months ago. Here are some of the things I am working on. This is my first knife, finished November 4, 2011. Forged from Nicholson file, deferentially heated and martempered using brine. Maple burl handle. Unfortunately I wasn't thinking and took no pictures of the WIP of this one. You wouldn't want to see the mess anyways Thanks for looking -Don Nguyen Link to comment Share on other sites More sharing options...
Don Nguyen Posted November 9, 2011 Author Share Posted November 9, 2011 Here are my second knives. Each one is half a Nicholson file, which I think is either 1095 or W1. They were cut and ground down some time in October, when I started my first knife. Unfortunately, I didn't know any better, so I annealed them before grinding the file teeth off. Hopefully it doesn't do anything drastically crazy. November 4, 2011. Here it is in the forge, ready for me to establish where the tangs will be. After a while, here they all are Link to comment Share on other sites More sharing options...
Don Nguyen Posted November 9, 2011 Author Share Posted November 9, 2011 I had some time in between what I was working on at the moment. Still November 4, 2011. This is the raw material I will be using for handles (for quite a while). It's called Indian Mountain Laurel; not sure about any other details. Cutting it up, Seems like good wood to work with, but, uh, what do I know... Each board makes 12 handles, and I've got 10 boards in total. Maybe I'll use some for saya's or something? Link to comment Share on other sites More sharing options...
Don Nguyen Posted November 9, 2011 Author Share Posted November 9, 2011 November 5, 2011. Forged out some of the basic lengths/thicknesses and did some hammering on the tangs too (mainly just to hold them better with tongs). Here is the culprit >:[ Link to comment Share on other sites More sharing options...
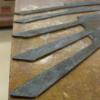
Don Nguyen Posted November 9, 2011 Author Share Posted November 9, 2011 Yesterday, November 8, 2011! Did some more work on the blades, but mostly got the tangs to length. Knife numero 1. Worst one out of the bunch; will probably be made into a small thingamajig. I didn't really have an idea for I wanted it to be, and this is what happens with an unorganized mind. I wanted to make this one a vegetable knife, but the width is looking a bit inadequate. Probably will be made into a smaller sized gyuto/chef's. THIS one I was going to make into a vegetable knife, but then I messed up on my big gyuto/chef's knife later seen. So this will be a medium sized gyuto/chef's. Ok. I really wanted to make a good sized gyuto. So I made it long. Drew out the length, thought I had enough material to get substantial width. It came out a bit too... narrow. So it's going to be a small slicer. As a slicer, it isn't too horrible. Not the gyuto I was envisioning, but... It seems like this one is the only one that came out the way I wanted. A really big xxxx sujihiki/slicer. I can't complain about it, really. Maybe you can, but I can't. At least not yet. Should I rename it to a kitchen sword, and not a kitchen knife? Link to comment Share on other sites More sharing options...
Don Nguyen Posted November 9, 2011 Author Share Posted November 9, 2011 Later that day, November 8, 2011! I went for a lunch break, and jazz band rehearsal. Now back to forging and stuff Here they are, after forging them further and then cutting+grinding them to rough shape. Some of them are still very thick, even though I thought I got the thicknesses good... =/ Either I will have to grind them down to desired thickness, or I'll have to forge them down. Probably forge. I like forging more than grinding. Notice how the smallest knife is probably the thickest. Uh. It should really be the thinnest, to be honest. Tangs shaped out! They aren't too bad, I think. Maybe a bit skinny though... I kind of misjudged how much (or little) they would grow with the hammering. That's it for now. More to come tomorrow when I get back to the shop. Please excuse the badly designed and badly executed profiles; all criticism is yearned for. Thanks for looking -Don Nguyen Link to comment Share on other sites More sharing options...
Rich Hale Posted November 9, 2011 Share Posted November 9, 2011 Don, I am impressed. You have done a lot of work and it is really nice of you to share. I have a couple of thoughts if they will be of any value: That power hammer has done a ton of work with you at the throtte. Wonder if you have tried Spreading the material on the blade by bringing the material in from the end of the dies? If you have not you can do a dry run with out the hammer on and see how it works. Also when I want to work down to a certain thickness I use a kiss block, For me it is a long enough bar that i can hold it with one hand while I work hot metal next to it. The kiss block is the thickness I want the steel to end up plus a little extra. Say if I want to forge a blank to 3/16" I may use a quarter inch kiss block. Mild steel for the kiss block may thin a little bit as I work and will not get my blade too thin. One other thought if I do not sound too pushy. I would use handle material tha has been stabilized. It is treated all the qay throuth and will tolerate alot in the life of the knife. If you want a pair of maple scales to try tht have been treated sent me a note and I will send a mismatched pair to you. I do not sell them and do not do the process myself. Link to comment Share on other sites More sharing options...
Don Nguyen Posted November 10, 2011 Author Share Posted November 10, 2011 Thanks for the feedback Rich! I am a little confused by spreading the material from the end of the dies. Do I bring the material from the side of the hammer, or hammer on the edges? The thought hadn't occurred to me to use a kiss block, but it's itching at my brain now. In future projects I'm going to give it a go. I'm also debating whether I should grind the bevels first before heat treating... Link to comment Share on other sites More sharing options...
Rich Hale Posted November 10, 2011 Share Posted November 10, 2011 Don. Bring the metal in in line with the dies. Will change where you stand, See which side of the hammer is best for yuso you can step on the loud pedal. On real thin carbon blades I heat treat then grind, over an eighth inch I start the grinds then heat treat, I leave a dimes thickness along the edge before heat treat. You blades look real nice and clean as forged, If they had hammer marks or scale to clean up I would leave thicker before heat treat. I Got a note from you and the site went down and it went away. Send again please or google richhale knives and there is a click on to my e mail. Link to comment Share on other sites More sharing options...
Stormcrow Posted November 11, 2011 Share Posted November 11, 2011 Looks like you're doing really well so far! Remember: You can screw it up beyond saving at any point in the process. But if you know what you're doing, you can save a lot. :D Link to comment Share on other sites More sharing options...
Don Nguyen Posted November 12, 2011 Author Share Posted November 12, 2011 Got some good progress today. Cleaned the tangs a bit, drilled them, and heat treated the blades. Or tried to heat treat them. We will see how they turned out, but I learned a loooot in the progress. Pictures will be up soon. Link to comment Share on other sites More sharing options...
Don Nguyen Posted November 13, 2011 Author Share Posted November 13, 2011 The long slicer curved along the spine a bit too much after I normalized it, but back in the forge it goes. The big pipe in there is for critical temp later on. It's kind of like an oven inside an oven. More even heating, less muck on the steel. Adjusting the curve... I think that's good. Then for normalization again. I am judging by eye. Really though, I'm guessing. It's bright out, and I'm inexperienced. My thought process was, "Get it as close as I can to what I think critical temp is. It's probably a dull red in this lighting." My heat treating set-up. Brine to the left of the forge, and the extra anvil to the left of that is for warp adjustments before Ms. I later moved the brine set-up to a dim area so I can see the colors better. Couldn't see anything here. Getting to critical (or what I think is critical). Clamping down in a warm area (after quench) for Ms --> Mf. A little doohickey I devised so I don't have to fumble around with the tongs. Works especially well if I need to adjust where the blade has to go (the heat area is a bit small). I modified it right after so I can use it at long distances. So the heat treating didn't go that well to be honest. I was playing a guessing game, trying to do a martempering process that I didn't quite understand. For the big slicer, I couldn't get the full blade heated in the oven-inside-the-oven, so I resorted to the torch, which made me impatient and sloppier. I learned a lot in the process, however. I get a much harder blade if I leave it in the quench for half a second longer than what I was doing. Most of all, I do a much better job when I'm not rushing to get things completed. I should leave heat treating for when I'm in a level-headed mood. I ended up with areas of the edge not quite hardened, and most of the blade warping (thinking I could straighten later during the temper). So I come home with shoddy hardened blades, with clamps and a straight piece of metal (relatively straight). Put it in the oven, and 30 minutes later the whole house stinks; it was probably the paint on the clamps. So I have to use the grill now, which has no temperature gauge. I followed advice from Rich Hale to use the tempering colors as a guide (used a separate piece of metal, since the blades had all the scale on them). First temper didn't straighten out the blades, so I stuck them in there again with the flame slightly hotter; just a notch. Weather around the area got colder, so the grill isn't as hot. I turn it up juuuust another notch. Check back and the temper color is now a dull purple. Overheated. Not even straight either. Looks like I have to go back and treat them again, this time doing it properly. Kind of glad that I messed up the temper, or else the heat treat would have been very, very, mediocre. Just bad. Also irritated that I didn't get any real progress done today, but on the same thought train, I did learn a heckofalot. I just have to learn my lesson not to rush things; I never seem to learn it. Here they are, taken out of the grill, still clamped. You can slightly see the hint of purple where I file-checked earlier. The scrap piece of metal I was using to gauge temperature was full purple. Thanks for looking. Link to comment Share on other sites More sharing options...
Steve Shimanek Posted November 13, 2011 Share Posted November 13, 2011 Why not take the scale off the bladews before you temper so you can see the actual temper colors on the blade? Link to comment Share on other sites More sharing options...
Don Nguyen Posted November 13, 2011 Author Share Posted November 13, 2011 I wasn't really thinking very smart when I was working on these. I didn't want to grind them any more, so I can heat treat them with some meat, but I didn't think about rough sanding just for the scale. At the same time, I was almost contemplating a kurouchi finish, which is probably why I left it on there. This is one of the other major flaws with my process; I don't know where I'm going. Major lessons to learn: -Don't rush. Stay calm. If I only have 30-60 minutes of work time left in the day, stop and continue when I come back. -Stay organized and outline where I'm going with the process. What kind of knife do I want to end up with? That's what I need to have established. Link to comment Share on other sites More sharing options...
Steve Shimanek Posted November 14, 2011 Share Posted November 14, 2011 Something else to consider is that your blade may be getting unevenly heated,causing the warping. I have a similar setup with the tube like you and had some warping not apparently caused by anything else i could see. Maybe try to make a jig to hold the blade up on edge when heating and see if that helps,asssuming all other factors are correct. Link to comment Share on other sites More sharing options...
Don Nguyen Posted November 14, 2011 Author Share Posted November 14, 2011 Yeah, I'm going to have to make a bunch of modifications to it. I'll probably cut it shorter, because it's about twice as long as the whole heat area. I'll make some little jigs to hold the blade vertical and horizontal too (horizontal because sometimes when I hold the really long blade vertical or at an angle the curve along the spine changes, which I don't want). Still have to figure out how I'm going to get the really big slicer heated evenly for the quench... Link to comment Share on other sites More sharing options...
Rich Hale Posted November 14, 2011 Share Posted November 14, 2011 Don this may sound real critical but if you get over that it may be of some real value. Kind of like your trying to get great lap times down in a race car when you really need to learn to drive. You are in a spot where in a given time frame you expect to do advanced work and you say you are not sure exactly what all that entails. Suggestion..only that... as it is your work and after all you may do it any way you wish. Critical temp is best checked with a magnet. When I look in that tube youare using it simply to me means your set up is not right for the blades you use it for. That of course could mean uneven areas of hardness along the blade.I am not sure why at this stage you are using brine for a quenchant. I have never used brine on a blade.If I had a steel that would not get hard when quenched in oil. I would try again in water, if not hard then I would recheck as to what the steel actually is and its source and if I was able to heat treat any of the rest of that piece of steel. If the oil or water did not get the steel file skating hard I would likely scrap it and start over with different steel.However it would be appropriate to try one more time with a brine. If it will harden at all brine should do it. I only check tempering colors on a blade with the scale removed to a nice finish. I wouild not rely on another piece of metal for that. I would never make a blade from a file unless I took a small piece of that file and hardened it and liked wot it did. Then I would use other parts of that file for a blade. Another file and I would repeat that. in anything I have done that failed it was almost always because I worked towards a final outcome and left out or did not know things for the middle of the process. Looking back at your pics; I put my quench tank right next to the forge. I can go straight from the fire at the right time and into the oil I have heated to a thermometor tested temperature. When you have to take steps you lose heat. And if youi do not miond I worry about your forging posture at the anvil youi are stangin with you hips not in line with the anvil and your smart hand,,tong side is way behind you Cool the tongs and choke up on them, your elbows should be in line with you body. Your hammer hand is reaching for the work. These things will make you pay later in life. Your young and will not feel it much for now. When you lose The use of that power hammer you will likely rely on your anvil and hammer. if you were a student of mine you would do all work with hand tools.Body mechanics, form , movement and basics would be your day. After along time on smithing then perhaps blades. But they would be small to begin with. I hope I did not offend you with this post but maybe it will help you get unstuck and move forward. Start and maintain a shop log of what you do and how..it will pay off in the longe run. Link to comment Share on other sites More sharing options...
Don Nguyen Posted November 14, 2011 Author Share Posted November 14, 2011 Thanks Rich; feedback like that is exactly what I need. I did realize that I was jumping the gun on practically everything I was doing. I'll be using 1084 in the future, and no messing around with brine martempers (I got too excited after I was reading this a while back: http://www.navaching.com/forge/heattreat.html). No power hammer for me either, and I'll probably stick to one small blade at a time. With only a forge or torch, how would you recommend getting the most even heating? So, hips in line with anvil, choke up on tongs, keep elbows in-line with body. I'm a bit confused when you say, "your hammer hand is reaching for the work." Is this what I should be avoiding or aiming for? Link to comment Share on other sites More sharing options...
Rich Hale Posted November 14, 2011 Share Posted November 14, 2011 Look back at the pic of you hammering, your arm is reaching out to get to the work. The work should be in front of you not out to the right front. If you would like to run up to Glendale one day I can show youi better than put it in words. 1084 is a wonderful steel, heat to non magnetic and into warm oil. A quick check with a file and into the oven for tempering. test again with file and make a knfe out of it. The internet is such a wonderful medium and this forum tops them all. However there is a draw back to reading. Anyone with a computer can post and give opinions. That is a great thing. But not if they overlook what the question was or think about who it is coming from. And this is not a good thing,,they can post a answer even if they have not ever forged a blade or heat treated anything or maybe even if they have no equipment to do any of that. It does not take much reading to figure out who the folks on here are that can talk the talk and walk the walk, When those folks post I read everything they write. That is the glue that has stuck me to this forum for so long a time. The imposters hardly ever last long. In yoiu I see a bright young man with a good future ahead of you I am glad to help you in any way I can.. Rich Link to comment Share on other sites More sharing options...
Don Nguyen Posted November 18, 2011 Author Share Posted November 18, 2011 I really appreciate all the help and feedback Rich. A little update on what I've been up to lately. Mostly it's been re-doing the heat treats. I normalized each of them, straightened, and normalized a few more times. I made sure not to get them overheated, using a magnet as reference point. I didn't get a chance to get any canola oil or anything (and at this point, I certainly can't buy anything too costly), so for these few blades at the moment I'm still trying out the interrupted brine quench. I stopped using the big pipe. It wasn't allowing me to control the heat; worked for the smaller blades, not the biggun. I set the forge on low, and then stuck the blade in and out, holding them with tongs. Made sure the heat went evenly, which it did. Same process overall. After normalization, bring it up to non-magnetic (I earlier was aiming for a little above non-magnetic, but with my shoddy skills/experience and lack of precise temperature measurement, I played it safe and went for just non-magnetic), and then do a very quick (one second) quench in brine. At this point it's well below 900 degrees F, around 450 F (I had a tempilstik at hand, which was handy). Now it's just starting to transform to martensite, and I have a very small window to try to correct any major warpages. Do whatever I can at this moment before it gets too hot, and then try to fix them later in the tempering. Right when it slowly cools to a slight warm in the hand, I grind off the scale and then do a makeshift temper. I wasn't anywhere near home where I have the baking oven, and at the school workshop we don't have any ovens. So, I used a forge. Low heat, stuck it far away. I check the temper colors on the blade very regularly and make adjustments now and then until it just starts to go a light straw color. That's when I take the blade and lightly tap it with a hammer to correct warps (riiiisky game, and it'll show in the pictures). I make sure to tap the blade when it's around 400 degrees, or else I risk even more of doing something horrible (my train of thought was, "if I'm going to tap with a hammer, hotter is better"). I don't get the blade any hotter than this; I leave that for the home oven, which they're in right now. The smallest 3 blades were straight forward without any hickups. Larger blades had trouble controlling heat and warps. Not to mention I messed up the temper 3 million times and started over. At the very least I decarburized them like crazy and all sorts of no-no's. Notice something different? It started out as a small crack about 1/3 way up the edge. Probably happened when I was trying the straighten it. I plucked off the tip to inspect. Dianosis? Anything horrible about it, besides the chunk missing? I can't really tell, but it doesn't look too coarse... I have also been working on a pizza pan. Really ghetto ugly thing, but at least I can now bake some bigger pizzas EDIT: I do realize that many and probably all of my approach isn't that effective. I was kind of in a trial and error mode, just to see what happens when I do this or that. UPDATE: Sticky situation! After I tempered them at 400 F in the kitchen oven last night (which might actually be high 400's, maybe even 480; the tempering colors are a bold mustard yellow). the biggo slicer started to bend back a little bit to its original warp. I can't clamp it to anything, because I don't have any clamps on me at home, and the clamps from school smell BAD when in the oven (nono from Mom). Maybe just ultra lightly bend it by hand when it's at temper heat? I just did that a liiiitle bit, which worked some, but it's still there. Of all the blades I'm working on, the biggo slicer is the one I want to succeed the most :( Link to comment Share on other sites More sharing options...
Rich Hale Posted November 18, 2011 Share Posted November 18, 2011 Thanks for the update Don. I never use clamps when tempering. To me I would have to get the clamps up to the tempering temp or they would suck the heat out of the blade at the spot where they contact. You can also heat a bar of steel larger thatn the blade ,,I go to a dull red heat to do this. This heat bar needs to be pretty thick to hold heat long enough for tempering. Then lay it on a flat surface that heat will not dllamage and lay blade on top of it and watch for colors to change. Light yellow is going to leave a blade pretty hard and I try and avoid that for longer blades. I believe your blades have stresses after forging causing them to bend in heat treat, however the clamps taking heat away in the spots they touch the bladee may be doing that as well. If yoiu want a process to get you more comfortable with your heat treat try this: draw out some steel about a foot long and same thickness as your blades. Make sure as we talked about before that this steel will harden in a oil quench. Do not worry at all about profile or tang. If you need to have a tang to hold with tongs then do that. I would put numbers on them and keep a log. Little spots with a center punch will count as numbers. Heat first to non magnetic quench in oil, Grind to see colors and put on heat plate to see color change. Log the color and how the file test went. Then test again with file after tempering. test that steel anyway you wish. even to the point of breaking a piece off while it is in a vise. look at the grain. Protect every part of you that you do not wish damaged. Since you are stuck on the brine quench try one with that. Temper and test. Shoot may as well try one in plain water. test as beffoe and log results. One bug problem I think is the brine an interupted quench. that may work on mid to low carbon steel. but something si not workg for you and I would find out why before I did another heat treat on those blades of yours that look so nice up to this point. AGain if youi want to run up to Glendale I can help you mkorfe in person that I can 'splain in here. Link to comment Share on other sites More sharing options...
Steve Sells Posted November 19, 2011 Share Posted November 19, 2011 Warping is normally from uneven heating, uneven hammering, of a combination of both. With your trying to make a production run out of this rather than first learning how to make one blade, then move on the the next after you learn a few things, I dont know. Slow down, you have a good start, Forget the fancy marquenching and learn a basic heat treat first, then experiment after you figure out how to harden and temper with out warps.. Your rushing in to everything at once is not helping you. also forget the brine. I bet 1 short bar of known steel, costs less than the 6 files you bought, and are having troubles with. Stop making this harder for yourself. If you cant afford a bar then you cant afford to screw up 6 at a time either. So get a 12 inch section of 1084 or 1095, K&G and a few others sell them that short. Make one at a time, keep notes, then make another improving on what you learned form the prior one. Used motor oil is fine if you have $5 laying around and do not want used oils, Buy a off brand qt each of 30 wt and ATF thats a half gal good for one blade at a time. Link to comment Share on other sites More sharing options...
Don Nguyen Posted November 19, 2011 Author Share Posted November 19, 2011 Thank you for the feedback. I thought it was a great idea to do multiple knives at once when I started this project, but it's taught me that it's only a great idea if I know what I'm doing For future projects I'm going to scrap martempers, brine, and unknown materials. I'll stick with 1094 and canola oil. I will also start a test log as you suggested Rich. I may not be able to come up there any time soon, but perhaps during my Christmas break? Link to comment Share on other sites More sharing options...
Rich Hale Posted November 19, 2011 Share Posted November 19, 2011 That may work..not a lot of plans, If you can make an all day we can do quite a bit, Link to comment Share on other sites More sharing options...
Don Nguyen Posted November 20, 2011 Author Share Posted November 20, 2011 I decided to work with my least favorite one first. The one that chipped and seemed least functional to me. Too skinny, narrow, weird profile, etc. Too too thin too. Also the fact that it chipped I chose to do a single bevel grind on it. I ground the tip to profile soon later, but I actually think I like the chisel like tip I have here. Oh well. The circles marked are high spots. The tool room! Here I am at work, grinding it down flatter. I didn't actually mean to give that kind of look, but uh, it just kind of ended up that way. I was just looking at the camera to see if it was still taking pictures For my very first knife, I tried to do a solid flat grind with a nice ridge line. I thought it would be easy, aaand it wasn't. At all. I ended up grinding like 3 inches off the end and turned it into a full convex with the slack belt. So this time I thought I'd try out some angle guides and/or jigs for a flat grind. Nothing worked. So I said, "Forget it! I'll just do it by hand!" I actually enjoyed doing the flat grind all by hand With the jigs, tool rest, guides, whatevers, I got mad when things weren't going well. So I threw all that out the window and just focused on technique. It's not perfect, but certainly better than my first attempt. Would also help if the whole blade was initially one whole flat thing, instead of a thin wobbly kind of warpy thing. Now it's at home, being hand sharpened. I don't have any vises or anything, so I brought some clamps to set up a work area. It works ok. More updates to come soon! EDIT: That backside shown in the homemade sanding set up is a ghetto concave grind. I'm not even sure it worked, but I was just trying it out. I don't have a wheel big enough to do a proper full hollow. If anything, it just made hand sanding more difficult :P Link to comment Share on other sites More sharing options...
Recommended Posts
Please sign in to comment
You will be able to leave a comment after signing in
Sign In Now