OddDuck
-
Posts
195 -
Joined
-
Last visited
-
You created an unknown variant of aluminum bronze. And yes, it's harder than Japanese arithmetic and brittle if alloyed wrong. Not much use except to create a goldish colored metal that can't be used for anything, unmachineable, undrillable, and shatters. Is aluminum bronze useful? Yes, but it has to be alloyed correctly. It takes a surprisingly small amount of either aluminum or copper to contaminate a melt, separate crucibles should be used for each different metal melted. And, it's melted, not smelted. You aren't turning raw ore into metal, that is smelting.
-
first furnace, first melt
OddDuck replied to gadget's topic in Smelting, Melting, Foundry, and Casting
Wheelium is some of the better backyard friendly AL you can use. Very close to A356, usually. With transmission housings you have to be careful you don't get a magnalium (magnesium/aluminum alloy) one. It's difficult to tell the difference just by looking. Biggest problem with wheels is breaking them down to fit your crucible. luckily I have a furnace big enough I direct melt them into ingots, and then use the ingots. Cylinder heads are good, engine blocks are good (again, the problem is breaking them up...) control arms are good. Next on the list is extrusion, easier to make it crucible friendly but not as good for casting. Don't waste your time with cans, it's not good aluminum for casting or machining. Oh, and I second, third and fourth a drain, it's not IF you have a crucible fail, it's WHEN. They need to be considered a consumable item. -
Whatever steel you start with, the best you are going to come out with is poor quality cast iron. The only way to counteract this is to use a sealed crucible, and you probably aren't going to pour it into anything. Cast iron is no joke safety wise, it's an order of magnitude hotter than copper when the iron is at pouring temp, and tends to spatter when spilled. Steel would need to be poured somewhere around 3000F, so even hotter than you would pour cast iron. You will need some seriously upgraded safety gear. And, even though propane can get to cast iron temps, it's not the most efficient way to do it. You are going to go through a lot of propane for not a very large melt. Unless you want to make small amounts of crucible steel for whatever purpose, I would forget about casting steel in a home foundry. I'm willing to bet that almost all hobby foundries lack the necessary fine control and metallurgy requirements to get a known, useable steel. I'm positive I couldn't do it in mine. Steel is not practical or realistic for a home foundry.
-
Help with new furnace
OddDuck replied to TastefullyPeenedIronWorks's topic in Smelting, Melting, Foundry, and Casting
Yup, you want the center of the flame (top to bottom...) to be even with the bottom edge of the crucible. Plinths are easy, make several of varying heights and try until you get the one that works right. You also want the plinth to be more or less the same size as the bottom of the crucible. Too small and it's tippy, too large and it's just a heat sink. -
Casting an aluminum handle
OddDuck replied to JD Bragg's topic in Smelting, Melting, Foundry, and Casting
For a beginner, this sounds like an almost ideal scenario for lost foam. Probably the easiest way to do this, in my opinion. Either use Styrofoam or the blue or pink insulation foam (the stuff in the sheets, not the spray expanding foam stuff), glue two blocks around the handle and carve it to the rough shape you want. Add a long square section of foam attached to the butt end to act as your sprue (the hole you will pour the metal into.) clamp the copper blocks ( aluminum blocks would probably work as well) along the length of the blade, and bury this assembly in DRY sand, point down. Metal bucket, by the by, don't use a plastic one. have the square sprue barely poking up out of the surface of the sand. Set an empty soup can with both ends cut off around the sprue, pour some sand around it to hold it upright. Melt your metal, for aluminum you will have to pour on the hot side of things, somewhere in the 1400 to 1500 F range. Pour into the soup can, the aluminum will vaporize the foam and fill the resulting void with metal. Pour fast and steady, there will be a lot of smoke when you do this. It also stinks a bit, so be warned. Let the metal cool for a few minutes, and then pull it out of the sand and quench it. Saw off the sprue, and clean up the resulting handle. Nice thing about doing it this way is that you are pretty much only limited by your imagination and carving skills. Bad thing about doing it this way is that it's a one shot deal, if it doesn't work you are left with a blob of misshapen aluminum adhered to your knife blade. The surface texture may be a bit rough, use as fine of a sand as you can locate. You can also dip the foam in thinned drywall compound and let it dry thoroughly, this helps by keeping the sand away from the surface. -
Help with new furnace
OddDuck replied to TastefullyPeenedIronWorks's topic in Smelting, Melting, Foundry, and Casting
I'll second the t burner, use one myself and it works fine. I'll also second IGNORE THE KOR!!! Alloy avenue spends much time fixing "But the king of random did this..." -
Help with new furnace
OddDuck replied to TastefullyPeenedIronWorks's topic in Smelting, Melting, Foundry, and Casting
Just out of curiosity, are you using charcoal as your fuel? If you are, the tuyere going straight in is fine. If you are planning on a burner, it should have gone in at a tangent to the inner wall. This allows the flame to go around the crucible and heat it evenly. You don't want direct impingement of flame on crucible. As far as welding legs to it, not a bad idea, use three so it will be easier to set it level on an uneven surface. Also, if it is up off the ground, you don't have to worry about redirecting the drain hole, it will just drip out the bottom. Just make sure you are not sitting on something that will catch fire. The exhaust should be three or four inches in diameter, believe it or not. If you are using a burner you want the exhaust at least four times the diameter of the burner. Besides, you can always block the exhaust off if it seems to be letting out too much heat. Moral of the story is, don't overthink it too much. Glad to hear you have PPE, by the by. Keep trying at Alloy Avenue, might take a few tries for the admins to let you on. Good bunch of people, however, and a lot of info there. -
Blacksmith Museum Section
OddDuck replied to GrumpyBiker's topic in Blacksmithing, General Discussion
FWIW, there's a hot shot furnace still intact at Fort Knox in Prospect Maine. Pretty neat, basically they would load the balls in one end, and they would roll down an inclined set of guides to the pickup end. -
Grog is used in a very similar way to the aggregate in concrete, it reduces the amount of cement you need, and helps prevent cracking after curing. Grog is not the refractory material, it is just part of it. I suggest that if you have located a source of grog (pottery supply? ) they probably have a castable refractory mix that you could use to line your foundry. Do NOT use sand and plaster of paris, such as some youtube videos show (King of Random, to mention one...). You will not be happy with the results, might as well do it right the first time. Get at least something that is good to 2600 or 2800 F, if you are eventually wanting to try bronzes of any type. Oh, and spring for a proper crucible and SAFETY GEAR.
-
FWIW, don't get hung up on an ingot mold. Guess what I use for ingot molds? My regular greensand, with either an ingot shaped trench pressed into it or molded up from a pattern I made specifically for that purpose. Infinitely (more or less) reuseable and no xtra storage space. In other words, don't overthink something as crude as an ingot. You will be best served by just making one out of thick steel plate, if you must go that direction. Not sure, but I would check if TI would react with molten steel. You may get a reaction you don't want, and molten iron in any form, steel or cast, is dangerous enough by itself. If you do make an ingot mold, you also want to preheat it thoroughly to drive off moisture before use.
-
Aluminum casting
OddDuck replied to William_James's topic in Smelting, Melting, Foundry, and Casting
Frosty may be overstating it a bit, yes, it's inherently more dangerous than blacksmithing, but not massively so. Step 1, don't overthink it!!! Research, there are all kinds of proven and simple designs (not plans, don't confuse the two...) out there, and lots of info. Research, ask questions in the appropriate places, and again, use your head. Yes, a gas forge can be used for a casting furnace, you are going to be limited in crucible sizes. As far as correct atmosphere, I mean whether you are running lean, rich, or neutral. Different metals like different settings. Heck, you could even (and many have done) a smallish melt in a coal forge with the correct crucible. A purpose built foundry furnace is well within the realm of anybody on this forum. Find one of those Xmas popcorn tins, that makes a pretty good sized first furnace. Find the crucible you are going to use and FIT THE FURNACE TO THE CRUCIBLE. This will save you a lot of problems in the future. I recommend a commercial crucible to start with, you can get them inexpensively link removed . I also second Frosty, however, in finding someone who has done this and is doing it now to show you the basics. On AlloyAvenue there is a map showing where many of the members are, I can almost guarantee you there are a few in your neck of the woods. I also bet you they would be more than happy to show you the ropes, I know I would, but I'm in the opposite corner of the country from you. -
Aluminum casting
OddDuck replied to William_James's topic in Smelting, Melting, Foundry, and Casting
Yep, I second the "go to a different forum" advise, the current forum (used to be backyard metalcasting) is www.alloyavenue.com , nice bunch of people and beaucoup information. As far as flux is concerned, I wouldn't worry about it, you are probably not going to be casting parts for the space shuttle so it's not really necessary. I do not use it, homebrew fluxes can actually cause more problems than they solve. Correct melting technique will serve you better, aka furnace atmosphere, quick melt time, and don't overheat if possible. Skim off whatever dross occurs from the melt, and you should be more or less good to go. Oh, and get safety gear, a faceshield, leather apron, and heavy duty welding gloves at a minimum. -
Might I recommend checking out www.alloyavenue.com , specifically the forum section? It's to metalcasting what Iforge is to smithing. Lots of nice folks there, and a ton of info. Frosty is correct in many of the things he says, gating directly to the top of a casting is not normally done, it should be gated from the side or bottom. Also, aluminum bronze is not a beginners' alloy, it is very difficult to get right, and what you end up with is probably going to be somewhat brittle and harder than Japanese arithmetic. Also, bronze doesn't tend to play nice with lost foam, I highly recommend moving to greensand casting.
-
Well, if it's worth doing, it's worth overdoing a bit. And overthinking. Didn't mess much with tuning it perfectly, the flame in the furnace was a nice even blue, and not much if any excess flame was coming out of the top. Foundry is a bit different than a forge, the flame doesn't impinge directly on the metal being heated. If it does, time to change the crucible. Furnace atmosphere can be important, depending on the alloy being used. I didn't even get much dross, come to think about it, so it was probably on the neutral/slightly rich side.
-
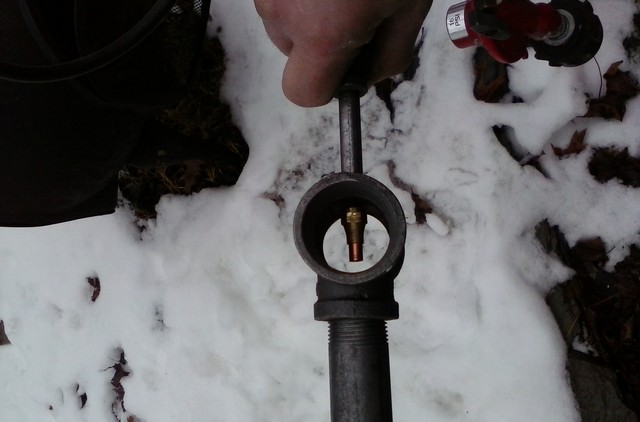
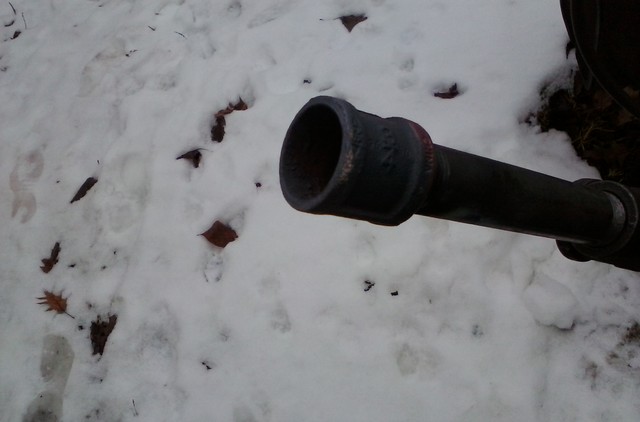
Okay, here's the pics of the burner, hopefully they are reasonably clear. The last pic probably doesn't show it very well, but I made the flare out of a 3/4" coupler, I chucked it up in the lathe also and bored out the threads on one end of the coupler.