Gold Country Forger
-
Posts
25 -
Joined
-
Last visited
Recent Profile Visitors
1,276 profile views


-
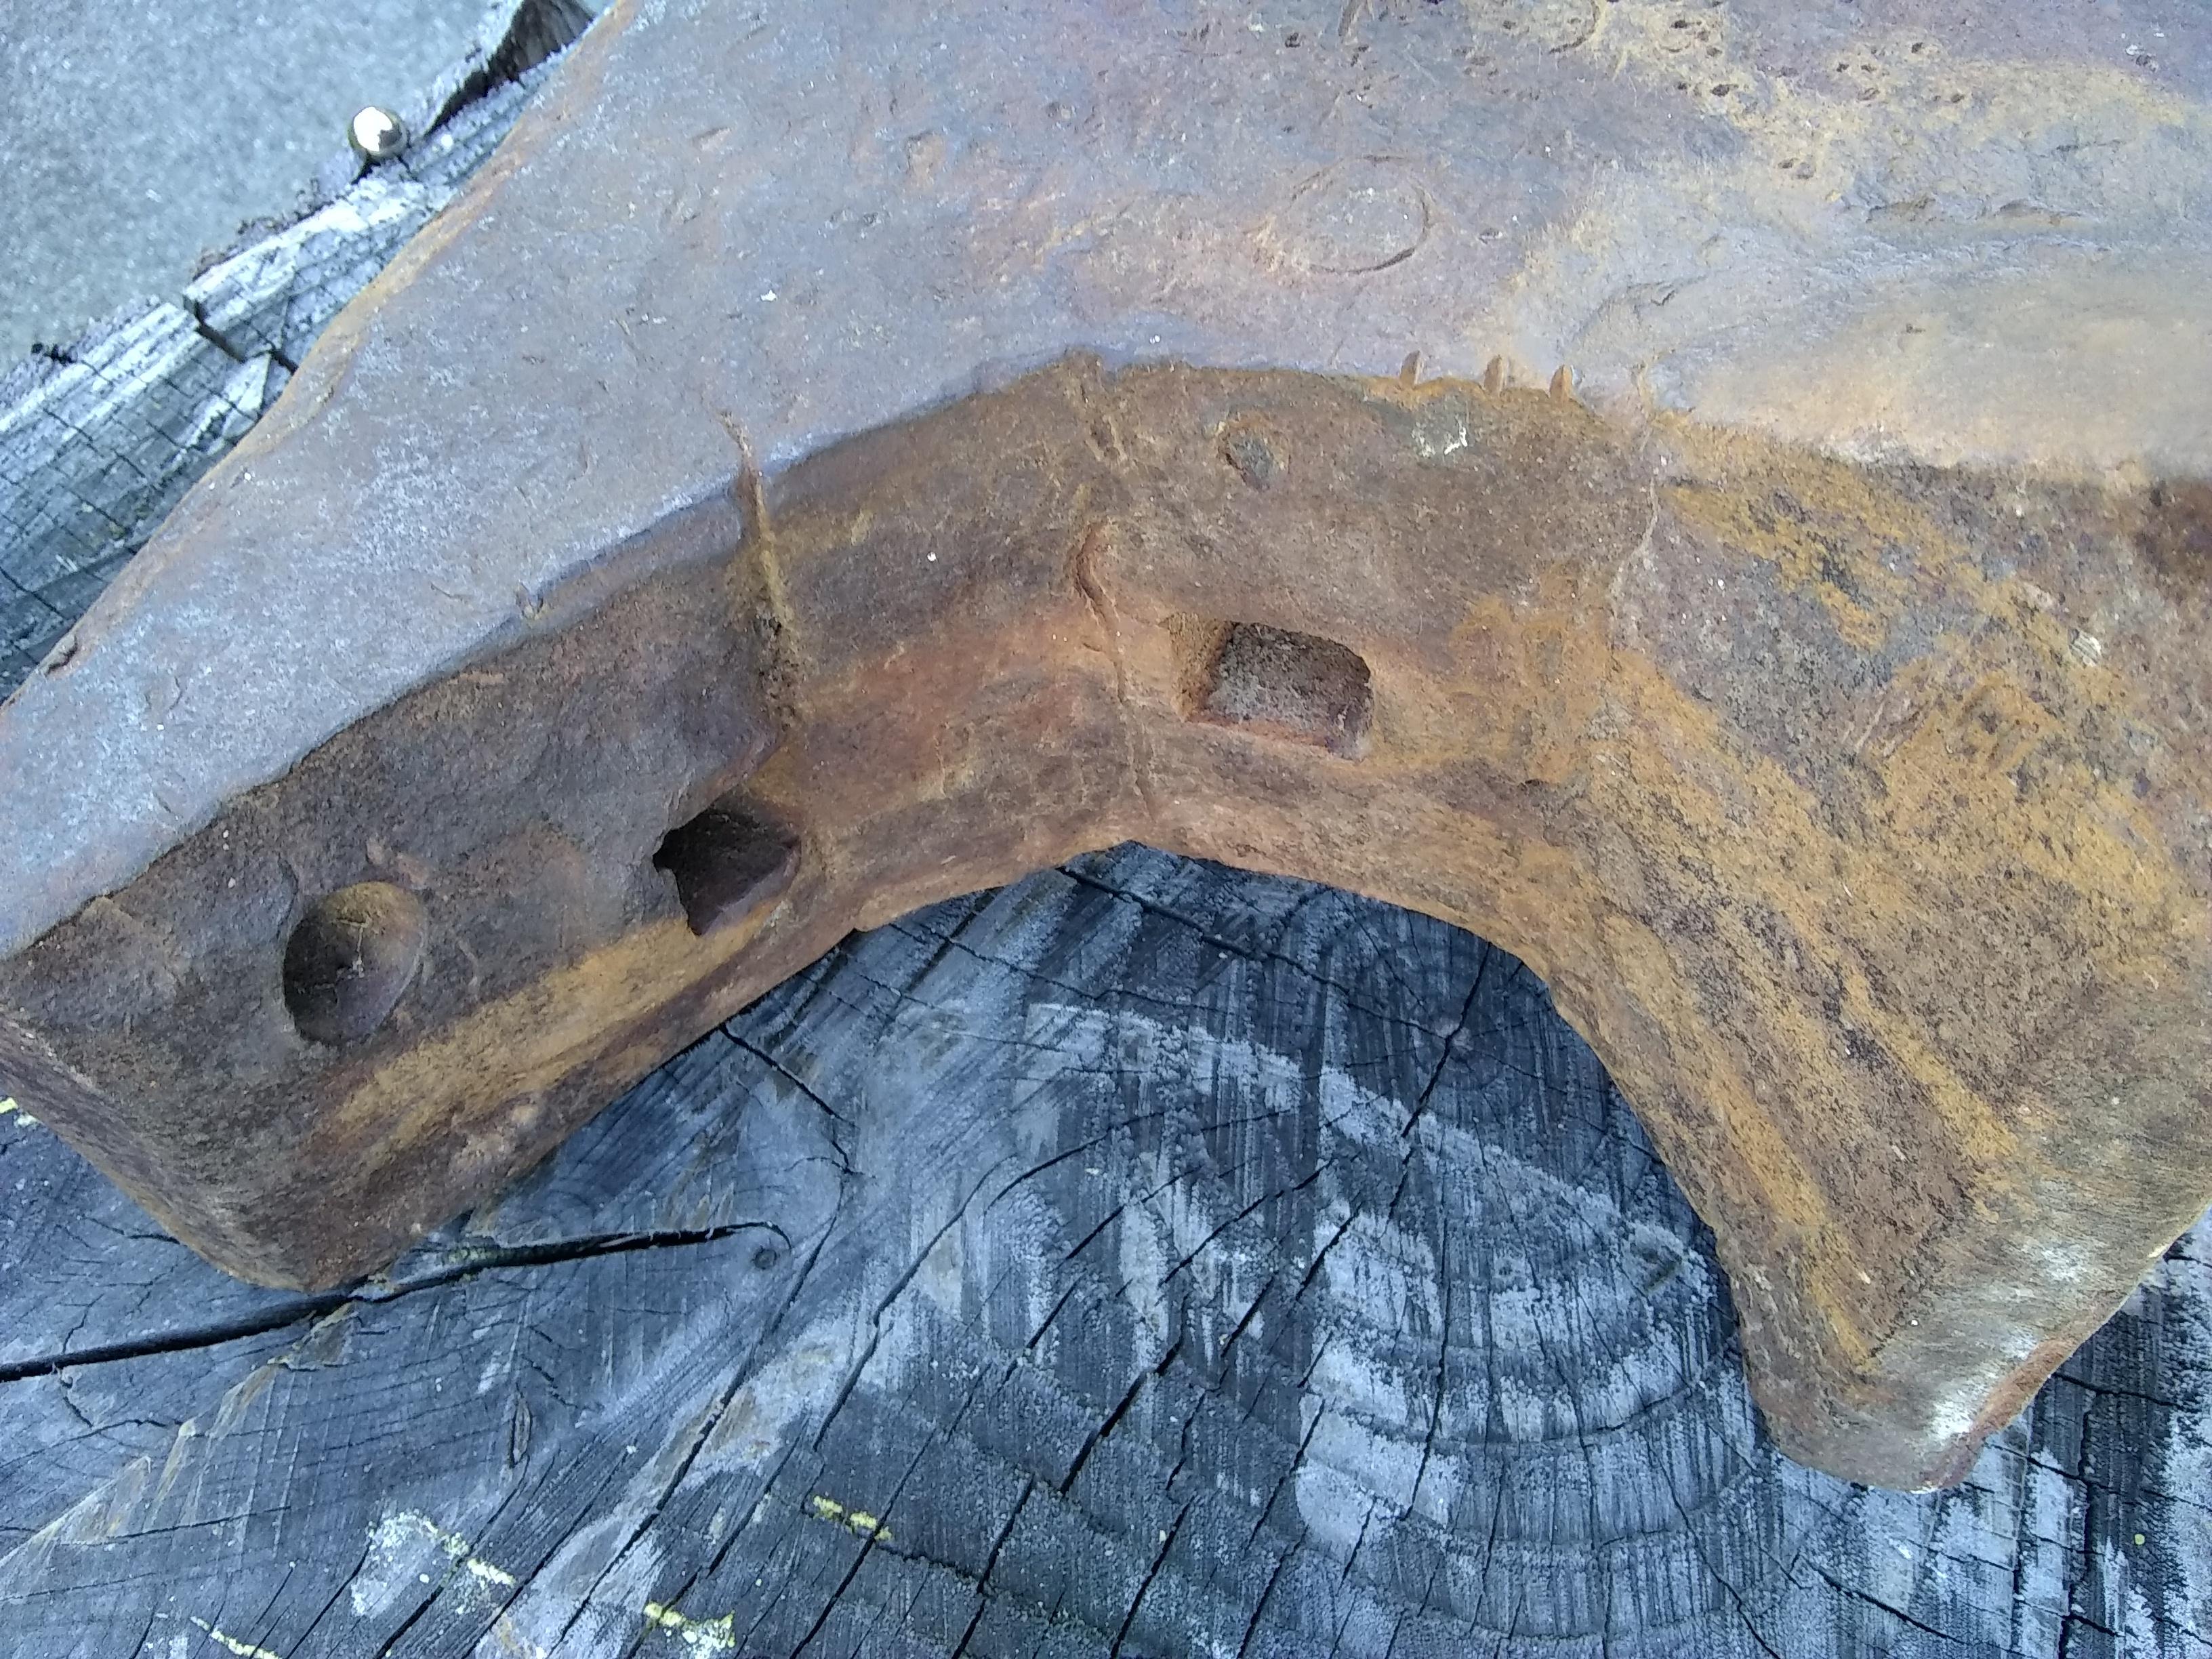
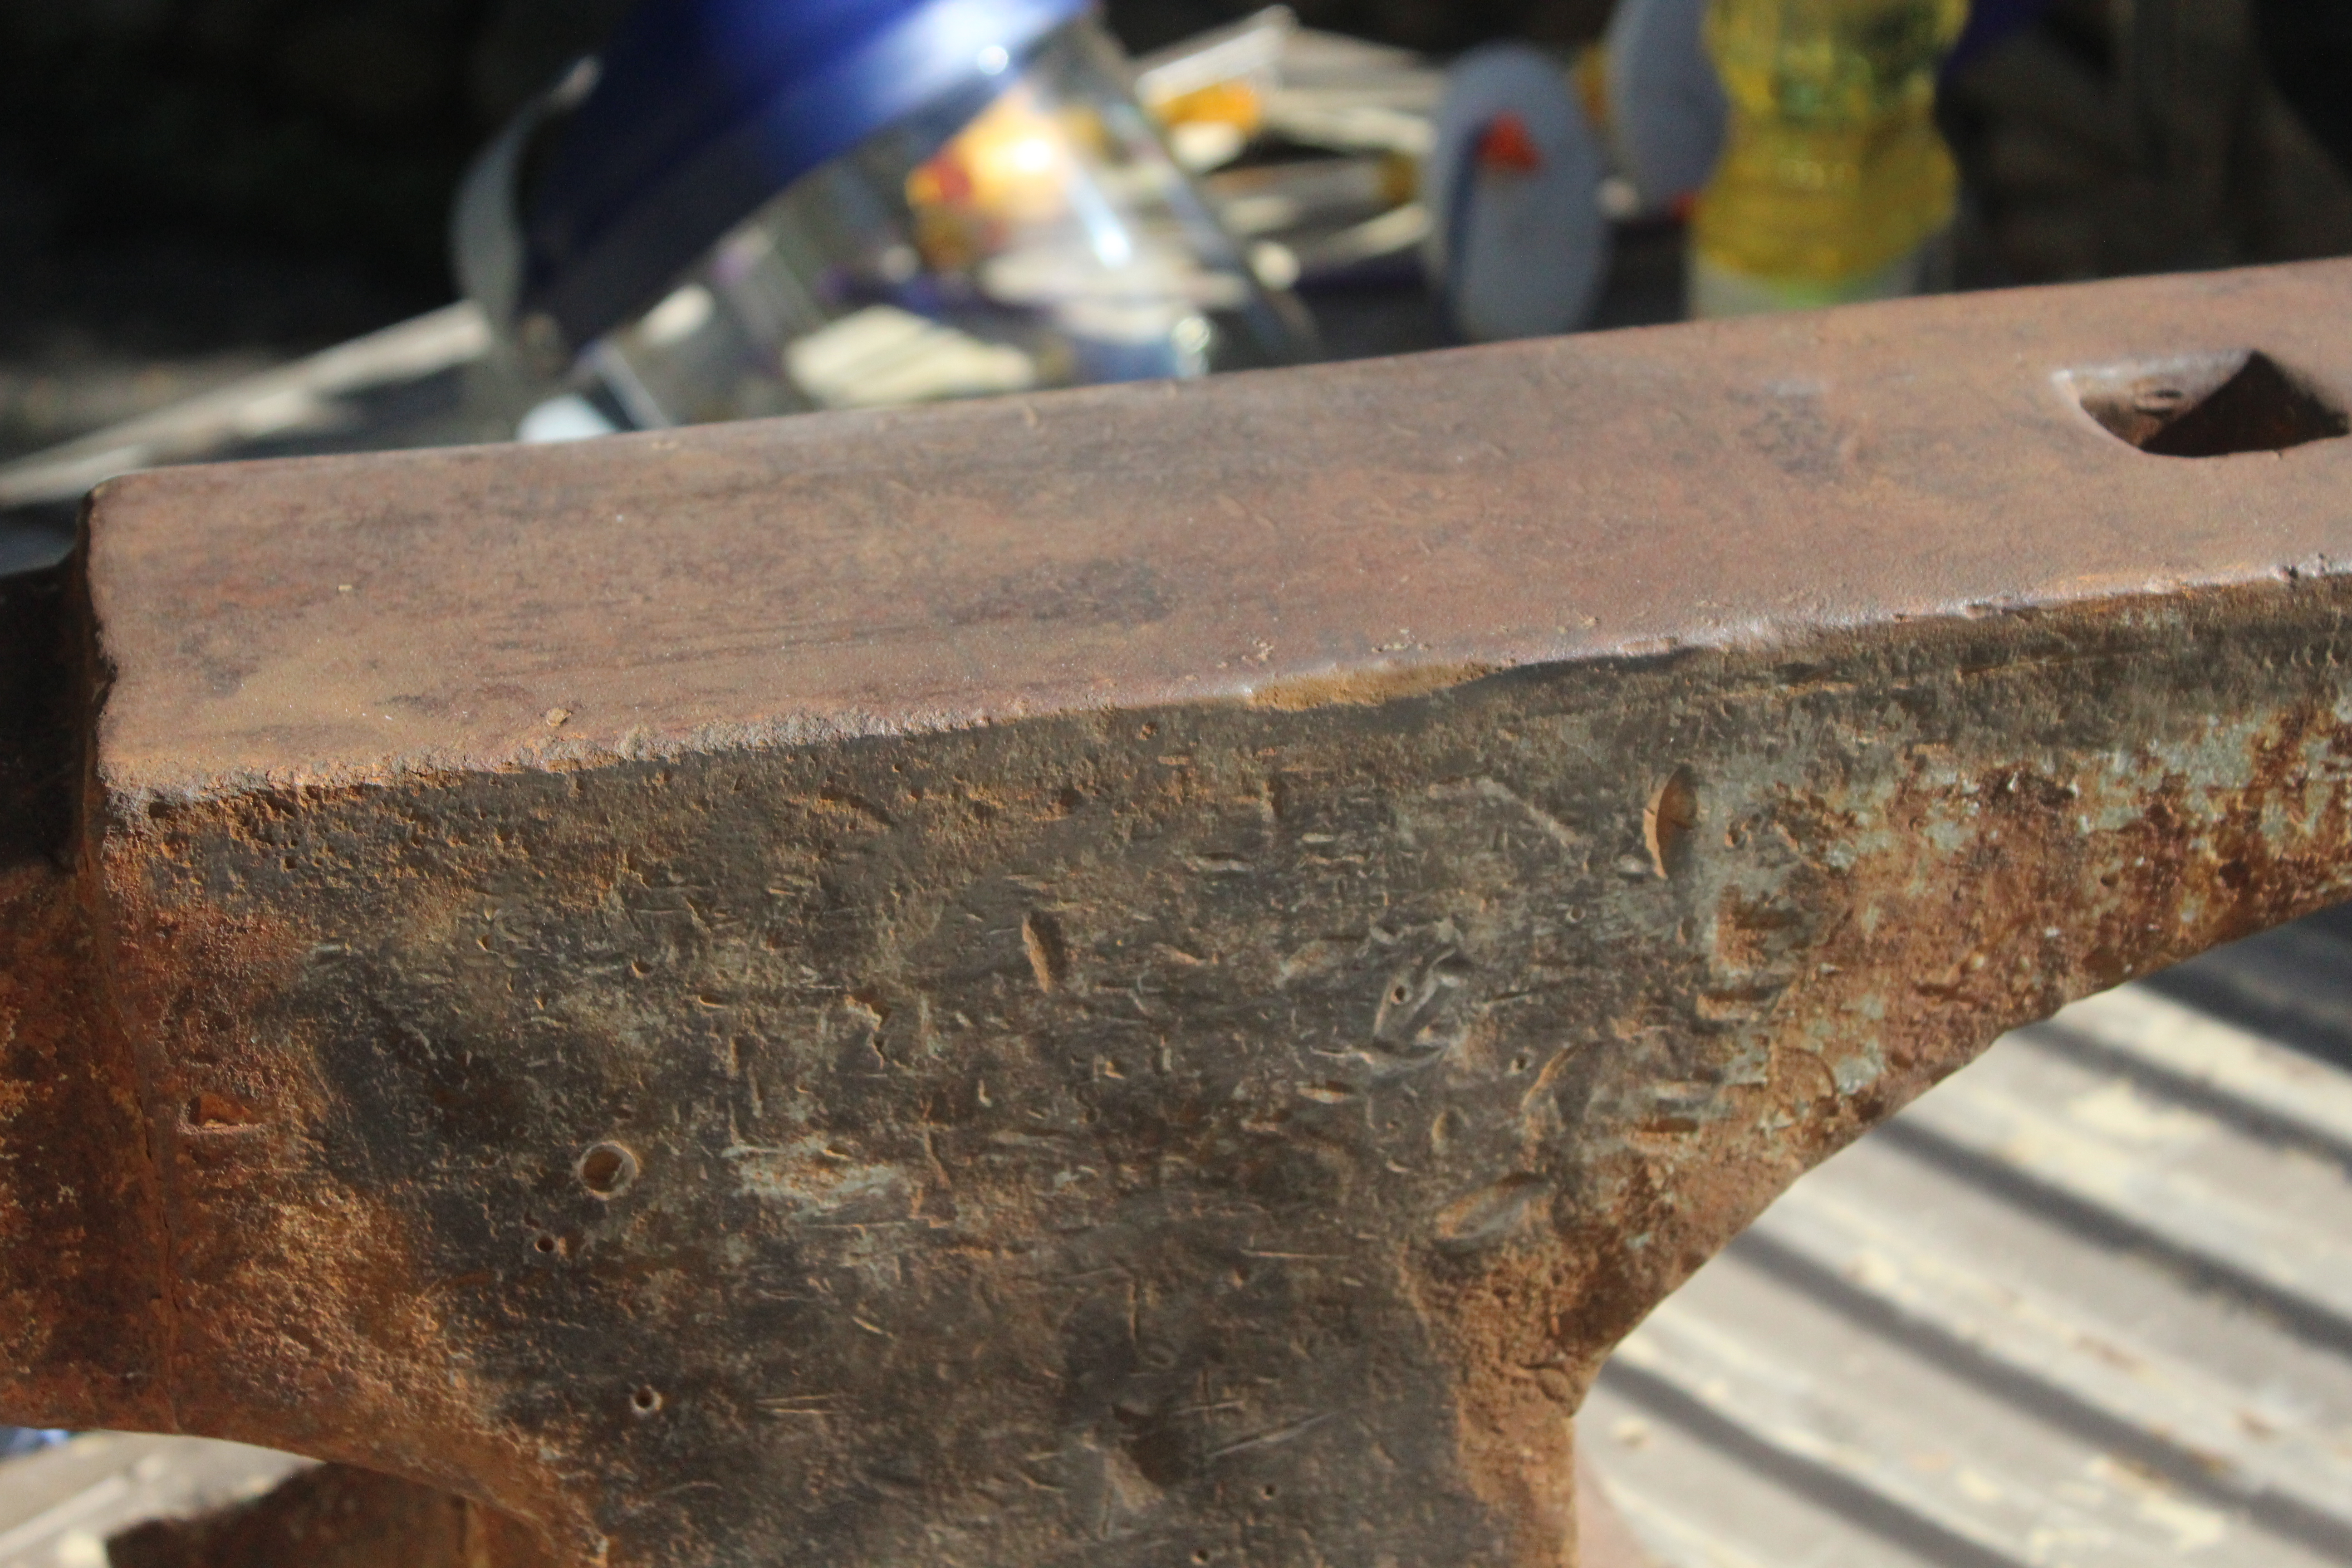
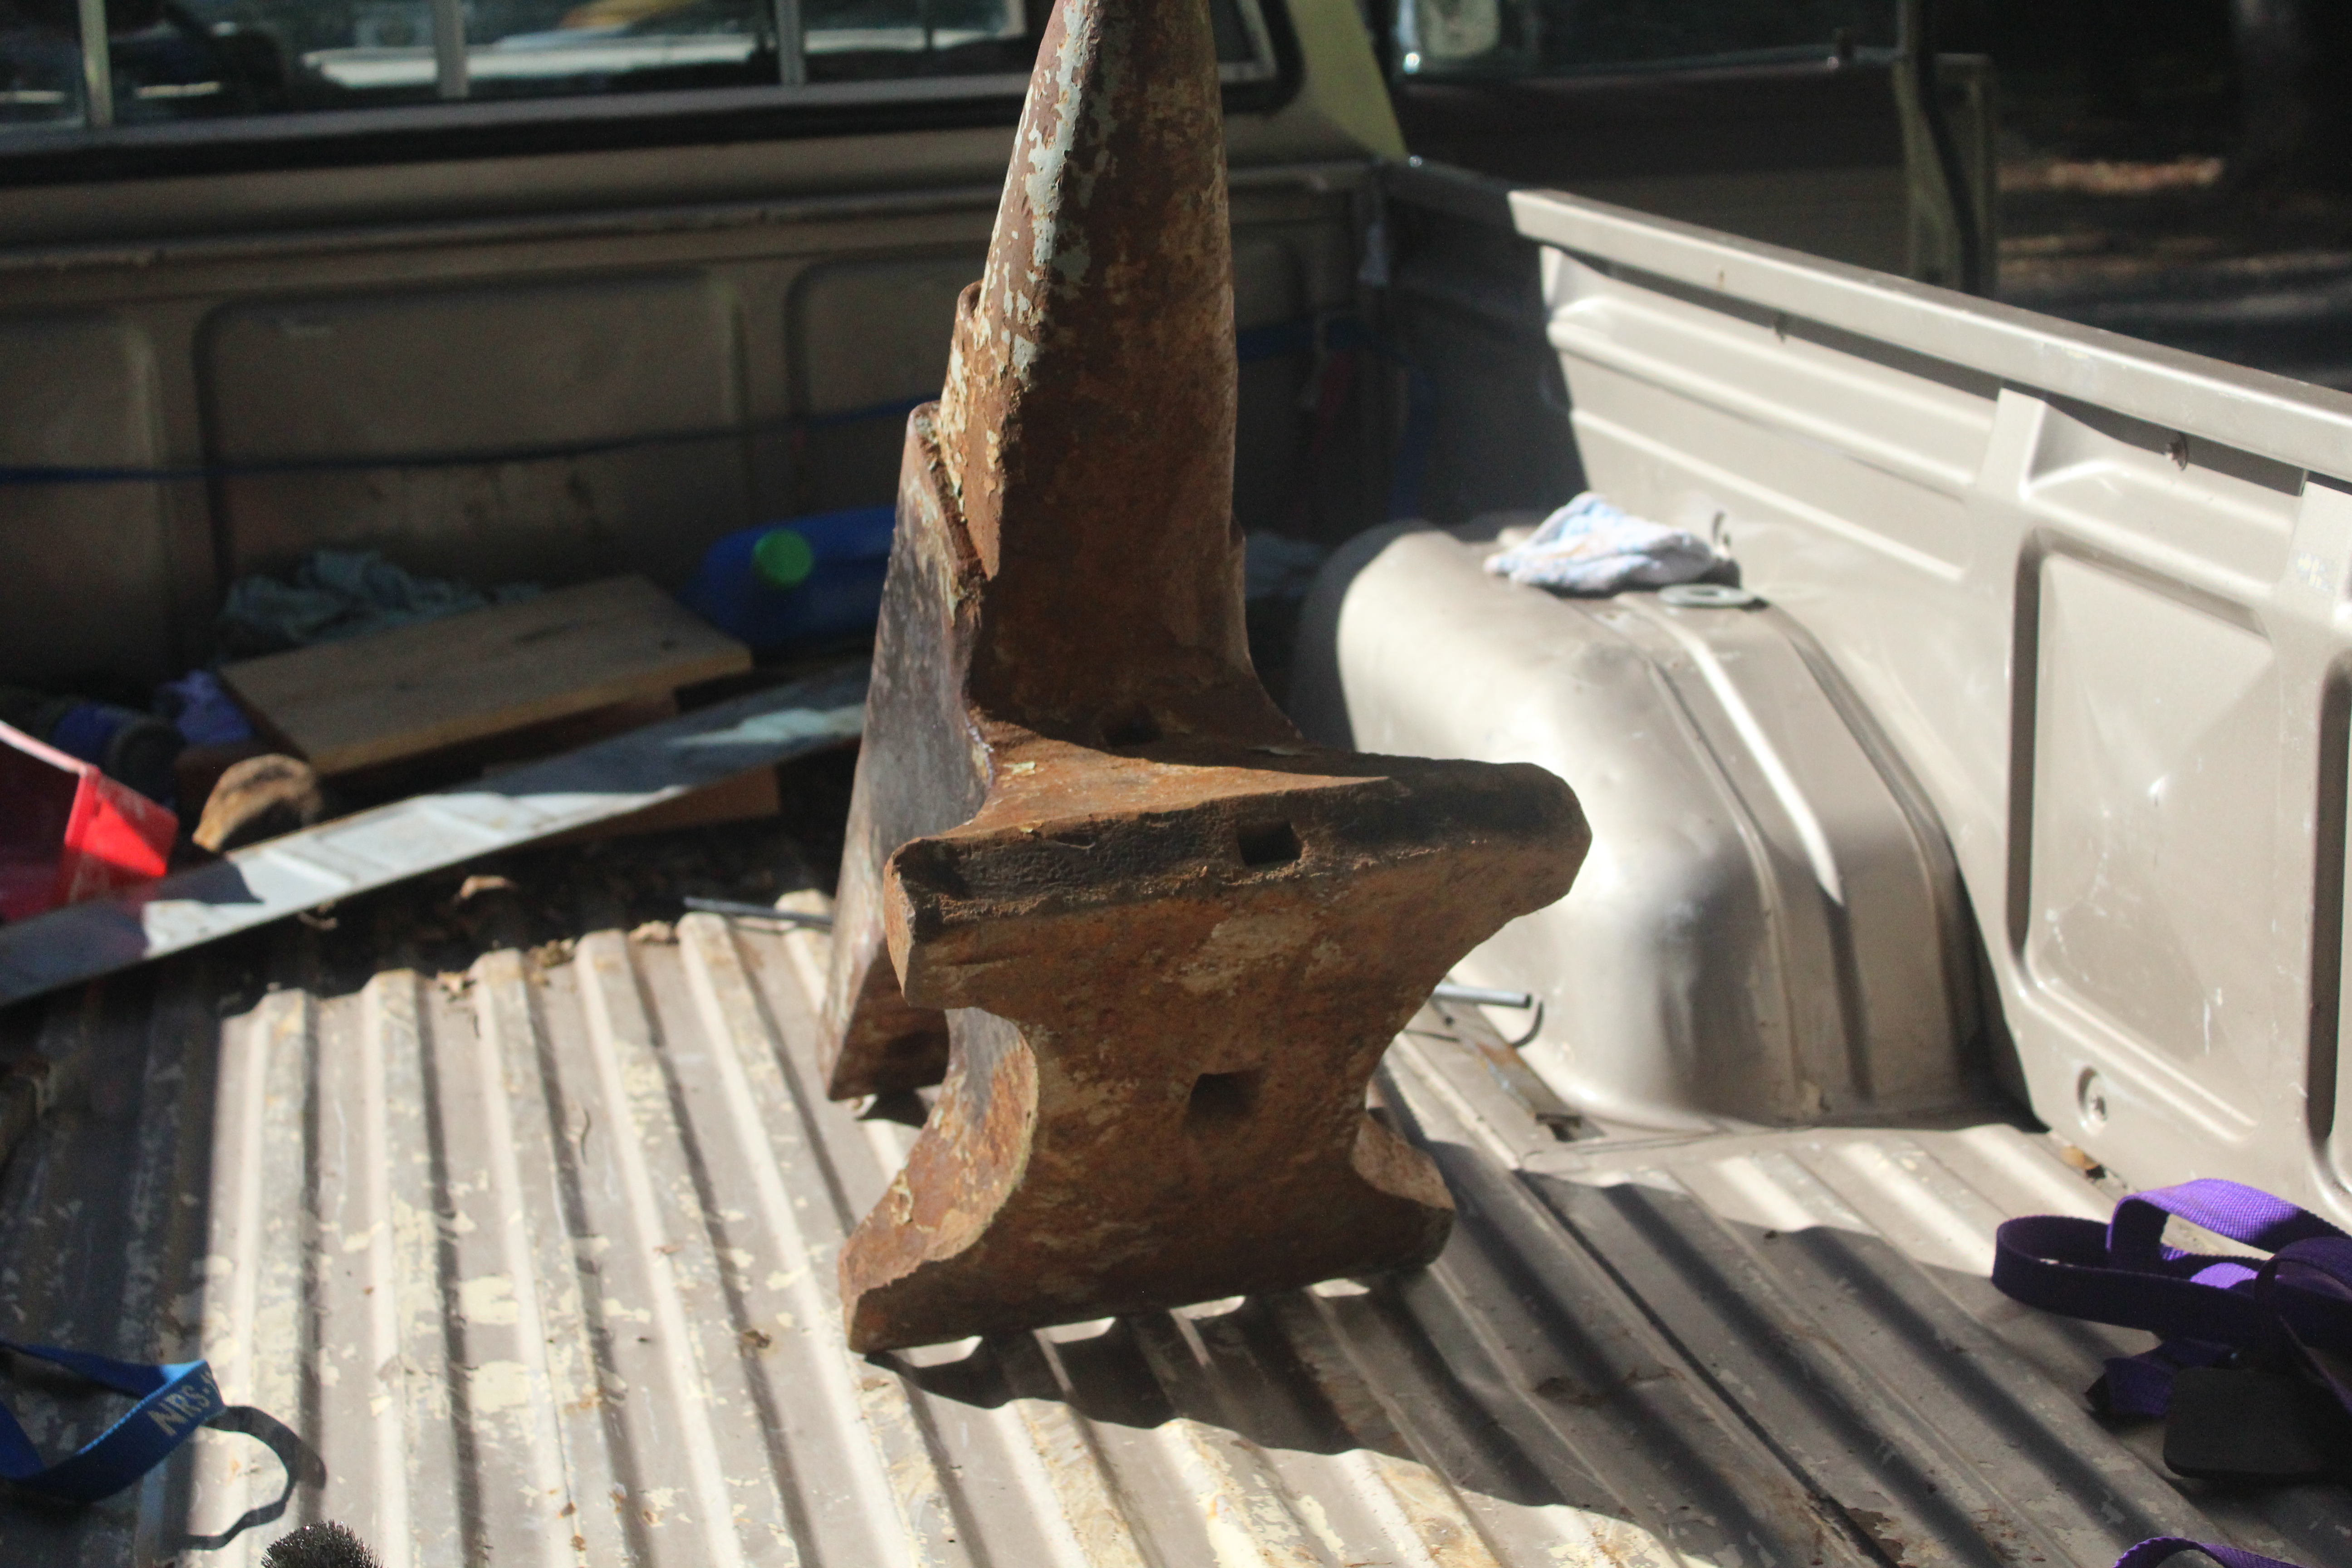
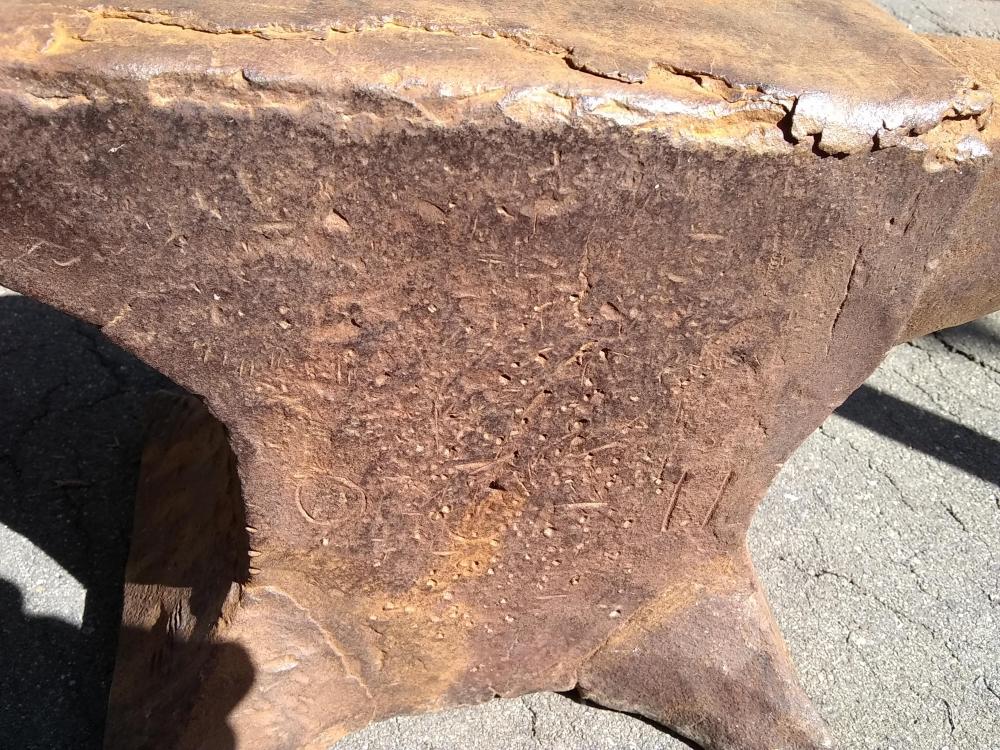
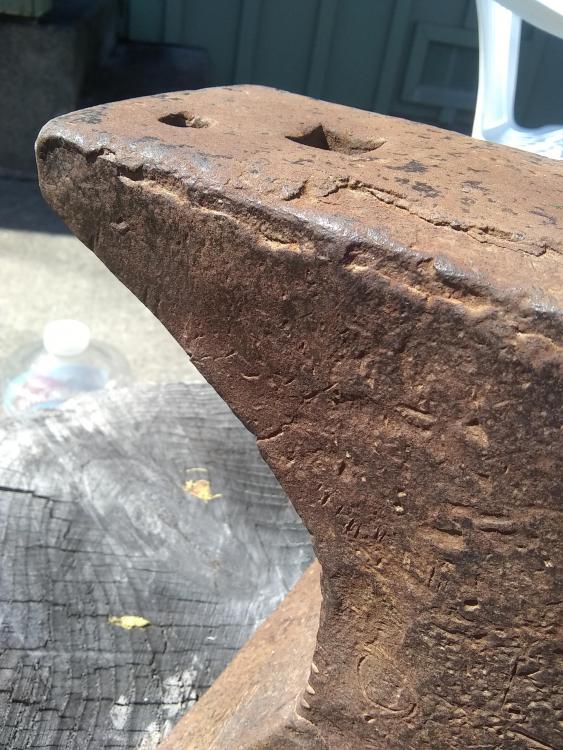
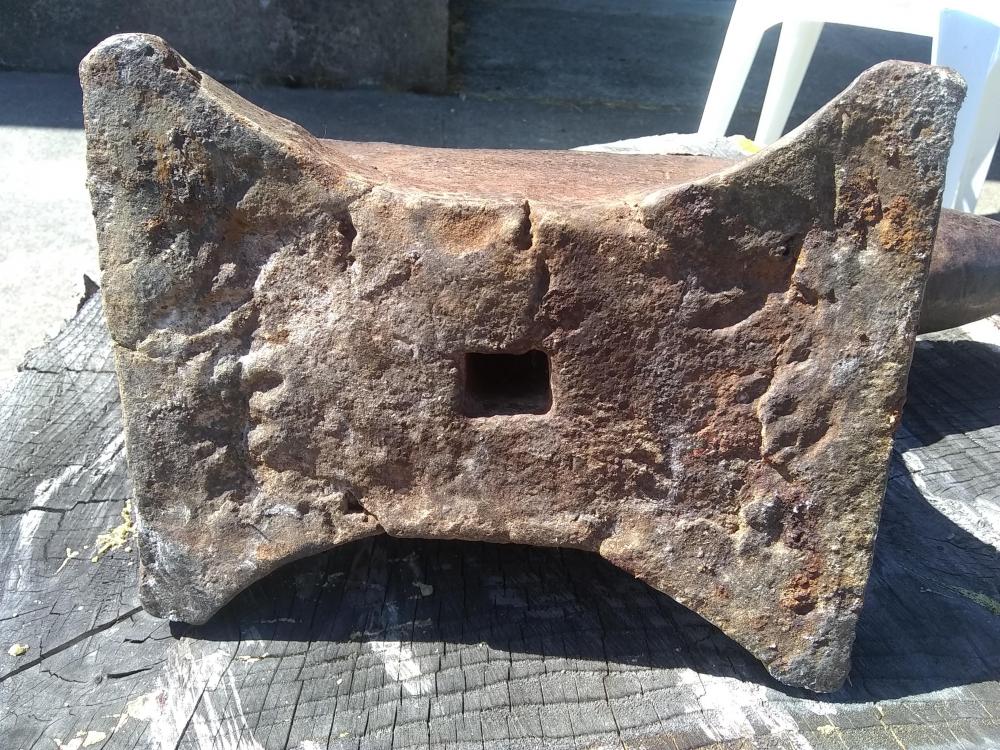
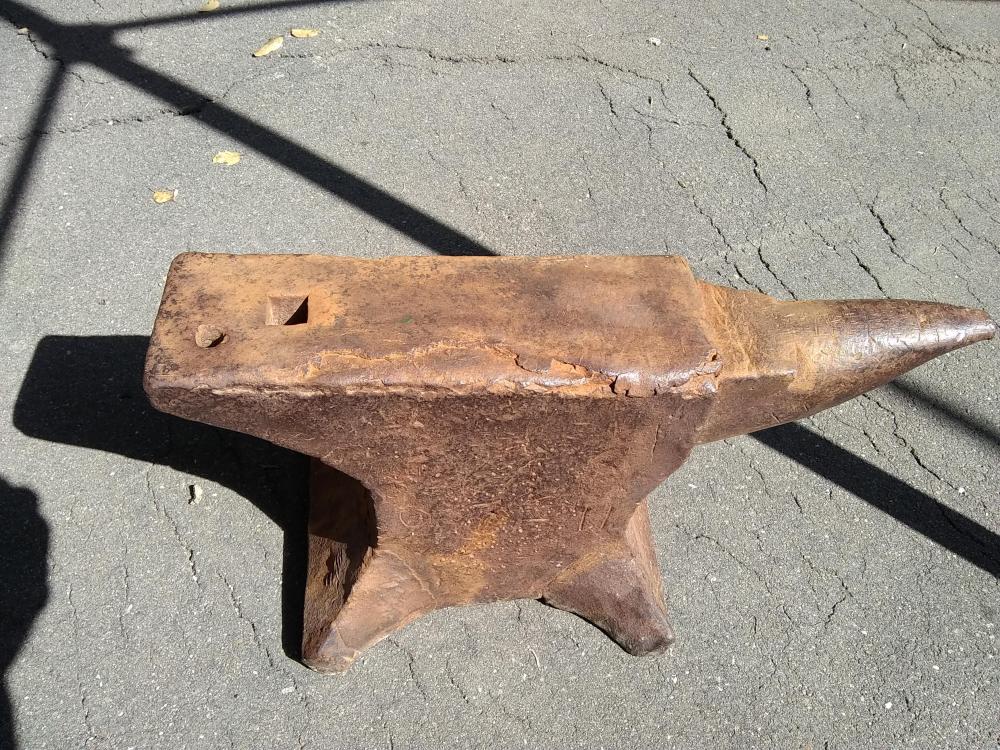
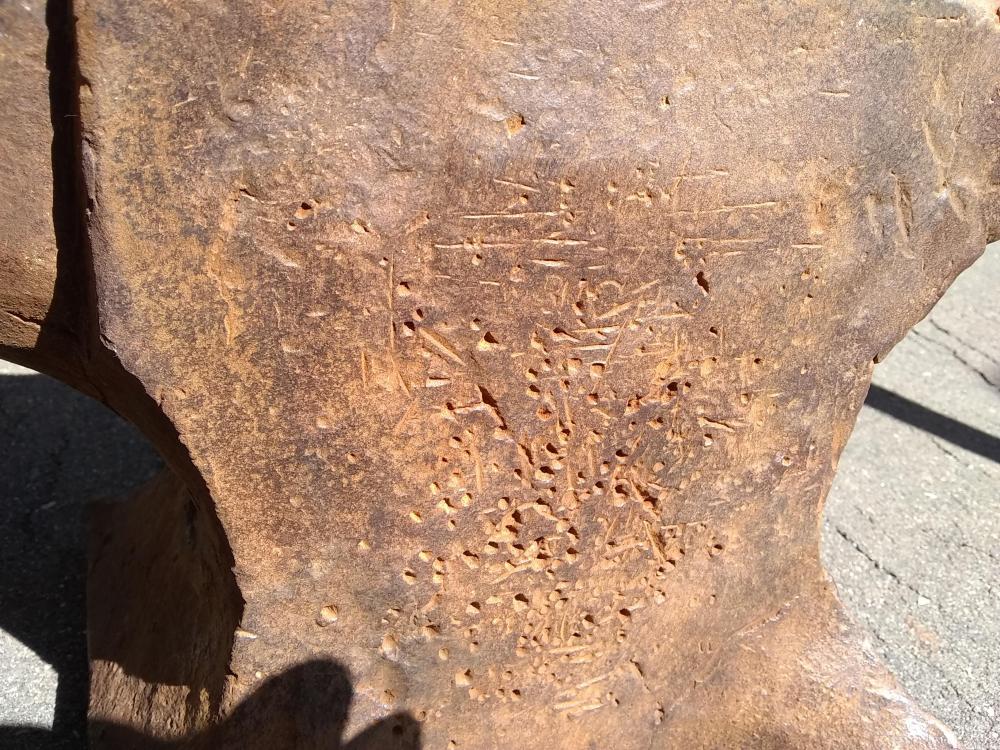
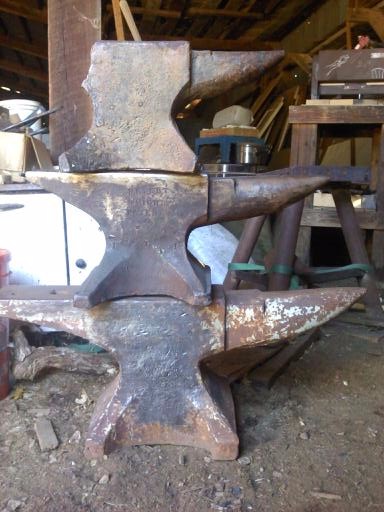
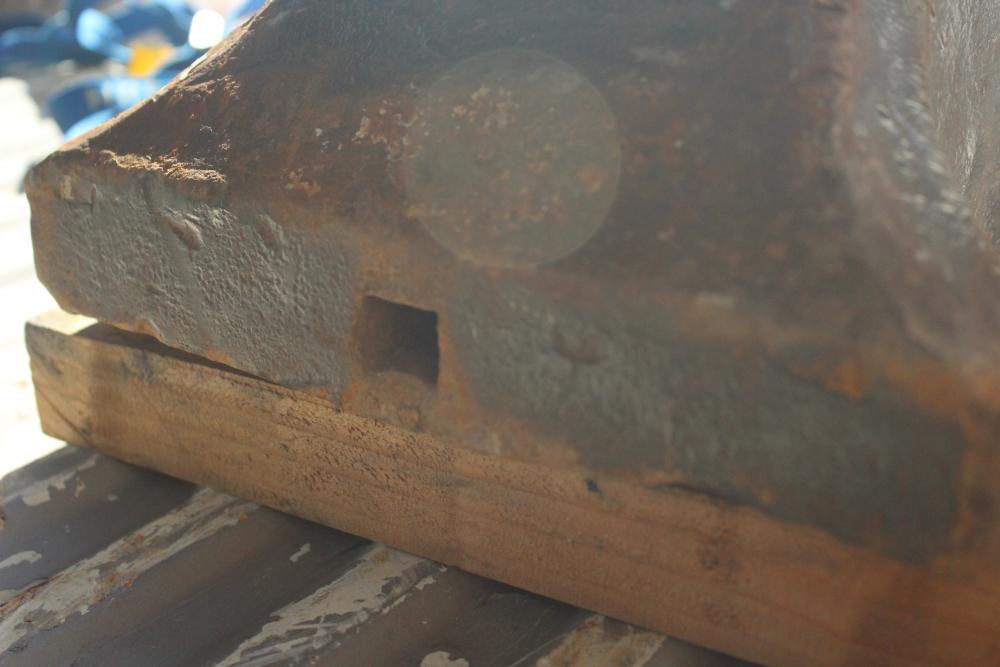
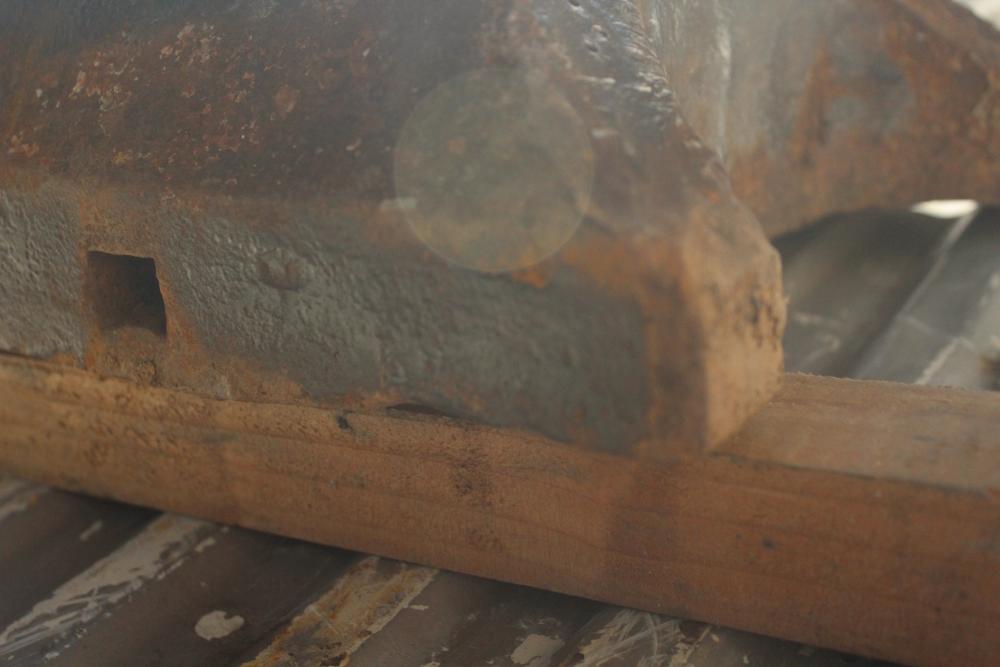
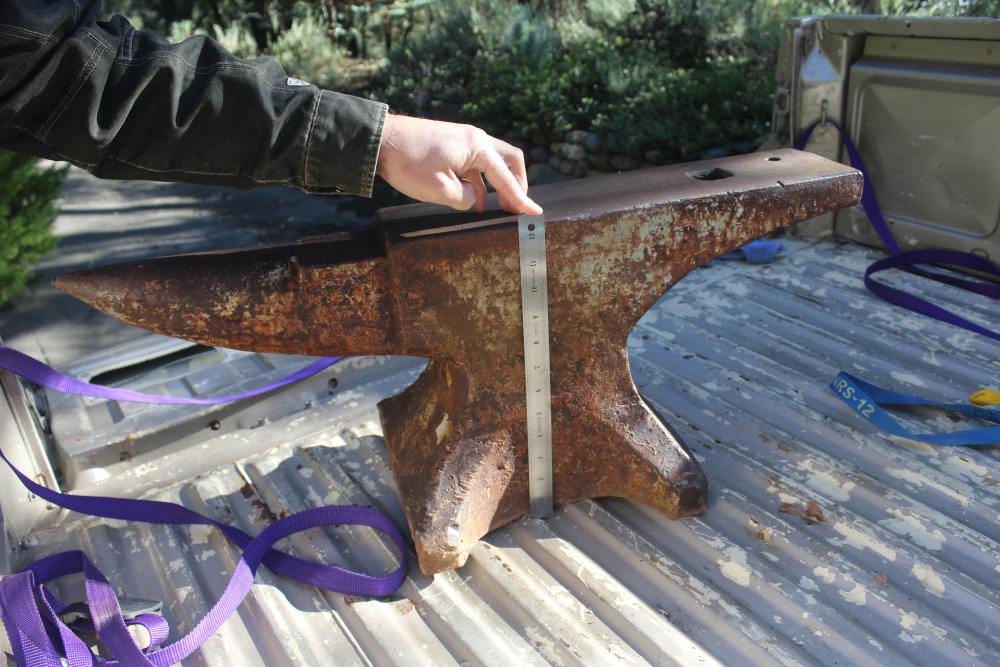
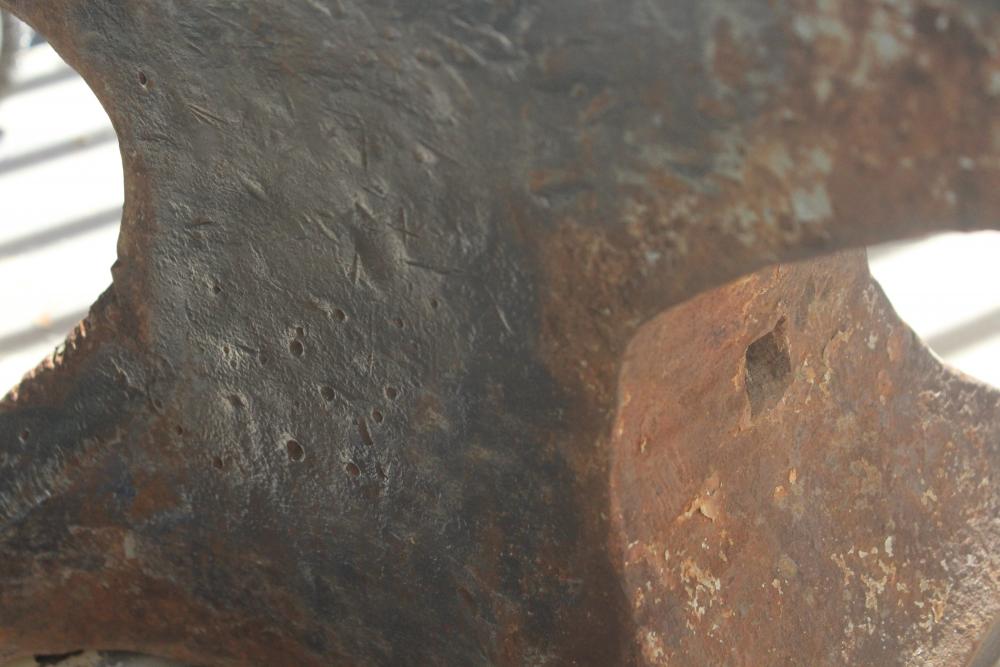
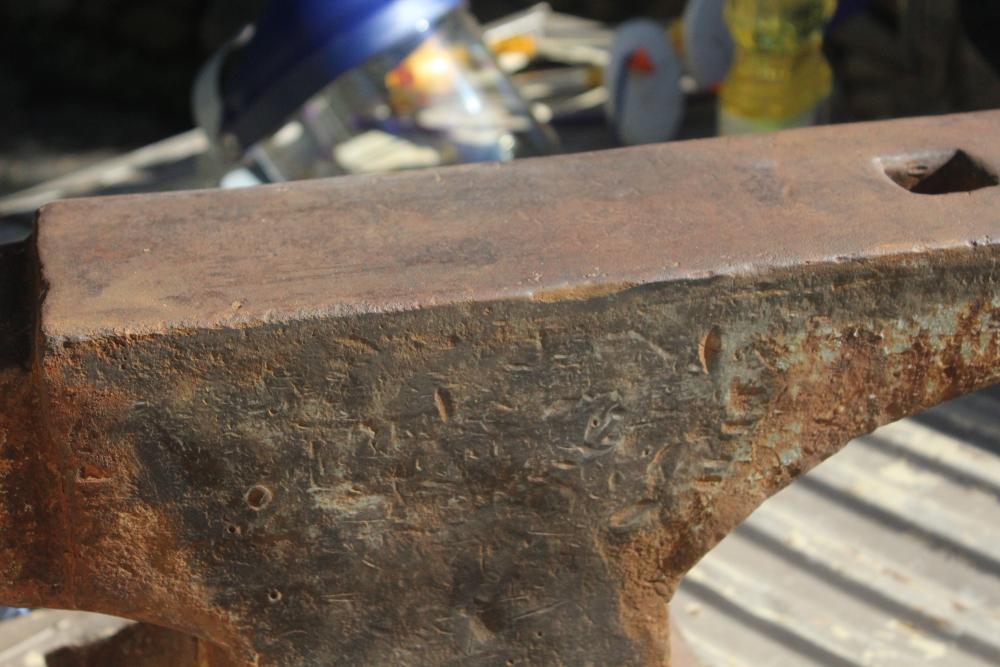
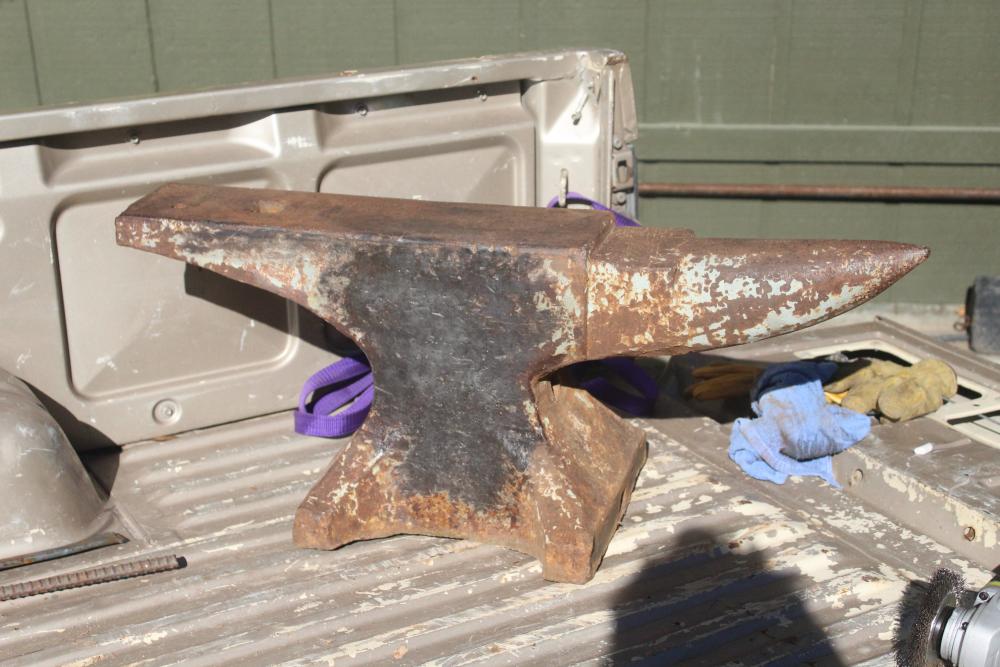
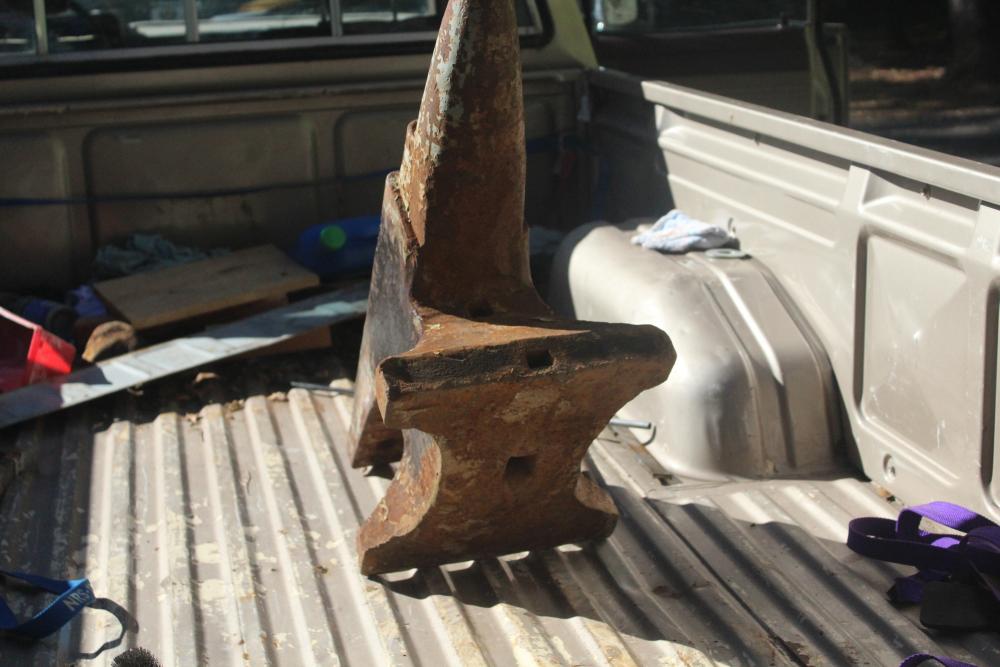
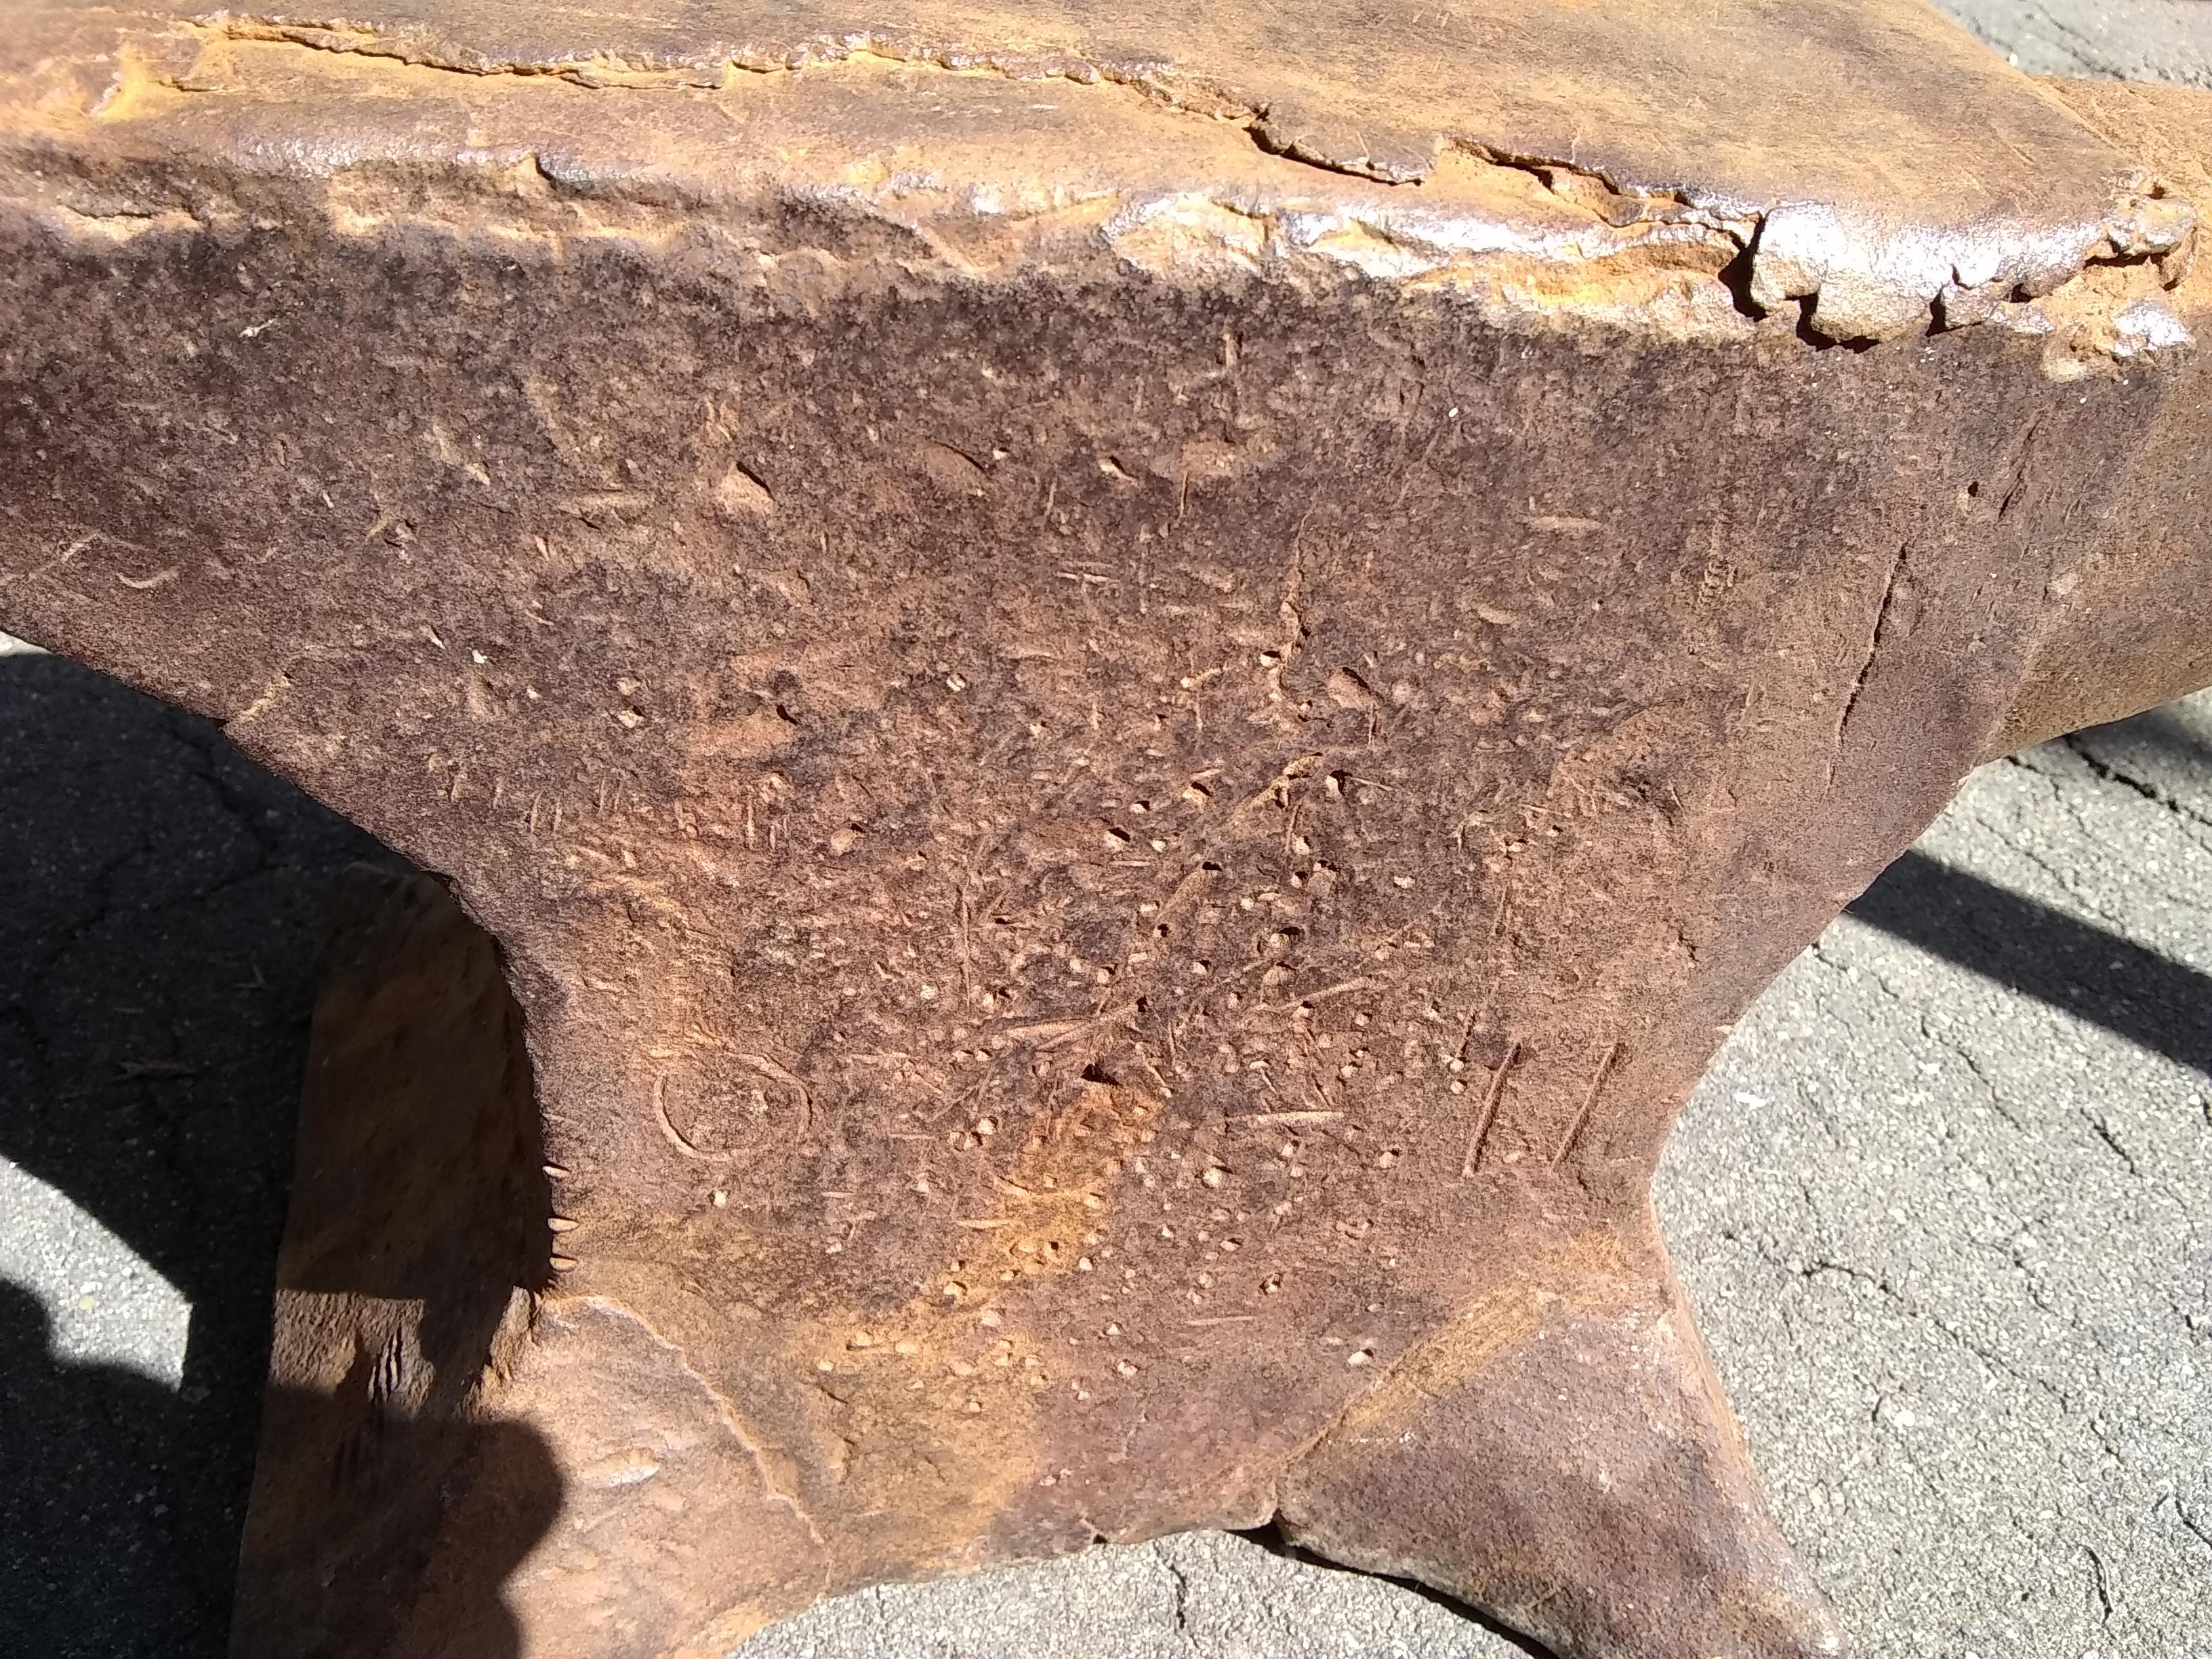
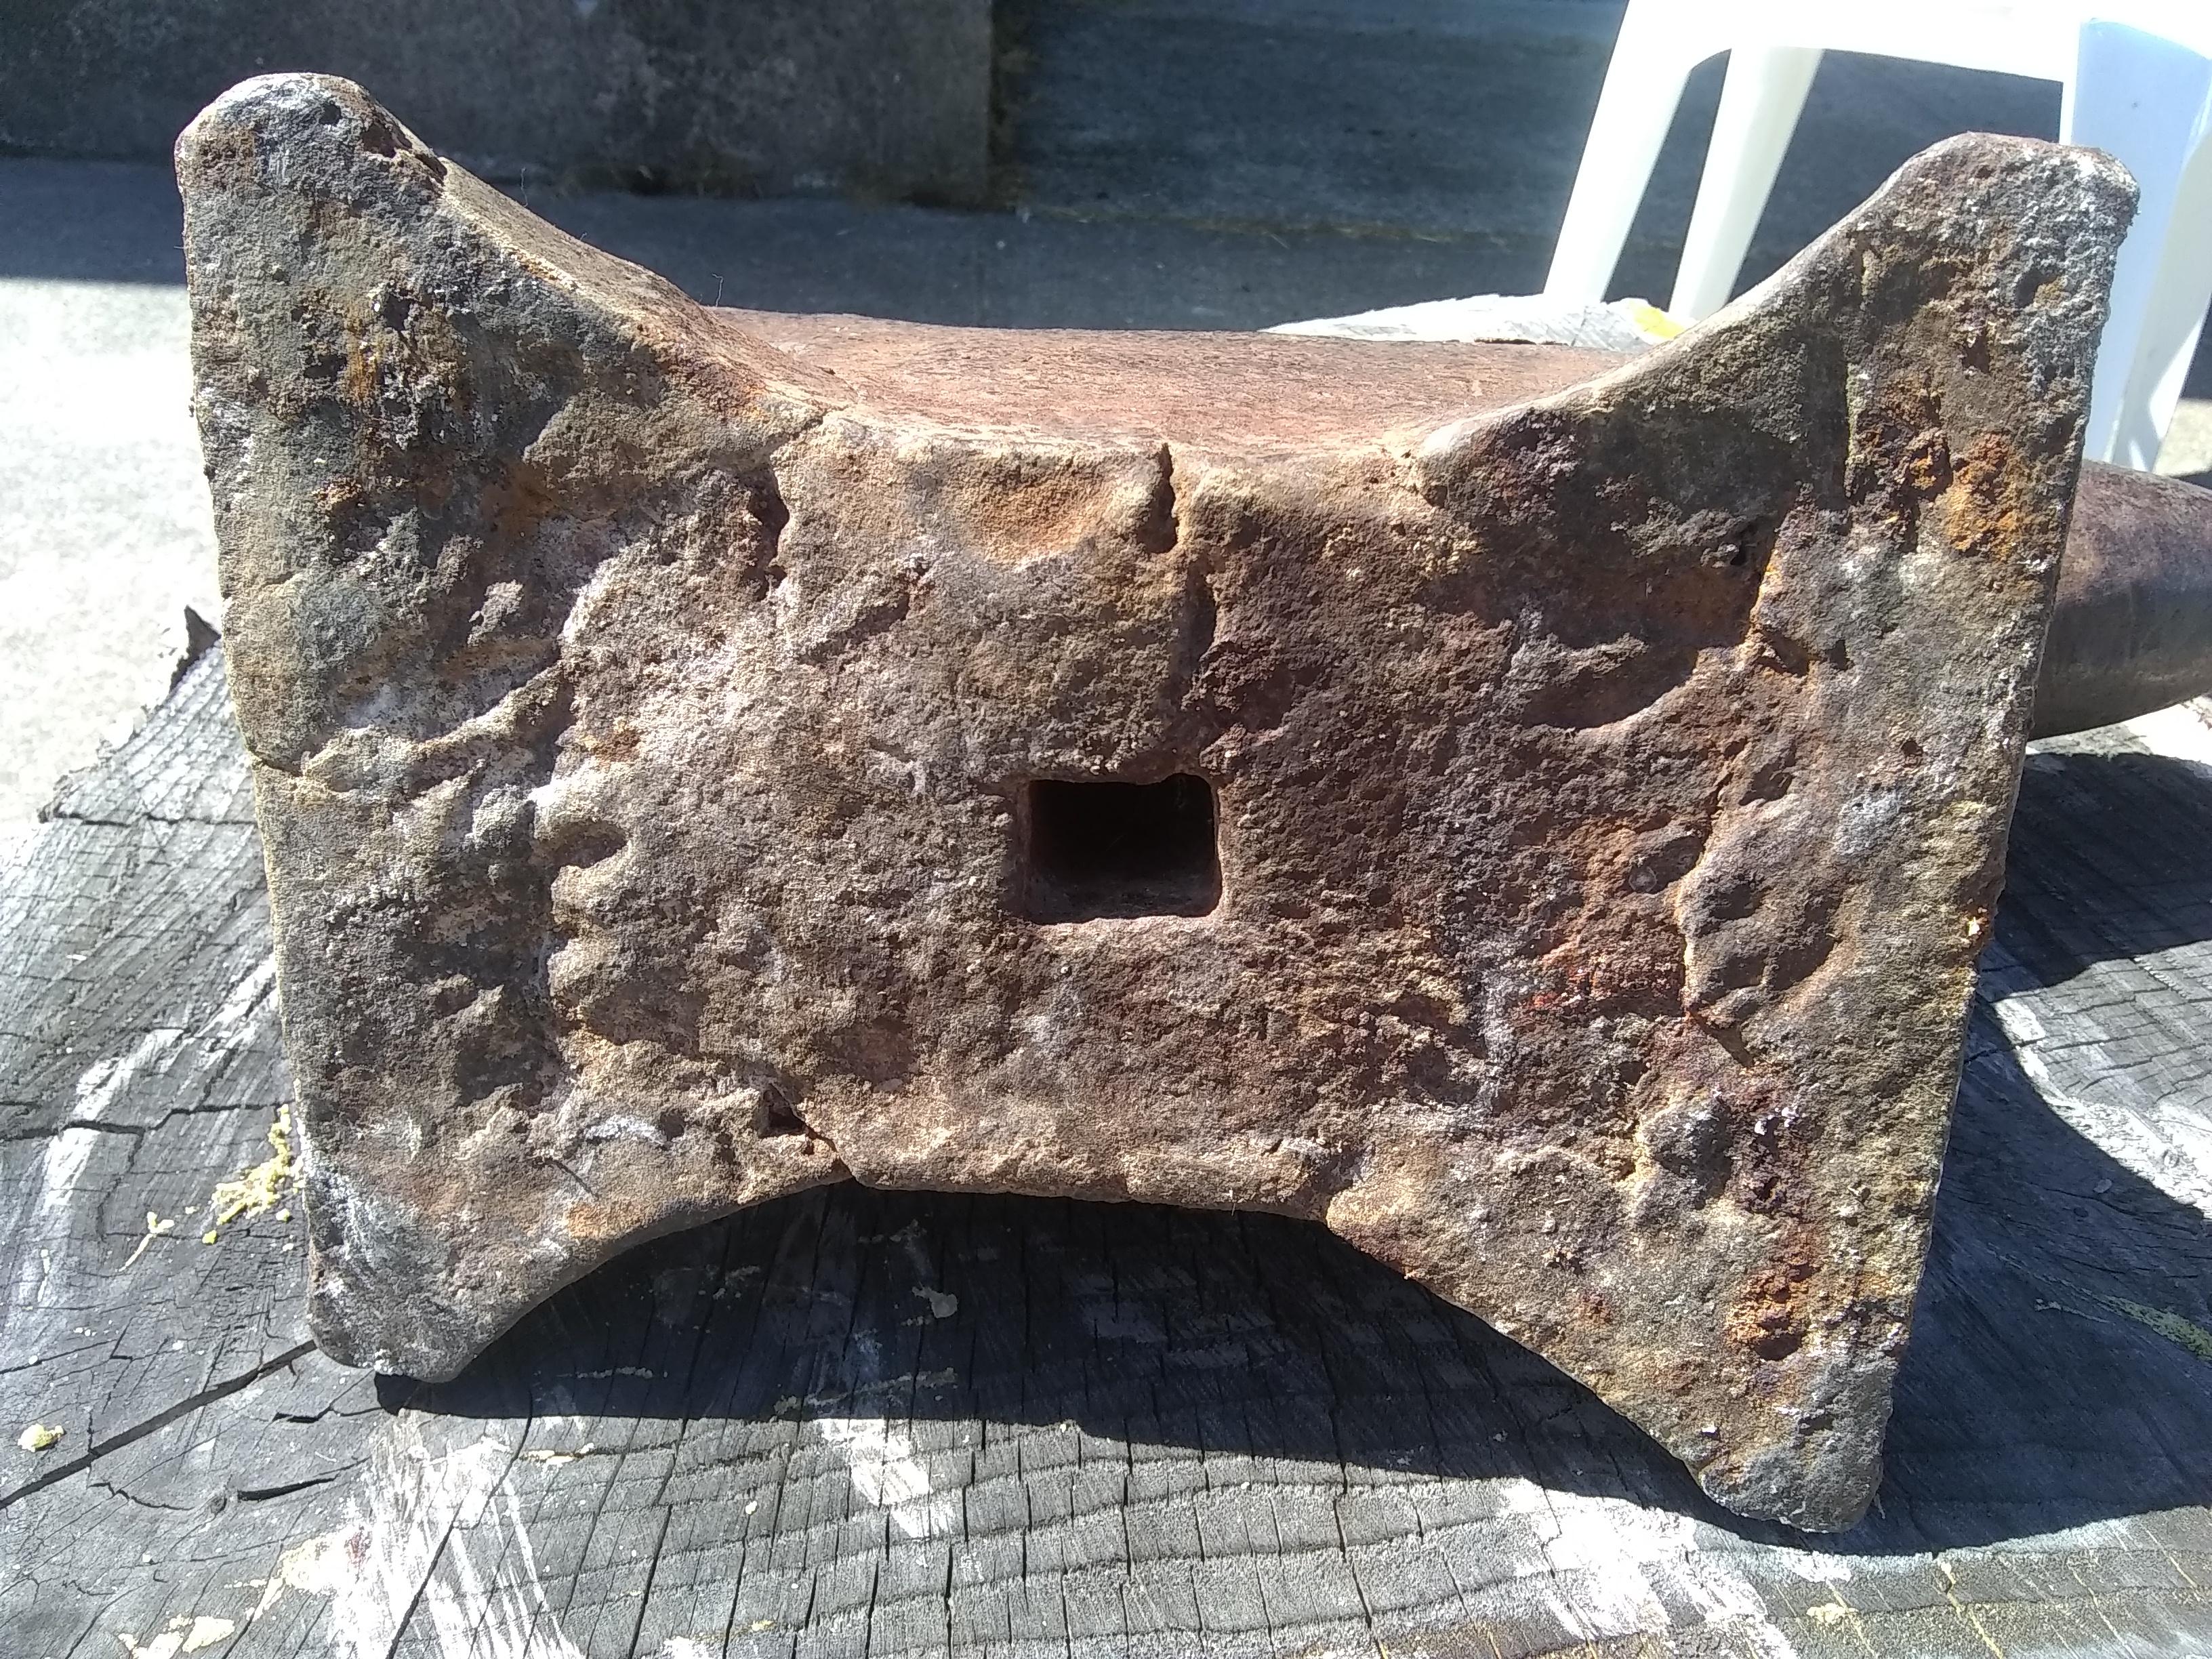
So first the story on the anvil: I work in a shop where getting tools is a huge pain, and a lot of what is there is not great, so I buy most of what I need for expediency and because I can always take it with me when I go. The last guy that ran the shop was a maintenance worker with fabrication skills, so the metal shop lacks a lot of tools I like to use coming from more of a fabrication background. Among the tools absent is an anvil. Additionally because this is a maintenance setting with a wide variety of tasks that need to get done I am not the only one with access to the fabrication shop, and while I keep some of my tools locked up most of the larger ones are going to be accessible. Finally I encourage the others to come learn how to use the tools, and try to teach them how to do so with their saftey foremost in mind, and the safety and longevity of the tools as a close second. We are all aware of the prices of new anvils, so I chose to wait for a suitable used one to come up cheap that would serve in this setting. My criteria was basically that it be around 100lbs so I can move it (small space) and worn enough that any damage inflicted by my coworkers would not degrade its usefulness... and boy did I find one that meets the bill. Anyway, the reason for the post is because once I got my hands on it I realized there were a lot of cool forge-welds visible, as well as some interesting degregation of the top plate that I wanted to post in the hopes that it would be informative. Disclaimer: this anvil is pretty much wrecked and while eventually I will probably weld repair it for now it will be used as is. First the top plate, which looks like it only had the first 1/8" or so hardened and after some abuse the hard layer has chipped away from the unhardened plate. additionally there is an interesting fracture pattern radiating back from the broken edge. in the second photo you can see where the steel plate and the wrought body meet as well. I do not think this has been weld repaired as the fractures go far back onto the face and the steel plate is still visible under the broken section at the edge: Notice the mushroomed part at the right side of the photo. On the left you can see a what looks like a cold shunt where the lower part of the steel plate meets the wrought. In the photo above you can see the forge weld lines of the feet. Below is the bottom of the anvil, and it is hard to tell but appears that the feet may be connected and welded then forged as a kind of 'bar' across the bottom of the body of the anvil: And in this next photo similar view but a different angle to see where the weld transitions to the side of the body: Lastly the heel appears to be two pieces, one right on the edge of the hardy hole that meets the body at 45 degrees and one piece further towards the body: And here is a shot in all her glory, as well as a close up of what remains of the makers mark: I can see the letters "...RIGH..." and thats it. Given the kind of wear and construction (as well as hundredweight marks) i suspect it was a middling level English import that got used rather hard. all together I count at least 6 pieces, 7 if we assume the horn was welded on as well, and as many as 9 if we count all the feet separately (but it doesn't appear to me to have been made that way). I'm excited to put it back to use and teach some new folks the many uses of the anvil.

.thumb.jpg.74c9a11646864b34fcf959cfdf08e24b.jpg)

-
Oil for power hammer
Gold Country Forger replied to Gold Country Forger's topic in Power Hammers, Treadle Hammers, Olivers
Thanks everyone! -
Oil for power hammer
Gold Country Forger replied to Gold Country Forger's topic in Power Hammers, Treadle Hammers, Olivers
Thanks for the reply, it is a striker (55) hammer so manufacturer is out. I have already checked comparison charts as well, and have found similar products that I will probably have to order, but it brings me to the supply source, as ordering a 5 gallon bucket online is about $40 for shipping. ouch! I'll eat the cost if I have to but if it is available somewhere retail that would be preferable. -
I have a new power hammer, and although it came with some oil it is time to buy more. The recommended oil is Chevron Rando HD 220. The issue that I am having is finding any for sale. I can find similar oils online, but not the exact oil. I am wondering how important an oil match is, and where might be a good supply source for any matching gear oil. I live in a rural area and have asked at hardware and auto parts stores (in addition to searching this site and others) but have come up empty.
-
Rhino Anvils
Gold Country Forger replied to Jerry Coburn's topic in Anvils, Swage Blocks, and Mandrels
I Have the 'Papa Rhino'. Great anvil all around. Steve was easy to work with. I would recommend getting the cone/saddle/ball hardie too as the horn doesn't come to a point. -
Columbia post drill
Gold Country Forger replied to Reading Creek Forger's topic in Drills, Post drills, Mag drills, etc
Are you still working on this project? pictures would really help but I came into a similar post drill recently. it has a sort of lever operated clutch on the left side of the main shaft as you are facing the tool that looks like it engages and additional system to lower the main shaft. it has some other hardware on there as well. mine needs a few parts as well but I'd be happy to compare notes if this sounds similar to what you have. -
I do lots of hand forging with a primitive set up and so use one probably every other day of forging or more. I think my most common use lately is laying it on edge and using the various half rounds in the same heat to put texture on leaf edges. Other than that spoons, chisels, drifting and punching, and hammer faces all get made on the swage block regularly.
-
First of all I'd just like to say I really appreciate your posts and insights Rockstar.esq. As someone who is learning how to run business in my 'real' job, as well as my own blacksmithing dealings I find them very enlightening. Background: I work for a Rafting and education company that provides meals, camping, etc for people on vacation and schools and a daily part of the business is providing input and assessing 'bids' that the office puts together. with a half dozen companies in the valley there is a lot of pressure to keep costs down, but as a culture and as individuals myself and the people I work with pride ourselves on a high quality product. Bidding too low just to put bodies in camp or selling a product we cannot provide is avoided. We do this to the tune of around 1500 proposals generated in a year, resulting in 7,000-9,000 unique users who experience our camp and products (products in this sense again meaning meals, accommodations, and trips). Because of such a high volume we experience all types of people. While I am happy to report that the vast majority are great, honest folks, we do receive a share of people who are less than honest. Generally there is a pattern with these people and we turn them away when we can but sometimes it does not get apparent until they are already on the trip. The pattern I have seen is that these people are 1. They lie; in this case its almost always about a competitors bid. 2. They request modifications to the product that are out of the ordinary then refuse to pay for them. 3. Steal; in our case usually meals or camping equipment. They usually get very angry when confronted, will huff and puff, employ an argument that it should be included in the price (see conclusions below), and are the most fundamentally dishonest because besides being thieves they inevitably lie to you and usually themselves. Your scenario: In your second scenario you draw the conclusion that "its their nature to cheat", but I see a more complicated problem here that often boils down to a lack of respect and knowledge that deserves a closer look. In your line of work it sounds like you are often dealing with people who have a fairly comprehensive knowledge of the work and product, however, I feel that most smiths or people who are dealing with the general public do not have the benefit of any assurance the client has realistic knowledge or expectations about the product or process. I have found that these people either inadvertently or sometimes intentionally put you in a position where according to their ethos you are beneith them, and at that point you have to cut ties. I do think that with the public careful managing of expectations and gentle informing can avoid this pitfall. In my business I see this inadvertent souring manifested in two ways. First, They try to entice you with submitting a lower bid (without any other modifiers to the contract), and in doing so you either A. Create in their mind the idea that you are overvaluing your product and are thus dishonest, or in a best case scenario B. Giving them the idea that your product and labor is actually worth less than it is. I feel this is common in the USA with is lack of socially sanctified bartering, where walmart has sticker pries, but craftspeople are often forced to negotiate to get a fair price. Second, they do not have a solid idea of the value of your work to begin with. This problem goes back to a lack of knowledge about the product, and no being able to discern quality, or have a good idea about what quality is in the particular sphere they are operating in. In this case they usually have unreasonable expectations, or see the price as overly flexible, or both. The Problem: The 'cheaters are cheaters' idea when applied to the layperson is not a complete picture. Managing peoples knowledge and expectations early on can mean the difference not only between a contract and none, but profit and loss as well. I am not saying 'give these people a second chance' (and if you have gone down the road of distrust cutting ties is the best option) but want to present a more nuanced view applicable to the world of craftsmanship and relatively small scale custom projects. The Conclusion: In your case I don't see anywhere left to go. they had cheated, lied and been disrespectful, and established a better relationship elsewhere. Case closed. However, my experience dealing with a large client base, with lots of relatively low bids dealing with people unfamiliar with the product, I do want to propose and alternative when confronted with the initial interaction and provide a standing that allows the seller to maintain integrity without undercutting themselves and leading down the path of distrust. In case of someone balking, asking stupid questions, or undervaluing the product in both my blacksmithing business and for work I have a 'full invoice' saved that I bring up and modify as needed. included are all of the minutiae that people do not think about: For rafting it includes workers comp, vehicle repair (large loads on dirt roads = lots maintenance to avoid stranding clients), and overhead (gently listing "average office correspondence per client = 1/hr at $20hr" also makes them realize that we are not on vacation and our time is still money) More topically for smithing the invoice includes everything they are paying for: Chisels which wear out, Time to start a project, time to do the actual work, fuel, planning costs, materials, jig creation.... Basically I Start with the biggest list I can think of, then do the project in my head deleting and adding anything as needed. Since my charge for fuel and tools is included in my shop per hour fee, and if the project is large enough I'll waive any planning or design fees (after all, blacksmithing is still fun for me), if I do drop those fees I want to make sure that the client knows I am doing them a favor, and doesn't just assume the work is inexpensive (or god forbid cheap!). Lastly any amendment to the price I make has to come with some give from the client. Want $20 knocked off? Then no brass patina. Want $1,000 knocked off? then I'll be stick welding all the joining instead of doing any riveting. Or if they do not want to compromise on the product have them order in such quantity that the overall price is higher but the unit price goes down (make sure to include jig manufacture in your invoice). In my personal experience I have found there is no quicker way to loose the respect of a client than to devalue your product without changing it. Again, thanks for all your insights!
-
At the risk of being burned for heresy I'll admit I put an extension on the leg of my vise. I am 6"2 and work with several vises that are set on the ground and find them too low. I think there ended up being a 4" lift from the very bottom of the post due to a miscommunication with the fabricator, I am very glad for the extra height but do wish it was just a hair less. I also have another vise I will mount without an extension at some point, and i took that into account before messing with the height. Being too low is just mildly annoying especially when it comes to operating that handle, too high however can make it almost unusable.
-
Thank you all for the responses. I am learning more and more as I go along. I have the anvil in my shop now so I do not have pictures on demand, but will take one when I have a chance (also this thing is heavy enough I was having trouble turning it on its side which is why there is just the tilt picture of the bottom). I did give the bottom a fairly close look and could not see any noticeable depression (besides the handling hole obviously). I never would have looked at mousehole anvils for this one. I have come up with a few examples that are similar but am having a little trouble getting good info. I'll keep looking but any help would be greatly appreciated! And lastly here is a picture of the collection now that it is (just barley) inside the shop!
-
Here they are, I couldn't find anything there....
-
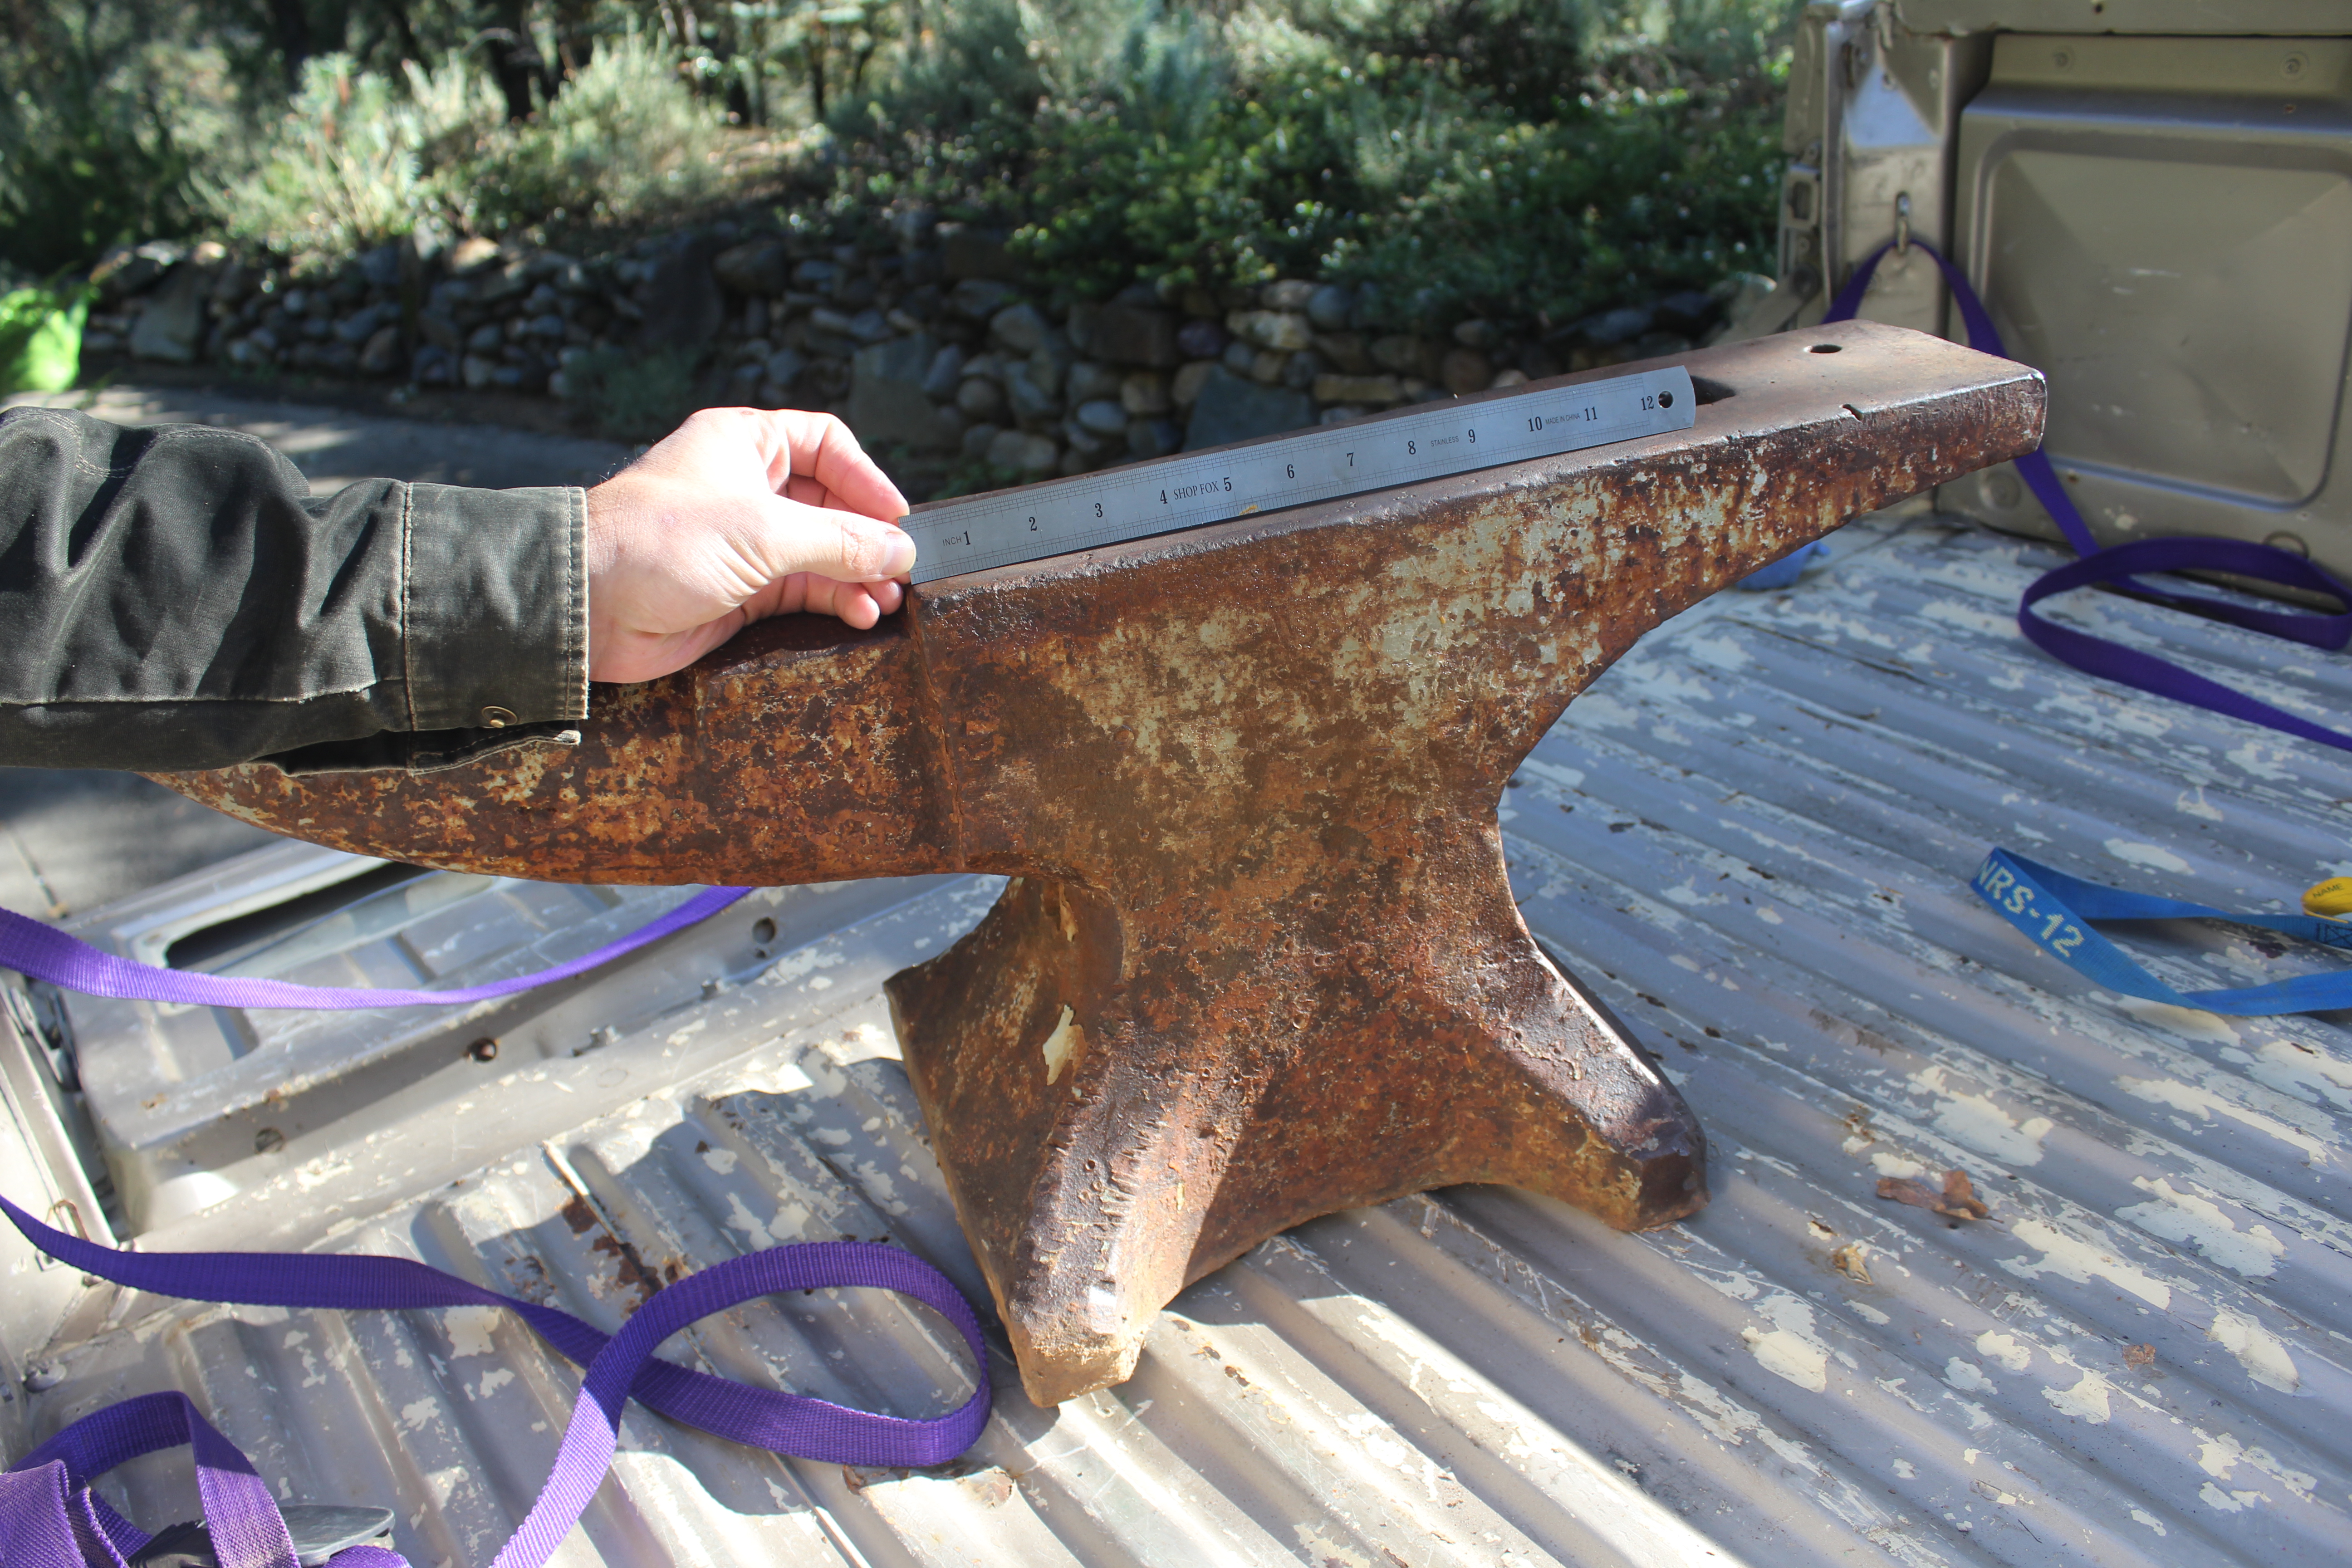
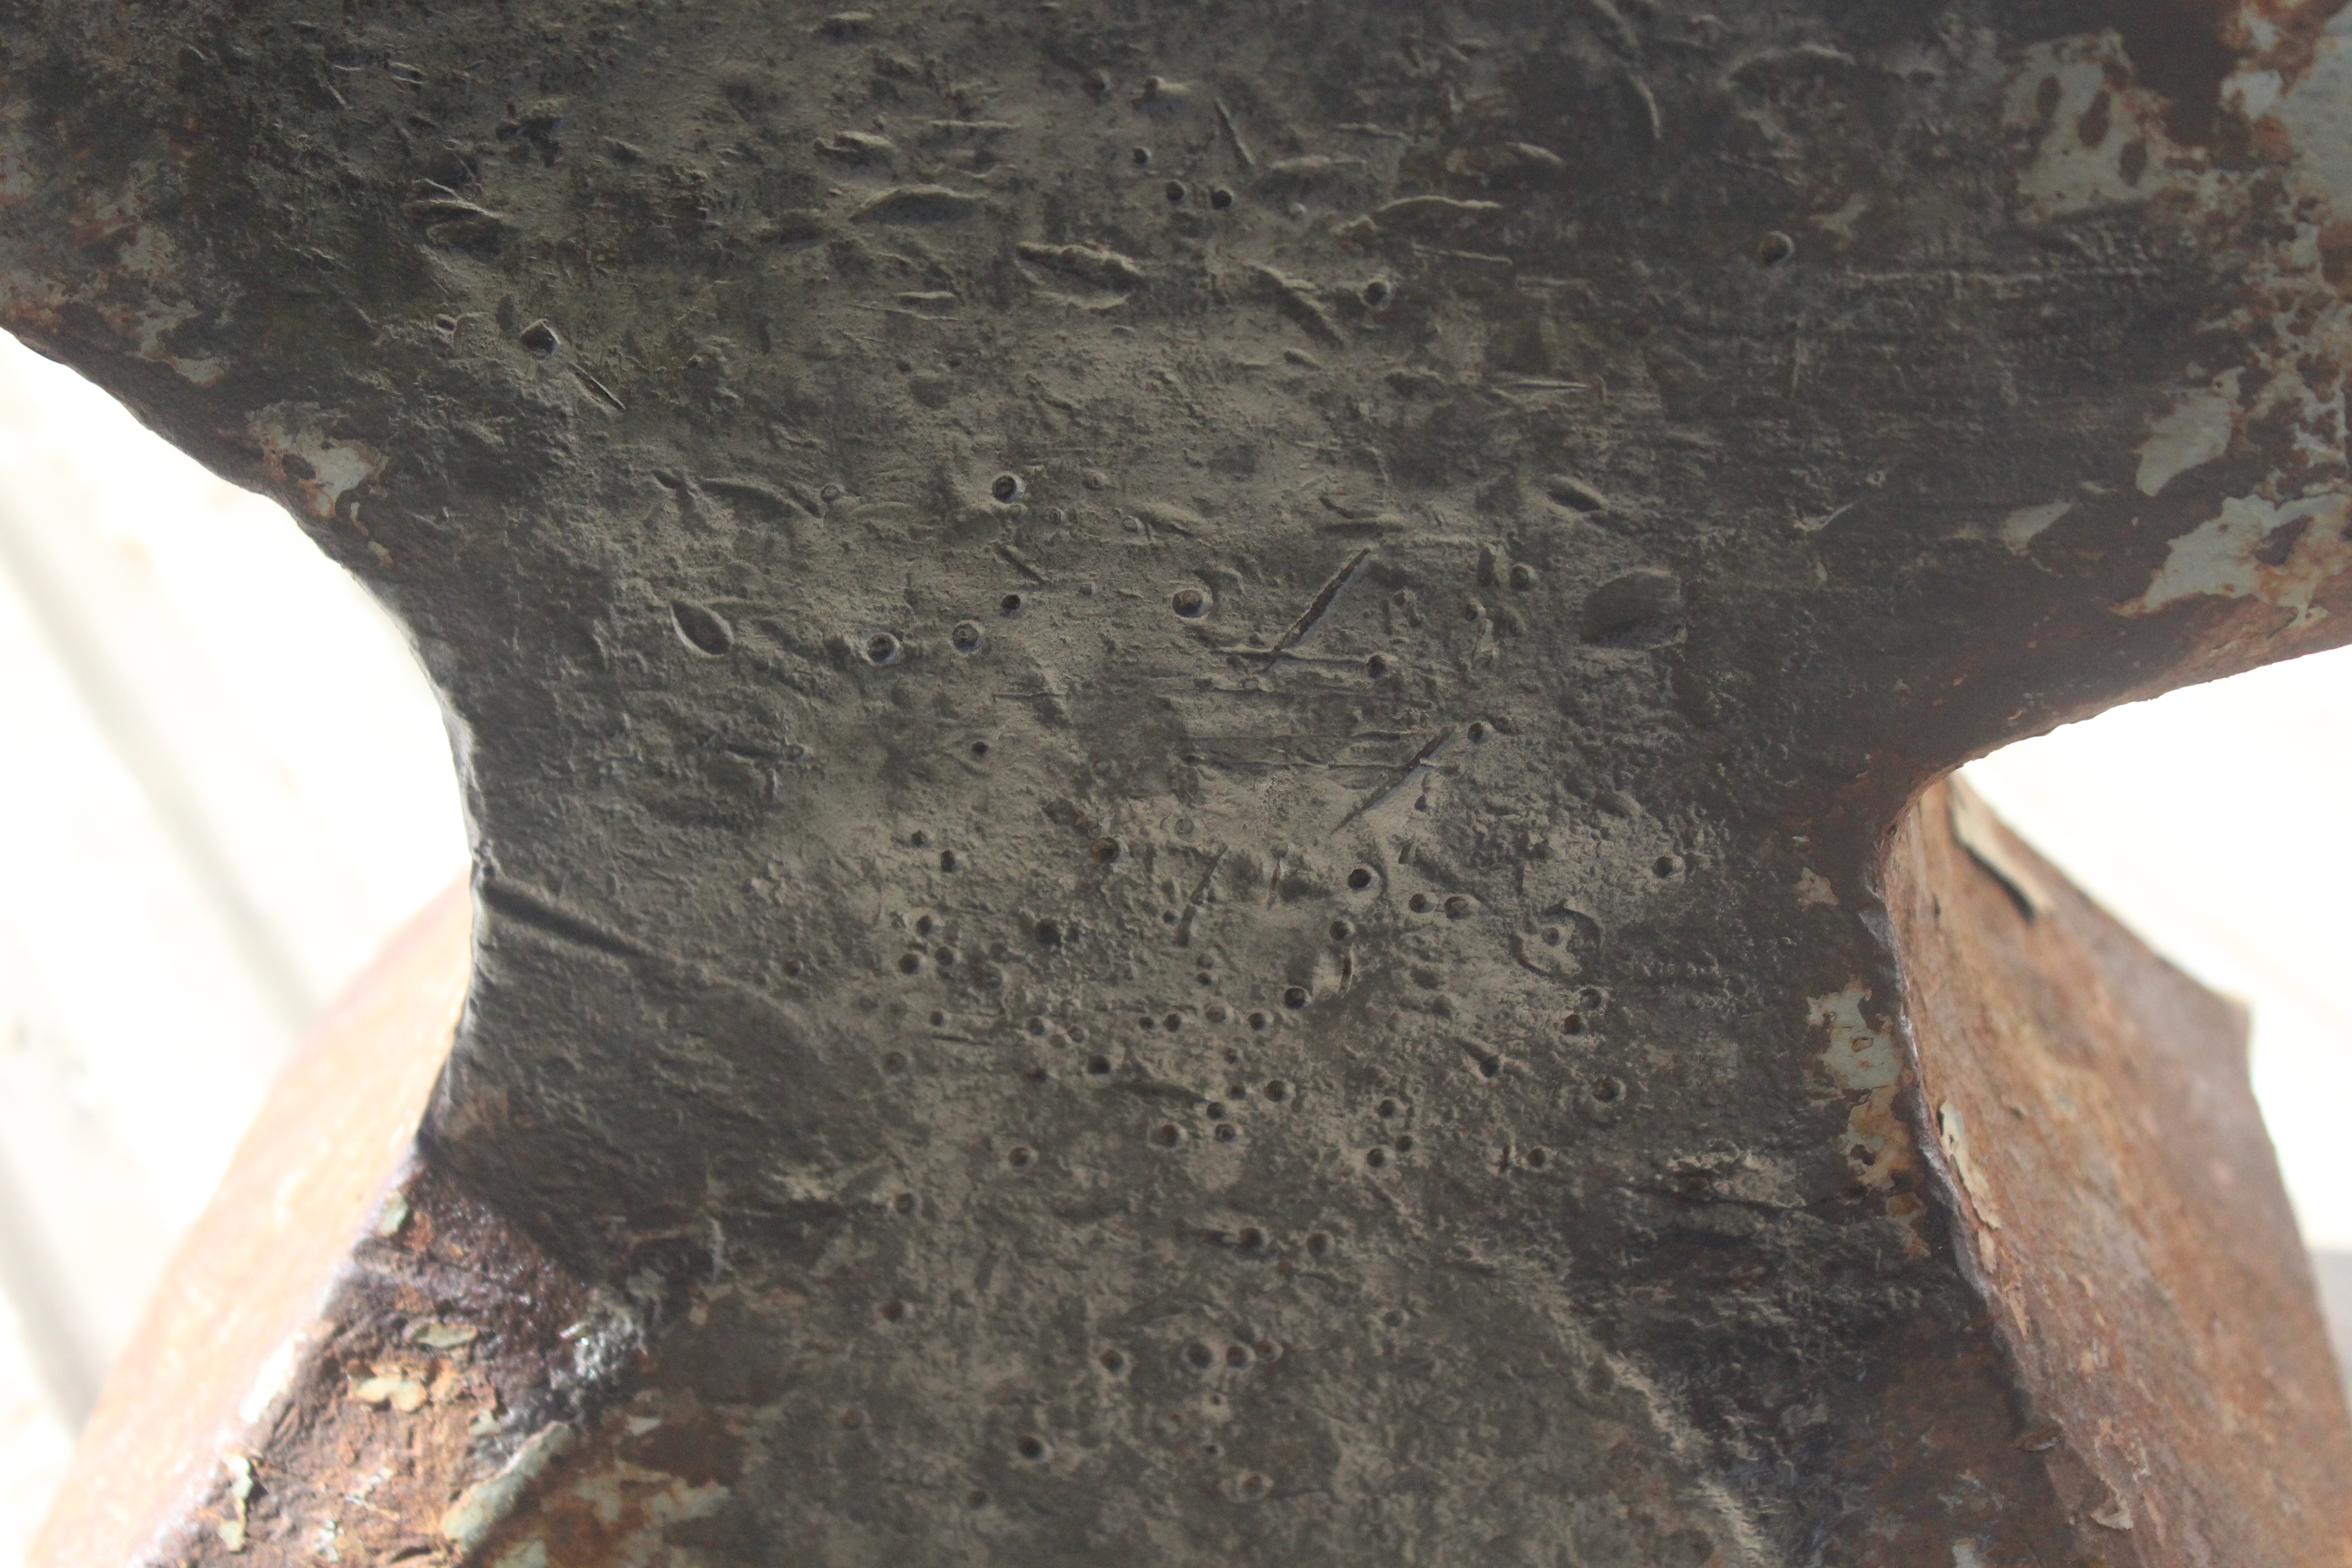
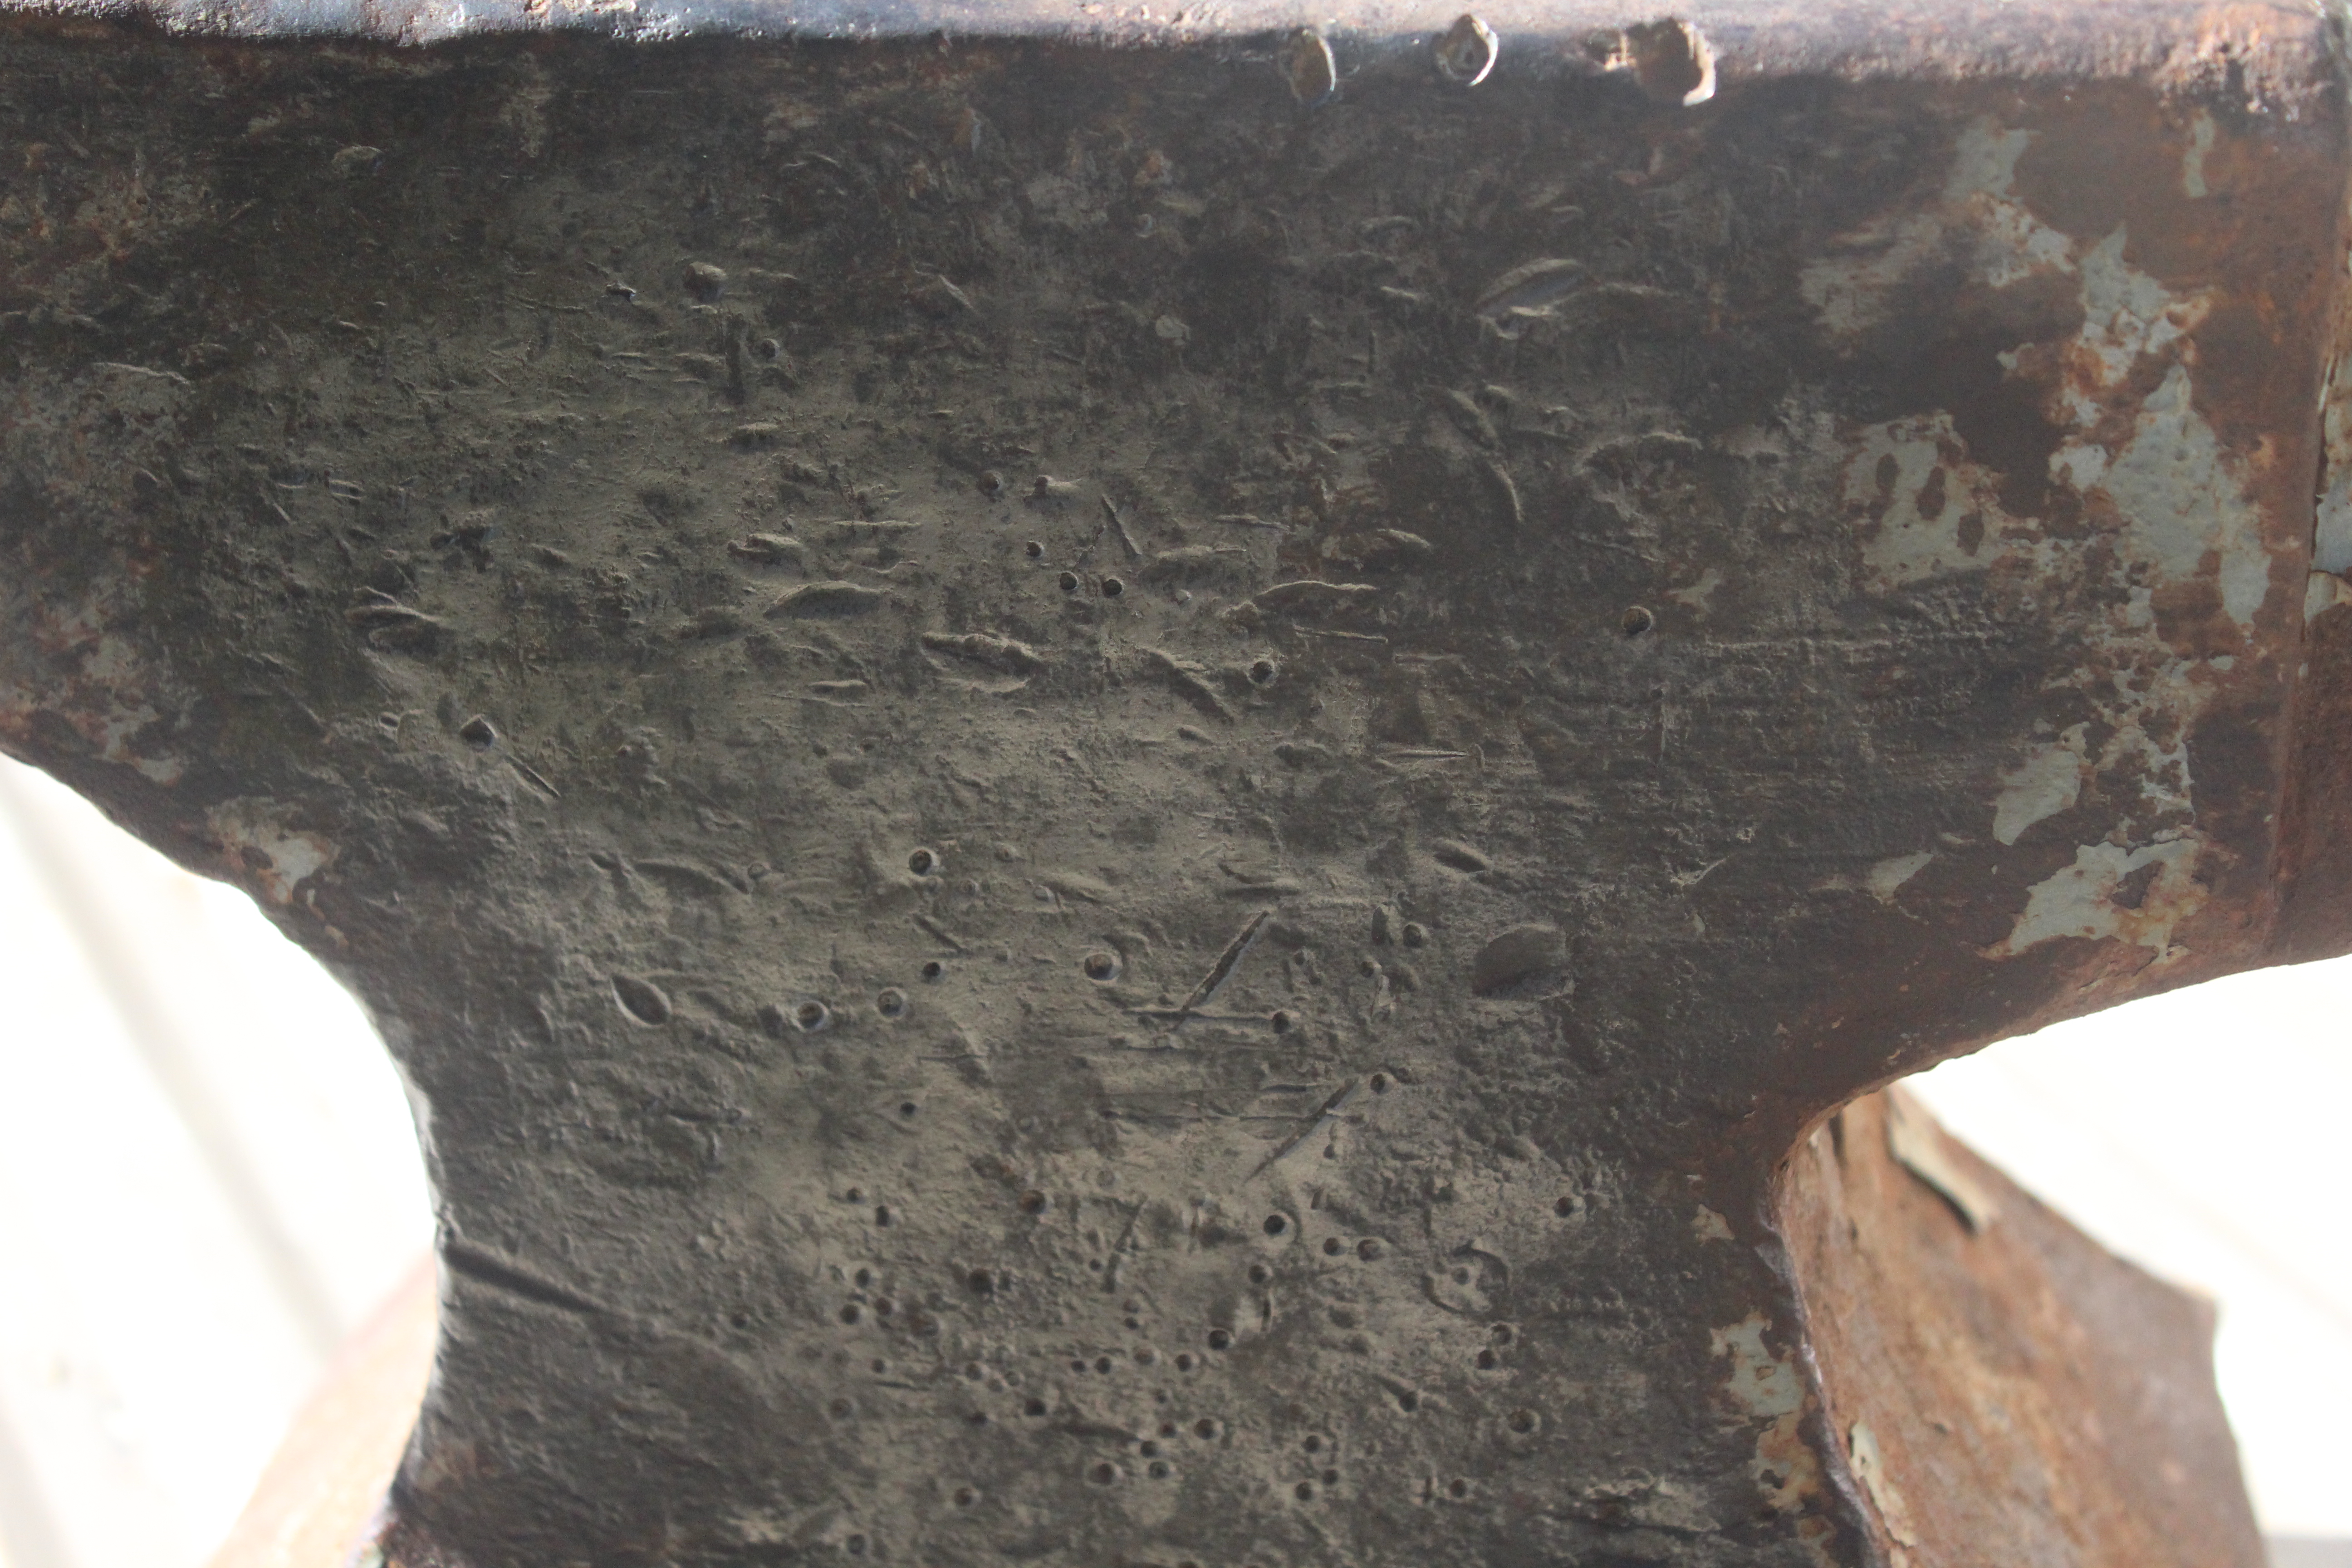
I was fortunate enough to get this anvil yesterday after a bit of back and forth. I have been looking for another serviceable shop anvil to compliment my 141lb Peter Wright and my poor beat to nothing old English style anvil (and lets not kid ourselves, I'm always on the lookout for a good deal on a bigger anvil). This anvil came up on a general sale site site with photos showing its dimensions and nothing much else. At the time and after acquiring it I figured it for around 250lbs. It was initially a very good deal, but once they figured out they had priced it low they wrote and said they were going to adjust the price. I replied agreeing that they had undervalued it and let them know I was open to a change in price, and to please contact me once they had decided (this was all in the morning when I was still at home). After going to work in my shop all afternoon I had just given up hope when I got the call. They said the first $500 takes it home. At that price and $20 in gas I wasn't likely to loose money if I want to resell it so I agreed and two hours later had this thing back home. As I mentioned it appears to be around 250lbs. It is mixed condition (more on that later), but has great rebound and is LOUD! from heel to nose (or horn if you prefer). There appears to be a little bit of sway, but the working surface only has a few marks and very light pitting. There are no dead spots on the face. Hardy hole is 1 1/4" and pritchel is crisp. Despite the good condition of the face-plate the body itself is quite beat with almost no readable markings left, just a bunch of punch marks and hammer marks. After taking a wire brush to the sides and clearing off a lot of paint (it seemed to have several layers of light blue and green paint very well adhered on the body) I was only able to make out a 7 and 3(?) stamped midway down one side. I asked if the seller knew the history and he said he did not, that he had gotten it from a relative who was a farmer and had another one that was the same size so he was getting rid of this one. It's dimensions are a hair larger than 5x19" on the face, just over 31" long total, and just over a foot high. For now this guy is getting a new stump and going to work in the shop to see if I like it. Any help on identification would be appreciated. Thanks in advance.


-
Which commercial forge would you go with?
Gold Country Forger replied to HaywardForge's topic in Gas Forges
One thing I would suggest is taking advantage of some of the local resources to sample different forges. I know the The Crucible in Oakland offers short classes where you can use the equipment, and there may be other local classes as well (if you check the California Blacksmith Assc site or the sublink on the forum for them here some stuff may pop up) as there are many smiths in the bay area. At the very least you may find out more about what you do not want and pick up a few tricks to boot. I ended up doing 20 or so hours of classes in various shops up here in the foothills before buying any equipment due to the fact I had nowhere to put it. When I did go to get equipment I decided to buy something I knew worked right off the bat but had no trouble pulling the trigger since I already knew what I liked. Good luck and happy forging! -
Anvil & Swage Identification
Gold Country Forger replied to fishingnathan's topic in Anvils, Swage Blocks, and Mandrels
Not a direct answer to your question but a little more info on the swage block: http://www.swageblocks.com/swage_block_gallery_d3.htm -
Hi Jim and welcome. I recently purchased a used Forgemaster Blacksmith model and had to reline it as it was in really bad shape. The kit came with all the parts including the ceramic floor lining. After running it without replacing the liner and after forking out the $150 bucks I still think it was well worth it as it stopped the heat from eating away at the forge body (which was still solid but starting to disappear at the door and side ports) and allowed me to get to welding heat and turn down my propane consumption by half. As for the work itself I just used the tools they listed (a rasp, a keyhole saw, drill, and a hammer and piece of 2x4 to disperse the blows while fitting it among others). It probably took me 2 hours from the time I started loosening bolts to when I fired it back up. Things I would watch out for: -Wear a respirator! not just the mask they send, the liner is nasty stuff. -You want the liner to fit tight since it will shrink a little but don't force it. the roof was the last piece I installed and due to the warping and being more comfortable with fitting the pieces I managed to put in minor cracks in two places (nothing that cant be fixed or result in a loss of performance but annoying). -There was a lot of waste; I think I filled a whole trash barrel with all the old liner, packaging, various consumables, etc. Be ready. -Have a notepad ready to write down any bolts and screws that need replacing so you can pick them up on the next hardware store run. -When you fire it up the first time a lot of nasty fumes get released from the new liner. So again, respirator or just fire it up, walk away, and then turn it off and let it cool (as the liner shrinks from cooling more fumes get released it seems). Of course all this in a really well ventilated area. As for frequency it depends on use and care. Flux eats at the floor quickly, and the insulating brick is soft, so if you hit it with metal you will wear it out pretty quickly. All in all its not a hard job and worth it. once you've settled on the model and parts set aside a day and go for it. And of course have fun.


.jpg.f9da9f67b05d74fdf0e81ce747fd199b.jpg)