
Elvirth
-
Posts
23 -
Joined
-
Last visited
-
My buddy that is in on this is sourcing a nice log round for me, as well as some rebar for simple crappy tongs. I'm not expecting my first set to look too pretty. As for a forge stand, I'm not actually sure what to use.
-
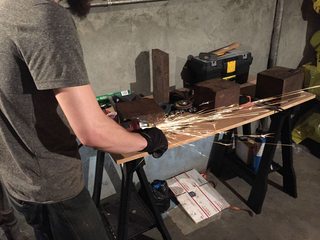
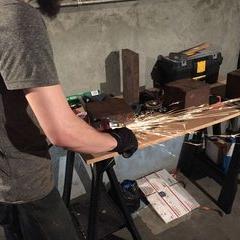
Hey fellas. Sooooo I got my propane regulator in the mail today, went down to the hardware store and bought a few parts to go on it and hooked everything up for a test burn. Now, before you all start pounding me over the head with crosspeins for using a five gallon bucket as a forge stand, I know it's not great or smart, this was just a short test, pounded out a little piece of angle iron (at least I think it was angle iron- might have been steel. It was welded onto one of the blocks I purchased with holes drilled in it), just for fun and personal satisfaction. Nothing caught fire, and I was grinning like a madman the whole time. I'm wondering if I ended up setting my burner a little too high in the holder, or maybe even too low. I had a bit of a hard time judging the tuning of the flame. The light outside was probably a factor as well. I might pull the burner out and see if I have an easier time that way. I wasn't originally planning to hammer anything today, which was why my (very temporary) anvil setup looked like this. Not exactly ergonomic working conditions. This pic was taken after I took all my gloves and tools inside and stuff. I'm just letting that piece of metal air-cool. Hand for scale. It got kind of mangled, but since this was literally my first time hammering hot metal, I wasn't particularly bothered that it still just kind of looks like random scrap. I have much to learn and I'm not going to rush into any particularly ambitious projects until I feel like I at least know a little more about what I'm doing. Anyhoo, just excited to share this with you guys. My buddy might be coming up next week and then we can get properly set up and maybe start making some actual tongs to use; those vise-grip pliers are short and really annoying. Cheers fellas.
-
I was aware, yes. This was just the most affordable option I could find that suited my needs, roughly 100-200 dollars cheaper than any other ready-made forge I could find. I'm not really that concerned about the regulator situation, it's just a slight delay. These guys are a pretty small outfit out of some little town in Lithuania, I can't say I blame them; They barely speak English. I realized when i decided to buy this that it would be a bit more inconvenient, what with the language barrier and foreign shipping and all that, but I'm going to make it work. I've dug my hole, and now I'll line the sides to my liking and make myself comfortable while sitting in it.
-
Well, the parts I need are a certain type and size of pipe nipple that I'll have to drill out a bit (finally bought a power drill, OH JOY), and then a large ring/nut thing to screw it onto the tank. Other than that, I can work everything else. Devil Forge has a video guide on how to convert their regulator, as well as the part numbers, but I am also a little hesitant because they appear to have changed their regulator design since then and have not told me if it's now US compatible. I have no problem with going out and buying a different regulator at this point.
-
Hey guys. Sooooo I decided to just go ahead and buy a ready-made forge to speed the learning process along. Got it in the mail today. It seems pretty sturdy, the main tube did get a little bent in transit, but nothing I couldn't mostly fix or deal with. The burner it comes with seems pretty straightforward, not sure what design it's based off of, but it looks serviceable. The major issue I have at the moment is that, while it does come with a regulator and hose for connecting a propane tank, the regulator is designed for some strange European standard and I need two absurdly specific little components to make it compatible. Also, the measurements on the gauge are in Russian, and I don't recognize the symbols. I think I might just end up going downtown tomorrow and buying a Bayou Classic or something close, just because I hate having to change things I don't particularly understand. I already coated the kaowool with some ITC-100, spritzed the wool down with some water first and then mixed and painted it on. Tried to cover any and all exposed wool. Not entirely sure I did it completely right, and I would have liked to add more kaowool, but I'm working with what I have at the moment. A couple pictures: They were also nice enough to include a pre-cut firebrick for the forge floor. I have a couple as well, so I'll probably be able to use those for closing up the back end a bit. I'm very excited, Now I have some very visual progress towards being able to hammer some metal out. I just wish all the provided instructions for the regulator weren't in Russian. Ah well. So, there you have it. I'll probably update this once I can get some gas and a regulator.
-
Yeah, the hardy hole is really the reason I'd be interested, figured that sort of thing would come in handy eventually.
-
Hey fellas. So my friend and co-conspirator on this project managed to source a "proper" anvil somewhere local to him. It's about 100# or so, estimated, and has no markings which I could see in the pictures he sent me. I was wondering if maybe someone here was familiar enough with anvil design to perhaps tell me if we purchased a dud. It was only 75 bucks, so no horrible loss, but still, nice to now if it's worth swapping with my metal block. As you can see the edges and face are pretty beat up but I think with a little professional help I could get it serviceable again, provided it's of a suitable material. Here are the images I have:
-
Buttering and refractory coating application
Elvirth replied to Elvirth's topic in Insulation and Refractories
Well, I might give that a try then. I ended up buying a Lithuanian ready-made forge roughly the same size as the coffee can design when i tallied everything up and realized it was roughly the same price as all the parts I needed. Should be here in a few weeks. Thing is, they only use 1 inch of thermal blanket and no interior refractory coating, so I do have some ITC-100 coming my way as well as hard firebricks for forge floors, but I do need a bit of extra wool to insulate it a bit better if I so choose. Hopefully my social skills are up to it; some guy called me some nasty names on a youtube comment thread yesterday when I was complaining about people displaying useable anvils as a lawn ornaments, so apparently I'm kind of mean or something. -
Buttering and refractory coating application
Elvirth replied to Elvirth's topic in Insulation and Refractories
Exactly what am I looking for in the yellow pages as far as professions and supply houses that would sell such things? -
Ok, more questions. I'm not trying to be annoying, I just keep stumbling across concepts that I need to know that seem to already be known to many members of the forum and thus explanations are necessary for the uninitiated, like me. I've seen a few references to "buttering" the kaowool liner before applying compounds like ITC-100, and while the concept was vaguely expanded upon by Frosty in one thread I didn't really find it clear enough to understand exactly what's going on and how to do it. I got my #10 can from work today and popped a little window hole in the back in prep for lining it once I find a suitable ceramic blanket supplier (ebay is looking best right now at around 25 for a 1x12x24 chunk). Right now I just would like to get all the steps I need to take to be safe in lining it and avoid silicosis and the like down on paper so I can do it as safely and correctly as possible the first time around. So basically, my question is, how do you "butter" kaowool to prep it for compound? It seemed like it involved wetting the wool and possibly any firebricks that are getting a coat, but I'm not really clear on whether it's like, damp, or soaked, or what. Also do I apply the refractory while the materials are wet, or do I wait for them to dry out a bit? (On a side note, I am still looking for soft firebricks, I would like to put one on the bottom of my forge for a nice flat surface and can't seem to find a supplier who lists the brick specs and also takes non-bulk orders, so suggestions would be great). Thanks fellas. I'm really getting excited to start putting all this together.
-
My noob anvil, advice welcome
Elvirth replied to Elvirth's topic in Anvils, Swage Blocks, and Mandrels
I was thinking about just wedging the block into the log round with shims, but do you think it would be alright with just a fairly tightly measured mortise? -
My noob anvil, advice welcome
Elvirth replied to Elvirth's topic in Anvils, Swage Blocks, and Mandrels
Like I said previously, I'm also trying to keep weight just below a certain threshold. This is meant as a temporary solution for my living situation until such time as I can actually have a larger shop-like space in which to set up my stuff. Thus, I'll probably opt for wood just because I can probably get a log round with a nice square mortise for cheap or possibly nothing at all. Well, I ground some basic radius shapes on two opposite edges of the anvil tonight. I think I might just leave the other two edges as they are, just in case I need a specific shaping method using a sharper edge. -
This might be a little OCD but the orifice in his "best" burner is noticeably off-center...
-
My noob anvil, advice welcome
Elvirth replied to Elvirth's topic in Anvils, Swage Blocks, and Mandrels
I would use a steel stand, but I'm not equipped to make one. That picture of my workbench shows every tool I own. I'm not set up for welding or anything. I will try the chamfer technique with my grinder and file later, see where that gets me. I'm not in a really big hurry, since my log round for mounting might not show up for a while. My friend is sourcing that and he's a very busy contractor, so hopefully he can get up here with some stuff that we split the cost on soon. I'm not really interested in stacking these up for a really heavy anvil, mainly because I need to be able to move it without using a hydraulic jack or something. I'm limited on space and I live in a duplex so I need to be able to stow my whole setup if the weather gets bad enough. -
My noob anvil, advice welcome
Elvirth replied to Elvirth's topic in Anvils, Swage Blocks, and Mandrels
I consider myself lucky to have found these for so cheap, 30 bucks for this much steel, I could make two other anvils and sell them to pay for other supplies, or experiment with making the second one better. I sort of started doing a radius on two opposite edges. Like I said before, I have very little experience with the flap disk on my grinder so getting a rounded shape is a little difficult. I might try tackling part of it with my bastard file tomorrow evening, just so I can take it slow and get it looking even. I forgot to mention how I wanted to mount it- my initial plan that I've been toying with is to get a nice log round slice, cut a square hole out dead center about 8 by 8 or a bit bigger, pour a bit of concrete in, then set the block in the concrete. That way it's got weight, but not so much weight that I can't throw it on a heavy duty hand truck and move it if I so desire. These blocks weigh probably close to 70 lbs apiece, by my gasping, grunting lift estimate. Don't have a scale, otherwise I would weigh it.