

jdinbr
-
Posts
22 -
Joined
-
Last visited
-
 That slitter seems to be split near the business end. If so, too dangerous to use in my opinion.
 -
There are at least two folks recommending he use abrasives on the outside of this gun. Shouldn't advice come from folks in the know? Why give advice if you don't know?
-

The Faggot Weld
jdinbr replied to brianbrazealblacksmith's topic in Blacksmithing, General Discussion
Goodness gracious y'all! As Strother Martin once said: "What we've got here is failure to communicate." I'm fairly sure my 2¢ is not going to fix that, but: Good enough - a task that has been completed to the level that the work will perform its intended job, albeit perhaps marginally. Implies imperfection or room for improvement, otherwise more fitting descriptions would be "excellent" and "perfect". Some folks that strive for excellence, or even perfection, think "good enough" isn't. And some folks enjoy the economy of "good enough" and find it's time to move on to the next task... or a Bud Light. Sound weld - some might say (engineers and testing labs included) this is a weld that when stressed to failure, rips the original material on the side of the weld rather than coming apart at the original joint. I'm not suggesting I can do this with a forge weld. Others might say a forge weld does not have to meet this criteria to be considered a sound or excellent forge weld and suitable for its intended purpose. I appreciate Brian's original question: Has anyone achieved a sound weld? And Dan's response: It's good enough and has a place in blacksmithing. Obviously, I'm paraphrasing. Personally, in the application of the end of a fire poker, I don't think the weld has to meet the requirements of building code officials, structural engineers, or testing labs to be considered excellent for it's application. In my opinion Dan's weld and poker tip appear excellent, but would the weld pass the scrutiny of a testing lab? Aren't both points/opinions valid? ... And while I'm here: Anvil... why do you bother to put periods at the end of your sentences? -
To make a spring similar to the ones in these locks, assuming forging from scrap spring material... Would you harden and temper? To what color? Any recommendations on steel material? Thanks in advance.
-
Thanks Thomas. Strangely, I spent hours in that book Saturday night and breezed right past that chapter not having a piece of rail on hand. After Sunday's unexpected rail acquisition, I didn't even recall it was there. Dan, thanks for the suggestion. I'm sure your point about the mass under the hammer is valid, but I'm thinking this particular piece has been suffering from "wanna be an anvil" for a while and prefers its normal orientation. Could be just my imagination. I'm mostly looking for info on how to best build up and then flatten the table and assure its hardness. Not sure what "phone dupe" means. In the book that Thomas refers to, Alexander Weygers lays out a procedure for annealing the rail, grinding it to an anvil shape, cutting hardy and pritchel holes, polishing, then hardening and tempering the table and annealing the horn and he closes by saying he has completed four great anvils by this method. It's informative but does not address building up the surface where pitted, bellied and crowned. I hate to grind off so much mass as would be required to obtain a flat table only by grinding, but the surface needs leveling fo sho. If I were to build up with hard surfacing rods, then level by grinding would the heat treating even be necessary? Alternately, if I was going to go through the heat treating process, would I need hard surfacing rods, or is there a "lesser" rod that might be more suitable, but hardenable?
-
BTW, that date is 1945. I guess that's a date.
-
From it's hiding place in a sloppy scrap pile and in nearly perfectly camouflage in the dust, yesterday, me and a buddy dug out this little piece of track and loaded it in my trunk. It's been around the farm for decades. Under the direction of my father in '68 I remember moving it along with a bunch of other stuff from the then "destined to be moved and reassigned" old blacksmith shop (a defunct mule team service center) to the new tractor shed's shop. I was 13. I remember being told it had been a secondary anvil. The primary one was and is still there and is shaped a bit differently - like a 250 - 300# Columbian. I rather have loaded it but they still use it. Maybe one day:) So I came home with this piece and spent some time today cleaning it up and exploring its possibilities. It's got a slight belly along the centerline length (about 1/16 th inch) where the most severe mushrooming is visible. And the tone is slightly duller in that area. I've ground down the top a bit to mostly eliminate the pitting at the centerline crown, but there is still significant pitting along the edges. One of the edges shows significant mushrooming... Presumably some from the rail traffic and some from a hardened smith abusing his favorite spot. The other edge - not so bad. This thing is 6" wide at the bottom, 7" tall, 3" wide at the top and 17" long. It appears to fit the cross section spec of 133# / yd rail, yielding ~66# for 17". It seems fitting to spend some effort and $ to make this a more desirable piece for my shop, though I don't want to go overboard on it. I'm hoping I'll get some suggestions from some folks here w/ know how on how I might improve it. And I'm hoping to get some technical help from someone who has experience resurfacing rail for use as an anvil, especially on what rods to use, and in what sequence. It doesn't need that much... The crown is roughly an 1/8" inch higher than the two edges. So if I was to flatten the surface, I'm thinking build up the edges... with what rod? Then grind and cap with what?... Then rinse and repeat with what? I just don't know. I've googled hard surfacing and anvil surfacing and read around a bit, so I know what's out there info wise for the most part, but the reading I find is mostly aimed at antique anvil restoration, not rail resurfacing. This surface sparks while grinding like Chinese Fireworks Manufacturing Co, would during a bombing raid. Can any of you guys help? Suggested technique? My welding machine is a Lincoln "cracker box" AC/DC, so that's what's at my disposal. It tops out at 125A DC & 225 AC. Thanks in advance. John in Baton Rouge.
-
Thanks Jim, Depression era you think? Anyway to know? John
-
This mark is all I saw - Is it enough to ID manufacturer of this anvil? It appears to be a "C" inscribed inside an inverted triangle. Thanks.
-
I think maybe it would help if everyone create some applicable tags when creating a thread. Maybe they're doing that already.
-
Bought some round bar stock from Lowes yesterday - Boy! That steel is high! Every time I do that I kick myself in the rear again. But my point and question: They have round solid steel in both hot rolled and cold rolled. Best I can tell there are two differences: The color paint on the end of the rod, and the price. Ok - a third would be the finishing process. Does anyone know of any other differences in the two that a smith might consider or be concerned about as for choosing hot rolled verses cold rolled round bar stock for forging? Why would anyone ever care, for any use, if it's hot rolled or cold rolled? Does the cold roll strain harden the bar any? BTW, in the big box stores, you can purchase a tool steel crow bar for about the same price you can buy similar sized mild steel piece of plain rod.
-
Thanks for your comments.
-
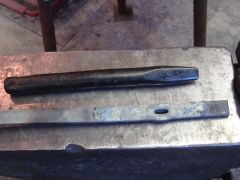
I was making a couple of what should have been simple punches from an old SDS chipping bit I got at the flea market. One tool worked out just fine. The other split... I think while I was doing a partial quench in water while tempering. Can you see the longitudinal split in the pics? About 2 1/2" up from the point there is a band of oxidation colors and from there to the butt is a split. I'm somewhat well read in heat treating. That about wraps up a description of my experience. So I had hardened the whole tool knowing that I should probably try an oil quench, but I didn't have oil, so I opted for water. Then thinking I'd soften the striking end and temper the business end, I heated the butt watching for the oxidation colors to run toward the tip. When I started to notice a change in color forward the tip, I quenched about 2 1/2" of the tip in water and held the butt above water w/ some tongs. I'm thinking this is when it split but I'm not sure. The split is from the water line up to the butt, but not below the water line. Comments? Cause?
-
I appreciate your help Thomas. Thanks
-
Thanks Charles. I'll be sure to experiment with the blocking around the openings as you suggest. And I appreciate your comments on the pressure. As I said, I'm learning and I don't really know squat about how this thing should work.