
RKM556
-
Posts
48 -
Joined
-
Last visited
Recent Profile Visitors
2,288 profile views


-
Hauling a hammer a LONG way
RKM556 replied to RKM556's topic in Power Hammers, Treadle Hammers, Olivers
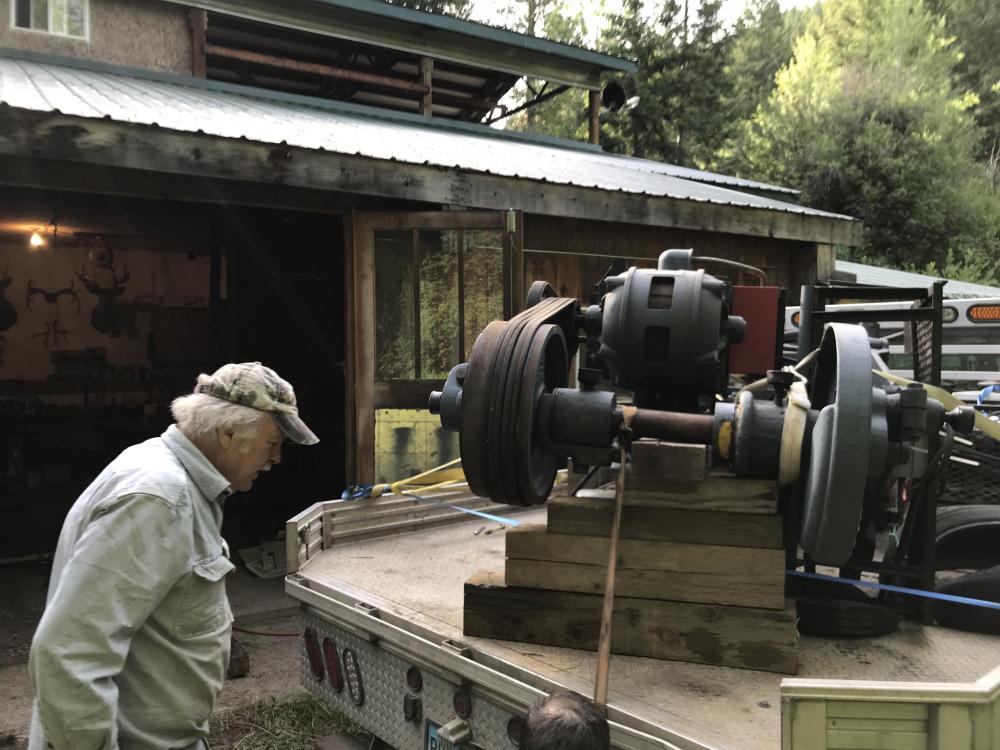
Hi all! I am so sorry for the delay in replying, but the hammer has safely made it back! 81 hours of driving over the course of 6 days was pretty tiring though. It also didn't leave me much time to browse and reply on my favorite blacksmithing forum After the recommendations of many here, and those on the ground out there in WA, we decided to try to lay the hammer down. It ended up working really well. We built a pretty solid crib out of 8x8's and some 6x6's cut to size and put tires below these as a shock absorber. (I honestly don't think it made a big difference with the tires, but it did make me feel better about it all.) The hammer is now in it's new temporary loaction as a new shop and base is built for it soon! Once my wife and I are established at our new property, it will all be good to go. A quick test run confirms that the hammer is still fully operational! Everyone was safe, and the hammer made it back in one piece. Mission accomplished! Thanks to all for your help and your time in replying. I'm stoked to get this thing set up permanently! (First Pic: Hammer before loading) (Second Pic: First cradle, not a great pic, ended up changing it a bit for more stability anyways) Also, to those suggesting bringing a load out to help offset the cost, I actually brought a motorcycle out to one of my groomsmen who lives in WA. I owe him so many favors at this point that it was fitting for him to get some free shipping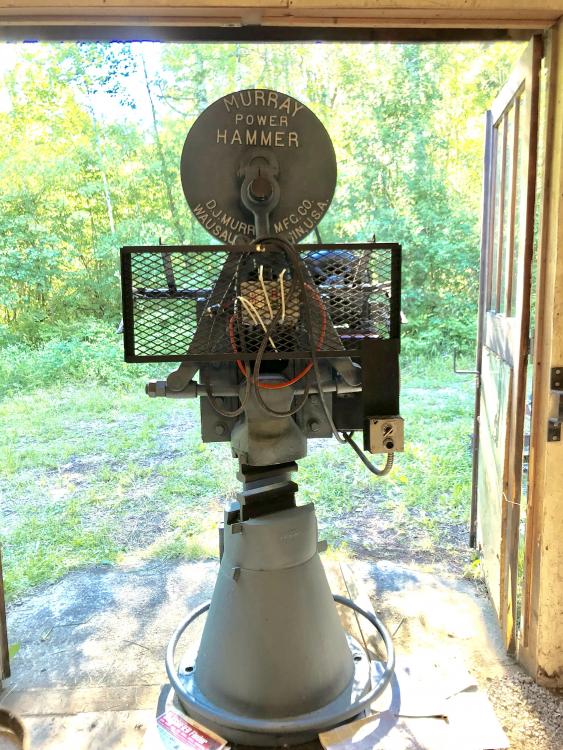
-
Hauling a hammer a LONG way
RKM556 replied to RKM556's topic in Power Hammers, Treadle Hammers, Olivers
Duly noted. I called up another friend as well who said the same thing. Absolutely. Upon some measurements, it would work in theory, but safer is far, far better in my opinion. Should I disassemble the hammer any before transport? I’ll have a full day to tinker before leaving WA back to GA. Neil, thanks so much for the info! I have looked into the freight option, but it was notably more expensive than gas for me. I will be camping for most of the drive, and I already had the truck. I had this whole week free too so it works out well I suppose... (maybe I won’t agree after the long drive ) -
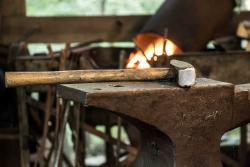
Hey all! I am getting my first big hammer this week. Woohoo! I’ll be picking up a 250# Murray hammer this week (similar in a lot of ways to a Little Giant of the same weight).The only problem is, it’s in Washington state and I live in Georgia. The drive isn’t the problem, it is safely moving the hammer I’m concerned about. I was planning on hauling the hammer in the bed of my F450 flatbed. It should handle the weight without much issue (approx 5500#) but I am still debating on having it standing up or laying down. With the machinery I have available, it would be much easier to have it stay standing. My question is, is this an absolutely horrible idea to have a huge hammer standing up in the bed of my flatbed? I am pretty sure the hammers have the weight centered in the sow block, but it is still going to be top-heavy. If I’m driving 2515 miles with hammer in my truck though, I want to do it right. If I need to lay it down to be safer, I will 100% figure out a way! Thank you very much for any help you can give! -RM
-
Finding large 4140 stock
RKM556 replied to RKM556's topic in Power Hammers, Treadle Hammers, Olivers
Thank you all so much for the time in replying! I will definitely look into these options. I'll post an update with some hammer pics too once all is set up! -
Hello all! I am in the process of acquiring a new 250# Murray hammer. I'm really excited, except for the fact that it needs new dies. I was quoted about $1600 from LG to have some dies made for it, but I am unsure if I can afford that right now. I'm looking into potentially making my own as I am pretty confident I can machine my own set. I have a great local source for heat treat. My only issue is finding stock large enough that is not extremely expensive. I am located near Atlanta, and I have received a few quotes for 4"x5"x16" 4140 bar, but all have been just over $700. Do you know of any creative places where I can find large stock suitable to make power hammer dies? I am slightly nervous to use a scrapyard, as I do want to have some sort of idea what material I am working with for safety reasons. Or, should I just suck it up and by the dies from LG? The dimensions I need are 4"x5"x8" per die. PS: If anyone has stock this large and is within 400-ish miles of ATL, I would love to buy it from you and bring you a beer or something. I love meeting other blacksmiths!
-
Hello all, I am forging 180 bottle openers for a client. He will be giving them to each of his clients as a Christmas gift this December. However, he really wanted the initials of his clients on each opener. Is it possible to do this? If so, where would I find the punches suitable for a job? By the way, I have never made 180 of anything... I am going to be so bored before I hit that 180 line. However, sometimes you have to take something you love and go through the boring parts in order to make it more exciting in the future. Let me know what you think! Your Friendly Neighborhood Blacksmith-in-the-making Ryan
-
I think you're right. I guess I will use it as a showpiece then. Also, sorry whoever had to move my post to a different area. Didn't mean to trouble you! I am use to it :) no problem
-
Hey ya'll! If you remember, I was really confused about why my previously annealed 5160 blade was not cooperating with me when I tried to drill some holes in it. Well, after annealing and learning a ton of awesome info from you guys, I got the holes drilled. I got a bigger problem this time I think though. Same blade, I sent it to Peter's heat treat cause it's a big boy blade and got it back this afternoon. For the very last step, I was making sure my bevels were very straight at the ricasso. However, I had a severe mishap. I cut into the blade much much further than I meant to. Like, way. I evened out to opposite side with the same amount of cut in, and it turns out the groove I cut was nearly .1 inches deep (.05 inches on either side of the blade.) This blade has some cash put into it. Like 80 bucks. (that's a lot for me.) Since this is a giant blade, basically a sword, I wanted to know if you guys think this blade is toast. The entire blade is heat treated to a spring temper. When I force the blade to bend, it does not bend any sharper at the point on the ricasso than any other point, but the bend spreads evenly and smoothly along the blade. If there is any way to save this blade, please let me know. It has been many hours and a bit of money. The calipers point to the exact spot on the blade where I made the mistake, and the other picture is of the mistake, (which, if savable, will be very cleaned up) If I need to scrap it, thats always an option. Just throwing that out there. Would rather have it scarpped than to be playing around with a blade that could snap at that weak point.
-
Unbelievable issues when attempting to drill holes...
RKM556 replied to RKM556's topic in Problem Solving
Wow thank you all very much for you help. I will look into carbide bits. I am trying to drill 1/2 inch holes, which is super thick, but I have been able to do it before. I also tried using brand new drill bits that I have never used to drill through, and that didn't work. I will try spot annealing as you all said, then I will try using a carbide bit. If this doesn't pan out I will just drill a smaller hole. I have drilled through 5160 a whole bunch, but uually after forging the blade so I anneal the whole thing. I guess my problem is that it hardened when I worked on it, or it came a bit hardened. My RPM was about 460, as slow as my drill press can go. -
Unbelievable issues when attempting to drill holes...
RKM556 replied to RKM556's topic in Problem Solving
That's exactly what it was doing. How strange. I guess I will need to resharpen my bits then? -
Unbelievable issues when attempting to drill holes...
RKM556 replied to RKM556's topic in Problem Solving
Yes, and yes they are sharp. I spent an hour and 15 minutes on one hole.... Still not through... -
Hey all! So okay, I am trying to learn to make swords, since I can make knives pretty well at this point. So instead of forging my first sword like I normally do my knives, I decided to go ahead and try just a stock removal sword (yes I know it's cheating. I am not selling it or anything) and see how it went. Made a few jigs... ect. ect. My problem happened this evening when I tried drilling a couple holes for the tang to secure it very well. I am doing a full tang just to experiment because like I said, I am not selling it. Okay so back to the problem, my drill bits decided that it would be impossible to drill through this material. I have never had issues with this, my drill bits are sharp Cobalt coated bits that were very expensive. My drill press is 3/4 hp. Shouldn't have too much of a problem drilling, it would seem. However, none of it worked. The steel is 5160 from Aldo. Maybe it was pre hardened or something?? I have no idea. I don't usually do stock removal. I was nervous to anneal just part of the blade (handle) because I have to send it off to Peter's Heat Treat because the blade is too big. But, I did it anyways... twice. I don't think it will help a second time, but it is cooking in ashes right now. Does anyone have a suggestion on how to drill my two holes? (that sounds absurd...) Thank you for any and all of your help! Your Friendly Neighborhood Blacksmith-in-the-making Ryan
-
I think you're right about the heat. However, when forging carbon steel I only keep it out of the forge until it loses its orangy-red color so I don't stress the steel too much. Also, I actually didn't know that. I have always word what my eye doctor tells me is best (I actually wear polycarbonate glasses full time because I only have one good eye), so I didn't even realize they naturally protected against that. By the way, Rich, I love that quote.
-
I would like to share a chain of events that could have been avoided. I was not aware at the time that what I was doing was incorrect, mainly because I am just starting my 15th month of forging. There are many, many amateur smiths like myself and I hope that they read this just so they won't have to go through the pain and trouble that I did! So I was down in the shop, just like every day. I was finishing up a blade I had started a month before and I was using flat jawed tongs (Mistake I) while I was working on the project. I had always used them since they were 1/8th in tongs and they worked great. So I was wearing my normal gear; apron, glove on the left hand, and very high end safety glasses (mistake II, for a beginner at least). They were high end because I am actually blind in my right eye, so I made sure to spend extra cash on glasses that fit very close to my face and offered UV protection. I was drawing out the tang of the knife, when suddenly it seriously flew right at my face, hitting my face and burning it, also kicking off my safety glasses in an unknown direction. (I didn't find them until two weeks later) For a millisecond, my brain said "Well geez, that sure was close!" Then, I looked up. I couldn't see. Not well at least! The only thing I could make out was the light coming in through my open shop door. I couldn't believe it, I had hit my only good eye. So, I ran outside and sprinted as fast as I could up to my house from the shop. Luckily, since I practically live in my shop, I could do this without seeing. I could feel blood running down the left side of my face and I knew this was VERY serious. The final mistake is that I was home alone, so calling 911 was a pain and trying to explain that my driveway was 1/2 a mile long while experiencing excruciating pain wasn't the best way to spend an afternoon... They arrived and took me to the hospital. Long story short! I had received a centimeter long corneal abrasion (OUCH), and my vision was 20/400 (besides the right eye... ;) ). Three weeks of the most pain I have ever felt and being super light sensitive, I'm back working just like I used to (with good eyesight again! I just wanted to say, however to all the beginners: 1. Please heed my advice and use goggles! The piece went UNDER my safety glasses!" 2. Use THE CORRECT tongs! Don't use tools that weren't meant for their original use. This is very tempting for a beginner who doesn't have a bunch of money to spend on tongs. 3. Keep 911 on speed dial! (at least if you are blind in one eye already, like me :D ) The only purpose of this message is to keep others safe. Learn from me; I sure wish I had known this stuff three weeks ago from today! Stay safe you guys and happy smithing! Your friendly neighborhood blacksmith in the making, Ryan
-
Hello all, I am in the long process of saving up to buy a KMG grinder, because my mentor recommended that I don't build one because my time is too valuable and it would possibly end up being "an odd looking anchor." I would LOVE to be able to use my 3hp 1750rpm 3 phase motor that I already own, but I don't know if it is possible to use a 230 volt motor on a 115 volt connection, the only connection currently available in my shop. The reason I want to use the VFD and my own motor is because I could buy the KMG without a motor, and still get variable speed for "only" 300$ more. Is it possible to use a 230V input VFD on a 115 volt outlet? If not, what are some alternatives that have worked for you? My shop is almost 50 feet away from a breaker box, so it could be very expensive to run a new outlet. Let me know what you think! Any and all help is greatly appreciated. Your friendly neighborhood blacksmith in the making, Ryan

